

Overview
With the Rhino C/C++ SDK, it is possible to write plugins that extend the RhinoScript scripting tool. In order to do this, a plugin must do the following:
- Create a COM object that implements the
IDispatchinterface. - Override the
CRhinoPlugIn::GetPlugInObjectInterface()to give plugins, such as RhinoScript, access to this object.
Step-by-Step
Let’s create a new plugin named TestScript that supports RhinoScript scripting.
NOTE: The purpose of this guide is not to teach COM Automation or to explain how the .IDL file work or what Variants are. There is plenty of information in MSDN and on the Internet that explain these areas.
Create a plugin that supports Automation
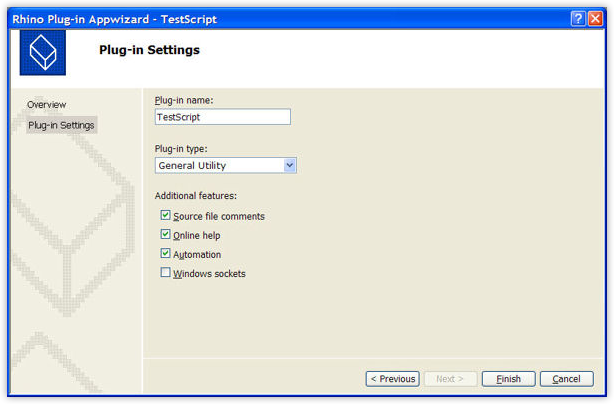
- Launch Visual Studio C/C++ and create a new Rhino Plugin project named TestScript.
- On the Plug-in Settings page of the Rhino Plug-in Appwizard dialog box, make sure to check the Automation check box…
 Once the Appwizard has completed creating the skeleton project, build the project.
Create a COM object that supports IDispatch
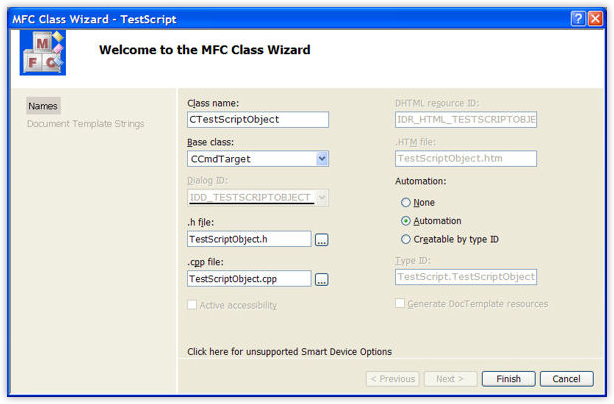
- Create a new MFC class by running the MFC Class Wizard.
- Name the class CTestScriptObject. This class should be derived from
CCmdTarget. Also, under Automation, select the Automation radio button. NOTE: this COM object will not be creatable by type ID because Rhino plugins (DLLs) are dependent on Rhino.
Add methods to your object
An object is not useful unless you expose methods or properties. In this example, we will create a new method that allows the scripter to add point objects to Rhino.
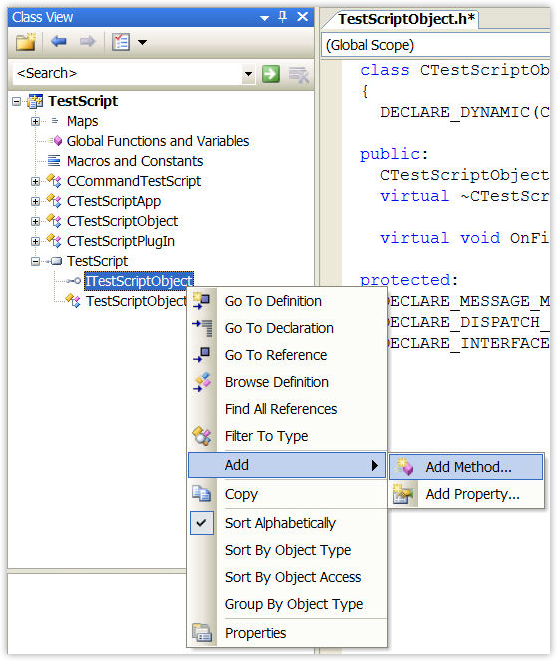
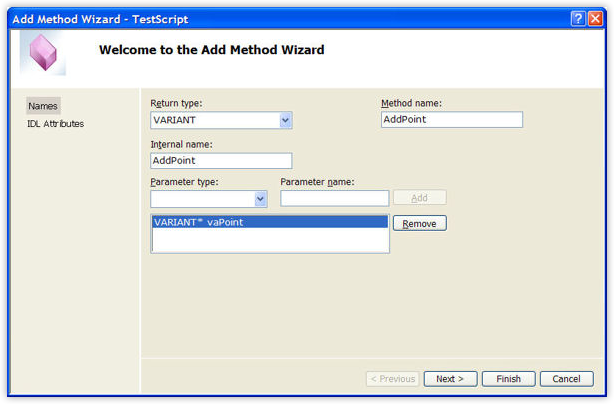
Within Class View, select your new object’s interface and add a new method using the Add Method Wizard. Give the new method the name of AddPoint. It should have a single VARIANT* argument and return a VARIANT.
Implement your methods
The Add Method Wizard will create a placeholder for our AddPoint method in TestScriptObject.cpp. Add the following code to your new method:
VARIANT CTestScriptObject::AddPoint(VARIANT* vaPoint)
{
  VARIANT vaResult;
  VariantInit(&vaResult);
  V_VT(&vaResult) = VT_NULL;

  if( vaPoint )
  {
    ON_3dPoint pt;
    if( VariantToPoint(*vaPoint, pt) )
    {
      CRhinoDoc* doc = RhinoApp().ActiveDoc();
      if( doc )
      {
        CRhinoPointObject* obj = doc->AddPointObject( pt );
        if( obj )
        {
          doc->Redraw();
          ON_wString wstr;
          ON_UuidToString( obj->Attributes().m_uuid, wstr );
          CString str(wstr);
          V_VT(&vaResult) = VT_BSTR;
          vaResult.bstrVal = str.AllocSysString();
        }
      }
    }
  }

  return vaResult;
}
In the above code, the VARIANT* argument is converted to an ON_3dPoint using the VariantToPoint() function. One of the biggest challenges to creating RhinoScript accessible objects is converting the COM Variant data type to an opennurbs data type and back. Fortunately, we have done all of the work for you.
Once the Variant has been converted to an ON_3dPoint, the code simply adds the point to Rhino. But, just like RhinoScript’s AddPoint method, this method also returns the object’s unique identifier.
Allow access to your object
Now that you have a COM object that implements IDispatch and has at least one method, we can allow access to it. The easiest way is to put a copy of your new COM object on your plugin object as a data member. For example:
class CTestScriptPlugIn : public CRhinoUtilityPlugIn
{
public:
  CTestScriptPlugIn();
  ~CTestScriptPlugIn();

  // Required overrides
  const wchar_t* PlugInName() const;
  const wchar_t* PlugInVersion() const;
  GUID PlugInID() const;
  BOOL OnLoadPlugIn();
  void OnUnloadPlugIn();

  // Optional overrides
  LPUNKNOWN GetPlugInObjectInterface( const ON_UUID& iid );

private:
  ON_wString m_plugin_version;
  CTestScriptObject m_object;
};
Then, allow access to the object by overriding the GetPlugInObjectInterface() virtual function. For example:
LPUNKNOWN CTestScriptPlugIn::GetPlugInObjectInterface( const ON_UUID& iid )
{
  LPUNKNOWN lpUnknown = 0;

  if( iid == IID_IUnknown )
    lpUnknown = m_object.GetInterface( &IID_IUnknown );

  else if( iid == IID_IDispatch )
    lpUnknown = m_object.GetInterface( &IID_IDispatch );

   if( lpUnknown )
    m_object.ExternalAddRef();

  return lpUnknown;
}
NOTE: RhinoScript will only request an IDispatch object from your plugin. Also because our object is a data member of our plugin object, we must increment our object’s reference counter. Otherwise, when VBScript releases our object, which will decrement the reference counter, our object will be destroyed. This will cause your plugin to crash.
Implement your RhinoScript Methods
Once you have implemented your methods, you can begin to test them. Launch Rhino and use the PlugInManager command to install your new plugin. Then, use RhinoScript’s EditScript dialog to test the methods in your plugin’s object.
The following RhinoScript demonstrates how to get our plugins scriptable object and run the AddPoint method…
Sub MyTest
  Dim objPlugIn, arrPoint, idPoint
  On Error Resume Next
  Set objPlugIn = Rhino.GetPluginObject("TestScript")
  If Err Then
    MsgBox Err.Description
    Exit Sub
  End If
  arrPoint = Rhino.GetPoint("Base point")
  If IsArray(arrPoint) Then
    idPoint = objPlugIn.AddPoint(arrPoint)
  End If
  Set objPlugIn = Nothing
End Sub
