
What are Containers?
Containers in eto are controls designed to contain other eto controls. Containers help us create responsive layouts which resize to the dialog or form.
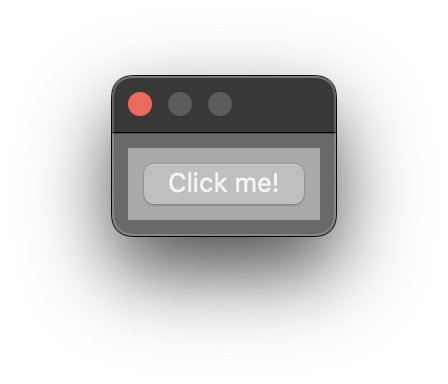
Panels
Panels are a single control container, and mostly used for adding padding.
using Eto.Forms;
using Eto.Drawing;
using Rhino.UI;

var parent = RhinoEtoApp.MainWindowForDocument(__rhino_doc__);

var dialog = new Dialog()
{
  Padding = 8,
  BackgroundColor = Colors.DimGray
};

var panel = new Panel()
{
  Padding = 8,
  BackgroundColor = Colors.DarkGray,
  Content = new Button() { Text = "Click me!" }
};

dialog.Content = panel;
dialog.ShowModal(parent);
import scriptcontext as sc

import Rhino
from Rhino.UI import RhinoEtoApp, EtoExtensions

import Eto.Forms as ef
import Eto.Drawing as ed

parent = RhinoEtoApp.MainWindowForDocument(sc.doc)

dialog = ef.Dialog()
dialog.Padding = ed.Padding(8)
dialog.BackgroundColor = ed.Colors.DimGray

button = ef.Button()
button.Text = "Click me!"

panel = ef.Panel()
panel.Padding = ed.Padding(8)
panel.BackgroundColor = ed.Colors.DarkGray
panel.Content = button

dialog.Content = panel
dialog.ShowModal(parent)
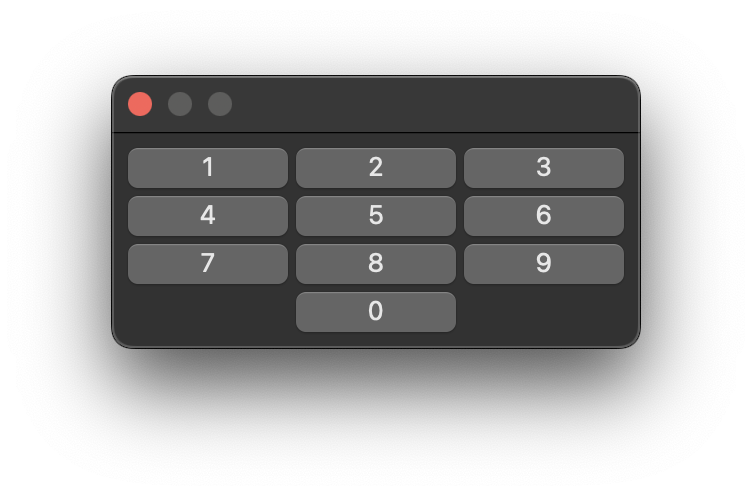
Tables
Table layouts make responsive grids very simple.
using Eto.Forms;
using Eto.Drawing;
using Rhino.UI;


var parent = RhinoEtoApp.MainWindowForDocument(__rhino_doc__);

var tableLayout = new TableLayout()
{
  Padding = 8,
  Spacing = new (4, 4),
  Rows = {
      new TableRow(new Button() { Text = "1" },
                   new Button() { Text = "2" },
                   new Button() { Text = "3" }),
      new TableRow(new Button() { Text = "4" },
                   new Button() { Text = "5" },
                   new Button() { Text = "6" }),
      new TableRow(new Button() { Text = "7" },
                   new Button() { Text = "8" },
                   new Button() { Text = "9" }),
      new TableRow(null,
                   new Button() { Text = "0" },
                   null),
  }
};

var dialog = new Dialog();

dialog.Content = tableLayout;
dialog.ShowModal(parent);
import scriptcontext as sc

import Rhino
from Rhino.UI import RhinoEtoApp, EtoExtensions
import Eto.Forms as ef
import Eto.Drawing as ed

parent = RhinoEtoApp.MainWindowForDocument(sc.doc)

table_layout = ef.TableLayout()
table_layout.Padding = ed.Padding(8)
table_layout.Spacing = ed.Size(4, 4)

button_1 = ef.Button()
button_1.Text = "1"

button_2 = ef.Button()
button_2.Text = "2"

button_3 = ef.Button()
button_3.Text = "3"

button_4 = ef.Button()
button_4.Text = "4"

button_5 = ef.Button()
button_5.Text = "5"

button_6 = ef.Button()
button_6.Text = "6"

button_7 = ef.Button()
button_7.Text = "7"

button_8 = ef.Button()
button_8.Text = "8"

button_9 = ef.Button()
button_9.Text = "9"

button_0 = ef.Button()
button_0.Text = "0"

row_1 = ef.TableRow()
row_1.Cells.Add(ef.TableCell(button_1))
row_1.Cells.Add(ef.TableCell(button_2))
row_1.Cells.Add(ef.TableCell(button_3))

row_2 = ef.TableRow()
row_2.Cells.Add(ef.TableCell(button_4))
row_2.Cells.Add(ef.TableCell(button_5))
row_2.Cells.Add(ef.TableCell(button_6))

row_3 = ef.TableRow()
row_3.Cells.Add(ef.TableCell(button_7))
row_3.Cells.Add(ef.TableCell(button_8))
row_3.Cells.Add(ef.TableCell(button_9))

row_4 = ef.TableRow()
row_4.Cells.Add(None)
row_4.Cells.Add(ef.TableCell(button_0))
row_4.Cells.Add(None)

table_layout.Rows.Add(row_1)
table_layout.Rows.Add(row_2)
table_layout.Rows.Add(row_3)
table_layout.Rows.Add(row_4)

dialog = ef.Dialog()

dialog.Content = table_layout
dialog.ShowModal(parent)
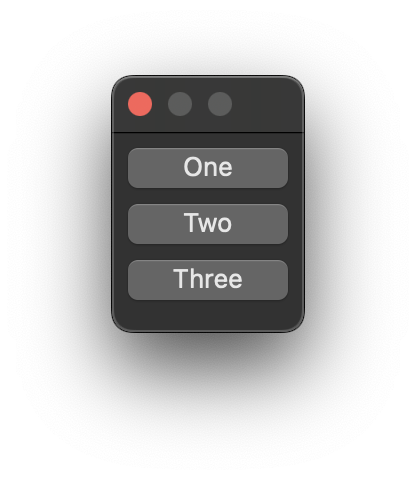
Stack Layouts
Stack Layouts stack a list of controls in a vertical or horizontal direction.
using Eto.Forms;
using Eto.Drawing;
using Rhino.UI;

var parent = RhinoEtoApp.MainWindowForDocument(__rhino_doc__);

var dialog = new Dialog();

var stackLayout = new StackLayout() { Spacing = 8, Padding = 8 };
stackLayout.Orientation = Orientation.Vertical;
stackLayout.Items.Add(new Button() { Text = "One" });
stackLayout.Items.Add(new Button() { Text = "Two" });
stackLayout.Items.Add(new Button() { Text = "Three" });

dialog.Content = stackLayout;
dialog.ShowModal(parent);
import scriptcontext as sc

import Rhino
from Rhino.UI import RhinoEtoApp, EtoExtensions
import Eto.Forms as ef
import Eto.Drawing as ed

parent = RhinoEtoApp.MainWindowForDocument(sc.doc)

dialog = ef.Dialog()

stack_layout = ef.StackLayout()
stack_layout.Spacing = 8
stack_layout.Padding = ed.Padding(8)

stack_layout.Orientation = ef.Orientation.Vertical

button_one = ef.Button()
button_one.Text = "One"
button_two = ef.Button()
button_two.Text = "Two"
button_three = ef.Button()
button_three.Text = "Three"

stack_layout.Items.Add(ef.StackLayoutItem(button_one))
stack_layout.Items.Add(ef.StackLayoutItem(button_two))
stack_layout.Items.Add(ef.StackLayoutItem(button_three))

dialog.Content = stack_layout
dialog.ShowModal(parent)
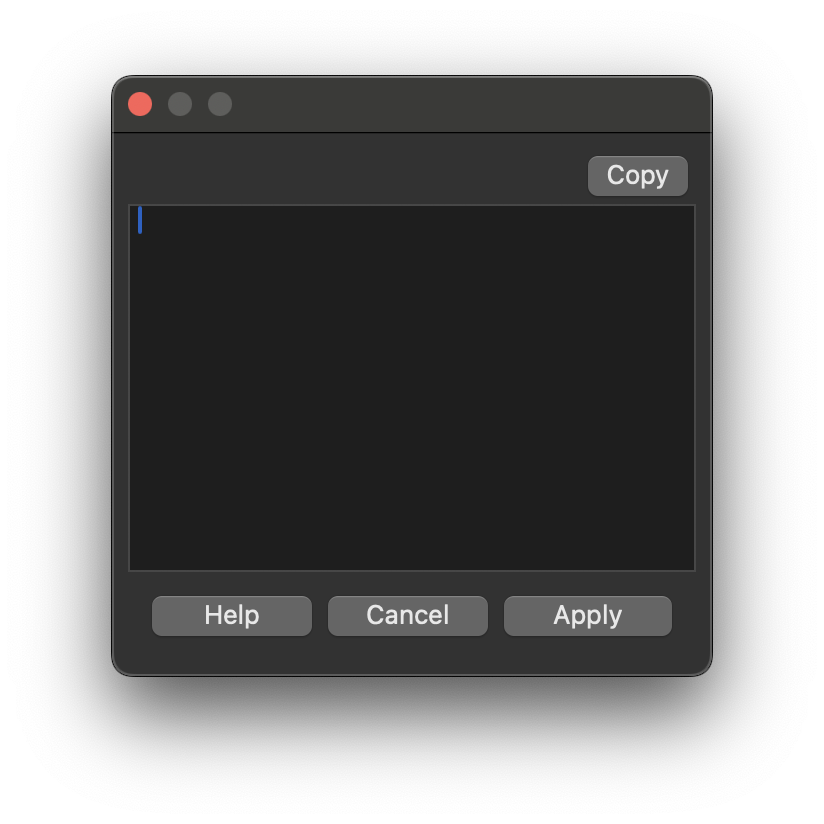
Dynamic Layouts
Dynamic Layouts allow powerful vertical and horizontal organisation of a UI with one (or more) item(s) in the layout stretching to fill the available space.
using Eto.Forms;
using Eto.Drawing;
using Rhino.UI;

var parent = RhinoEtoApp.MainWindowForDocument(__rhino_doc__);

var dialog = new Dialog()
{
  Width = 300,
  Height = 300
};

var dynamicLayout = new DynamicLayout()
{
  Padding = 8
};
dynamicLayout.BeginVertical();

dynamicLayout.AddSeparateRow(4, null, true, false,
                  new [] {
                      null,
                      new Button() { Text = "Copy", Width = 50 }
                  });

dynamicLayout.Add(new TextArea(), true, true);

dynamicLayout.AddSeparateRow(12, new (8, 4), true, false,
                  new [] {
                      new Button() { Text = "Help" },
                      new Button() { Text = "Cancel" },
                      new Button() { Text = "Apply" },
                  });

dynamicLayout.EndVertical();

dialog.Content = dynamicLayout;
dialog.ShowModal(parent);
import scriptcontext as sc

import Rhino
from Rhino.UI import RhinoEtoApp, EtoExtensions
import Eto.Forms as ef
import Eto.Drawing as ed

parent = RhinoEtoApp.MainWindowForDocument(sc.doc)

dialog = ef.Dialog()
dialog.Width = 300
dialog.Height = 300

dynamic_layout = ef.DynamicLayout()
dynamic_layout.Padding = ed.Padding(8)

dynamic_layout.BeginVertical()

copy_button = ef.Button()
copy_button.Text = "Copy"
copy_button.Width = 50

dynamic_layout.AddSeparateRow(ed.Padding(4), None, True, False, [None, copy_button])

dynamic_layout.Add(ef.TextArea(), True, True)

help_button = ef.Button()
help_button.Text = "Help"

cancel_button = ef.Button()
cancel_button.Text = "Cancel"

apply_button = ef.Button()
apply_button.Text = "Apply"

dynamic_layout.AddSeparateRow(ed.Padding(12), ed.Size(8, 4), True, False, [help_button, cancel_button, apply_button])

dynamic_layout.EndVertical()

dialog.Content = dynamic_layout
dialog.ShowModal(parent)
Pixel Layouts
Pixel Layouts allow adding elements at specific pixel coordinates. Pixel Layouts are not a good way to create responsive layouts, any of the above containers should be used instead.
The best use of Pixel Layouts is to overlay elements on top of another, which other layouts do not allow for.
using Eto.Forms;
using Rhino.UI;

var parent = RhinoEtoApp.MainWindowForDocument(__rhino_doc__);

var dialog = new Dialog() { Padding = 20 };

var pixelLayout = new PixelLayout();
var button1 = new Button() { Text = "Button 1" };
var button2 = new Button() { Text = "Button 2" };
pixelLayout.Add(button1, 0, 0);
pixelLayout.Add(button2, 0, 30);

dialog.Content = pixelLayout;
dialog.ShowModal(parent);
import scriptcontext as sc

from Rhino.UI import RhinoEtoApp, EtoExtensions
import Eto.Forms as ef
import Eto.Drawing as ed

parent = RhinoEtoApp.MainWindowForDocument(sc.doc)

pixel_layout = ef.PixelLayout()

button_1 = ef.Button()
button_1.Text = "Button 1"
button_2 = ef.Button()
button_2.Text = "Button 2"

pixel_layout.Add(button_1, 0, 0)
pixel_layout.Add(button_2, 0, 30)

dialog = ef.Dialog()
dialog.Padding = ed.Padding(20)
dialog.Content = pixel_layout

dialog.ShowModal(parent)
