
Overview
Rhino.Compute is a web service that exposes the full Rhino and Grasshopper SDKs over HTTP. If you have not used Rhino.Compute before, start with the Compute guides for background on what it does and how to call it.
This guide covers the fastest way to get a production-ready Rhino.Compute server running on AWS: the Rhino.Compute AWS Marketplace product, published by Robert McNeel & Associates. The Marketplace product is a preconfigured Amazon Machine Image (AMI) that you launch through a CloudFormation template supplied with the listing. When the instance boots, Rhino.Compute is already installed, licensed, and serving requests, with no bootstrap script to run, no IIS setup, and no license server to configure.
The product is metered: you pay for the software by the vCPU-hour, billed through your regular AWS bill, on top of the normal EC2 infrastructure cost for the instance itself. There is no separate invoice from McNeel. See Billing below for details.
By the end of this guide you will have:
- Subscribed to Rhino.Compute in the AWS Marketplace.
- Launched an instance with the product’s CloudFormation template.
- Verified the service with the healthcheck endpoint and a first authenticated request.
Product Identifiers
The rest of this guide refers to these values by name. If the product is republished under a new listing, only this block changes.
- Product code:
prod-5h6g7nckpl654(listing: Rhino.Compute 2026) - Listing page: Rhino.Compute 2026 on AWS Marketplace. During the limited preview, this page only opens for AWS accounts that have been granted access (see Requesting access).
- Software version: always launch the latest version offered on the listing. This guide does not pin a version number, because a specific build is superseded on each release; where automation needs an exact AMI, resolve it from the SSM parameter path under Pinning a version.
Requesting access (limited preview)
The Marketplace listing is currently private. AWS Marketplace only shows a private listing, and only lets you subscribe, from an AWS account the seller has explicitly added to the offer. Until your account is added, the listing page returns “Page not found.”
To request access:
- Find your 12-digit AWS account ID (the AWS console shows it under your account menu, top right).
- Contact the McNeel developer team and let them know you would like to try the Rhino.Compute Marketplace preview, including your AWS account ID.
- We add your account ID to the offer and confirm when it is live for you, usually within one business day. The listing page then opens for you, and you can continue with the steps below.
Prerequisites
-
An AWS account with permission to subscribe to Marketplace products and to create CloudFormation stacks, EC2 instances, and IAM roles. If you are on a corporate account, your administrator may need to approve the subscription.
-
A Rhino account and a Marketplace Billing token. The CloudFormation template asks for your Rhino account email and a token that licenses the instance. This must be a Marketplace Billing token. An ordinary Rhino login or a standard server token will not work. Generating it is a short, self-service process, covered in Generating your Marketplace Billing token below.
-
Basic familiarity with the EC2 and CloudFormation consoles. You should know how to find an instance, read stack events, and locate a VPC and subnet ID.
-
A VPC with a subnet that has outbound internet access. The instance must be able to reach AWS endpoints to report metered usage, and your clients must be able to reach the instance over HTTP.
Generating your Marketplace Billing token
The server authenticates to Rhino’s licensing service with a Marketplace Billing token. This is a specific token type: an ordinary Rhino login or a standard server token will not work, and the server refuses to start without a valid one. You generate it yourself in Rhino Accounts. Creating a team and enabling Marketplace Billing on that team are two separate steps; the walkthrough below covers both.
-
Log in to Rhino Accounts.
-
Go to Licenses.
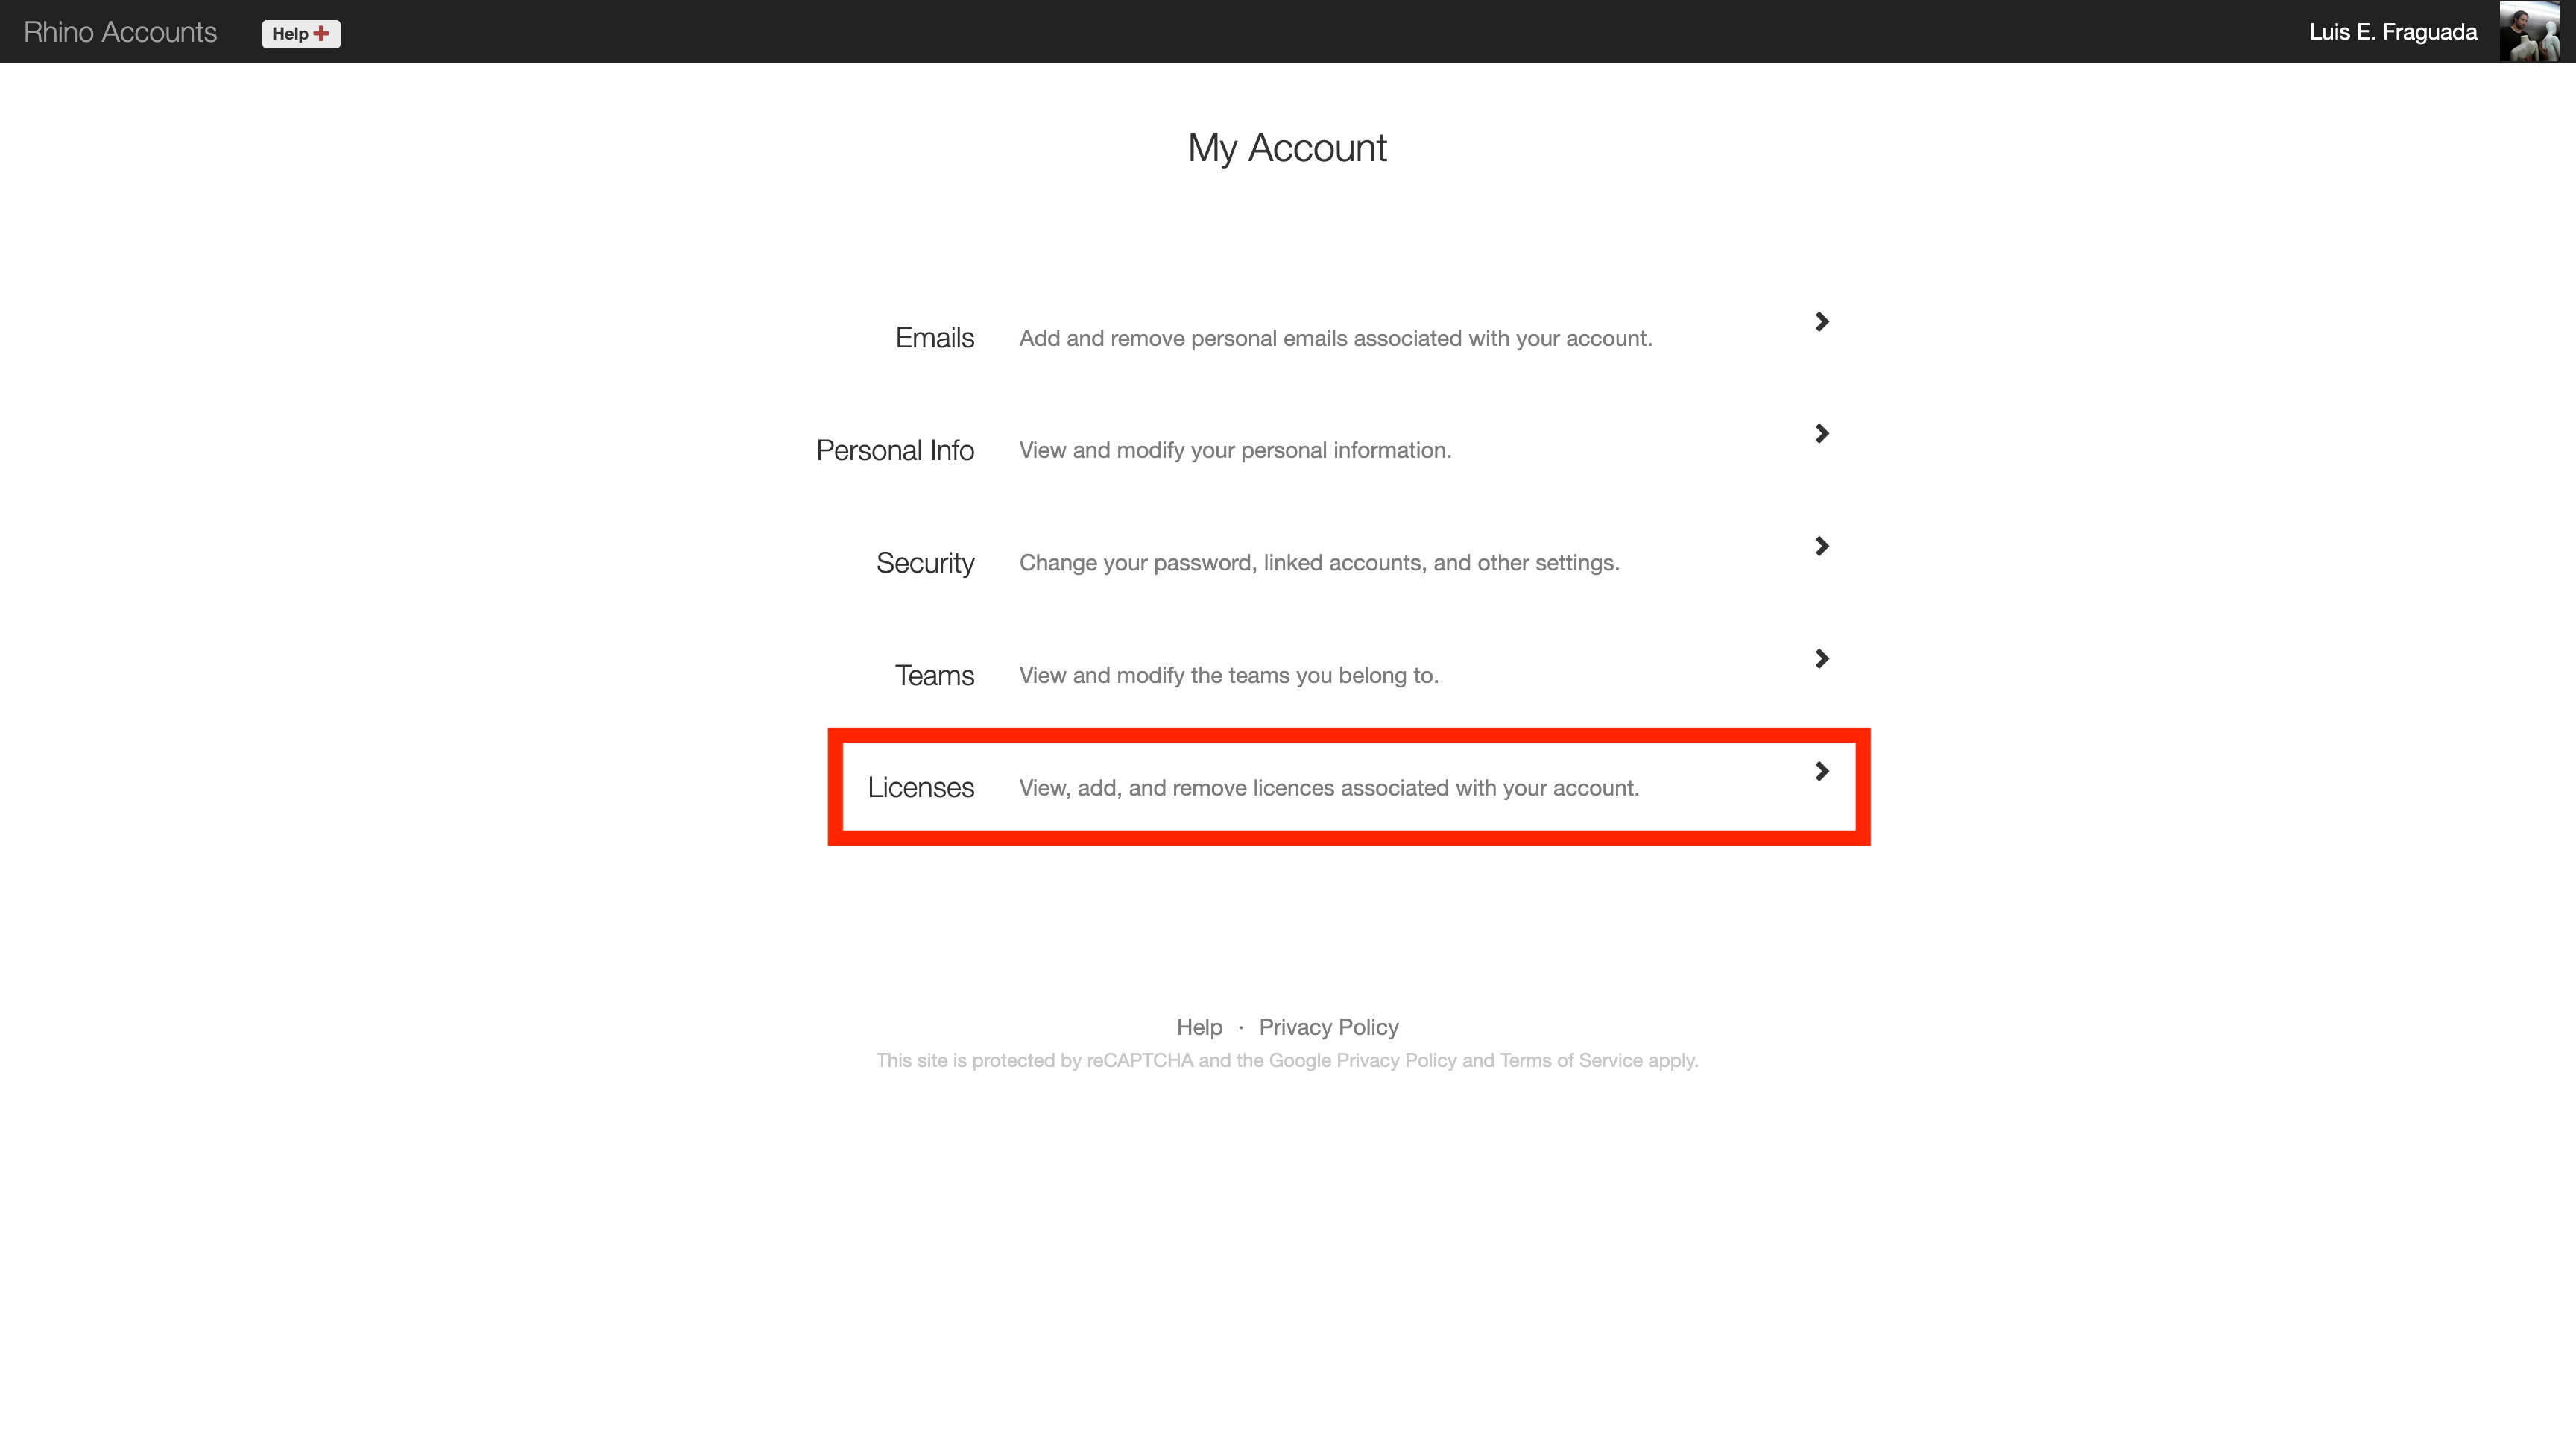
-
Create a team. Marketplace Billing is enabled on a team, not on your personal account, so you need a team to attach it to.
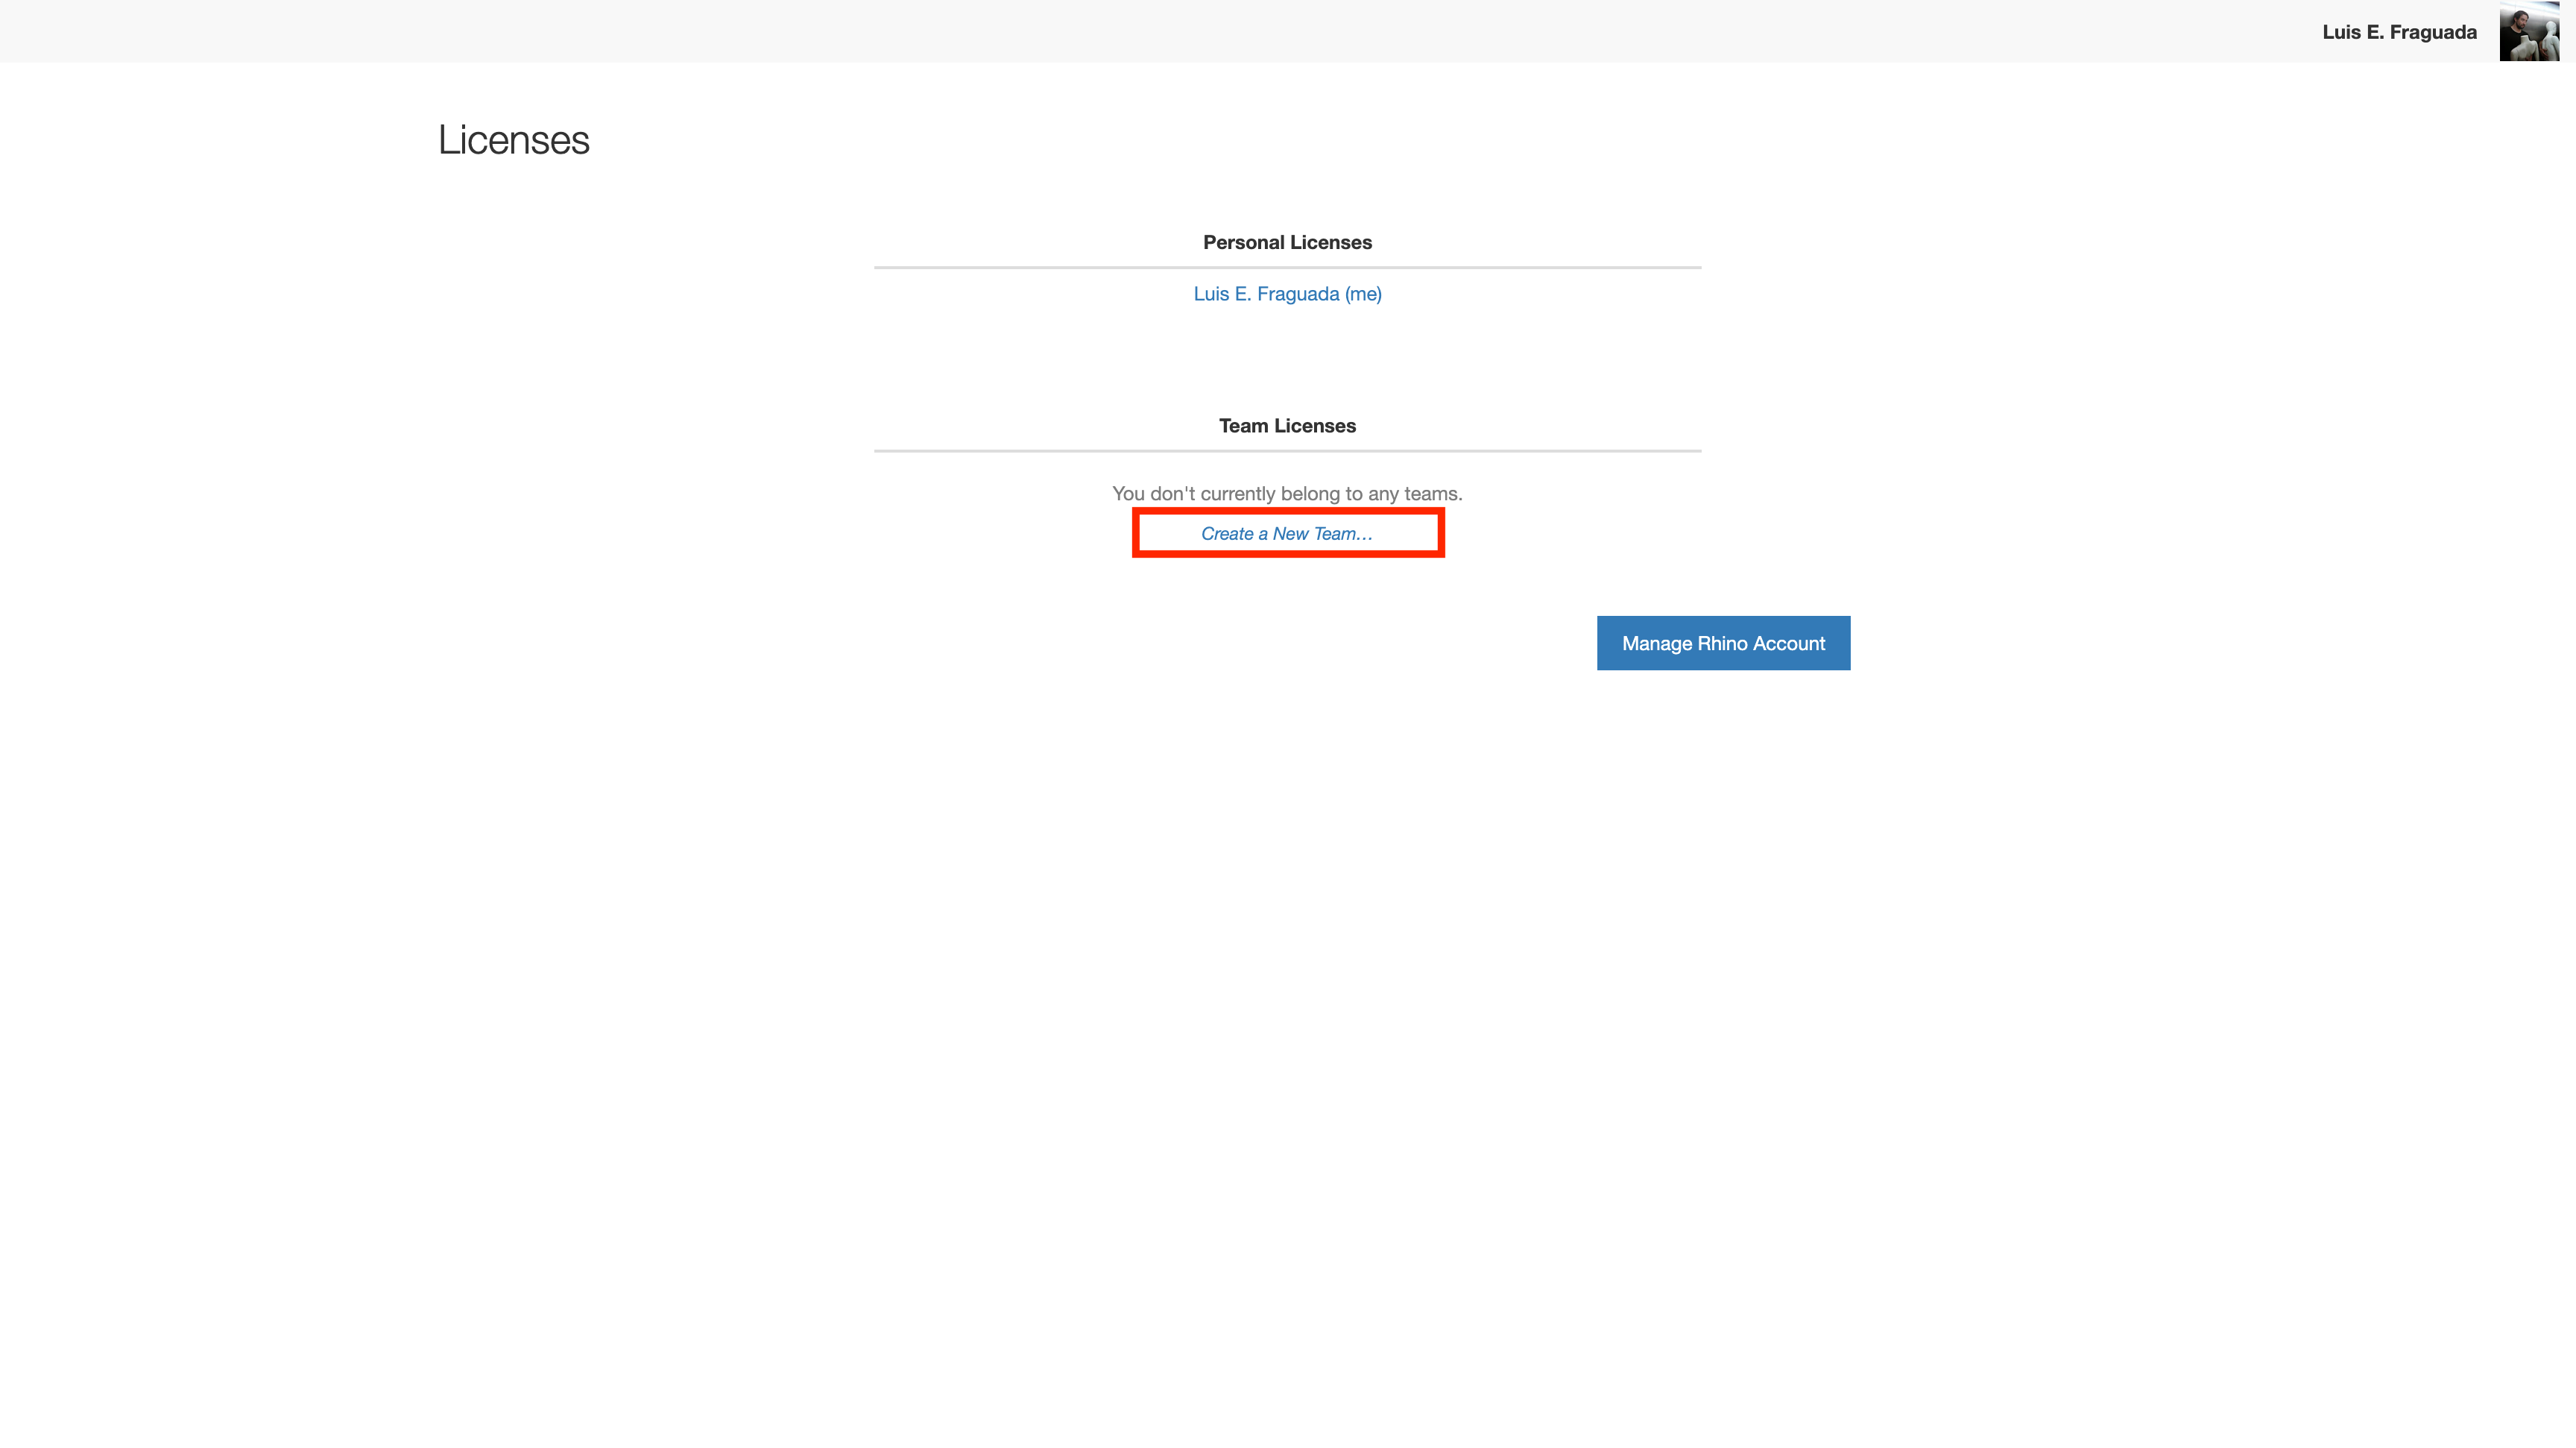
-
Name the new team and create it.
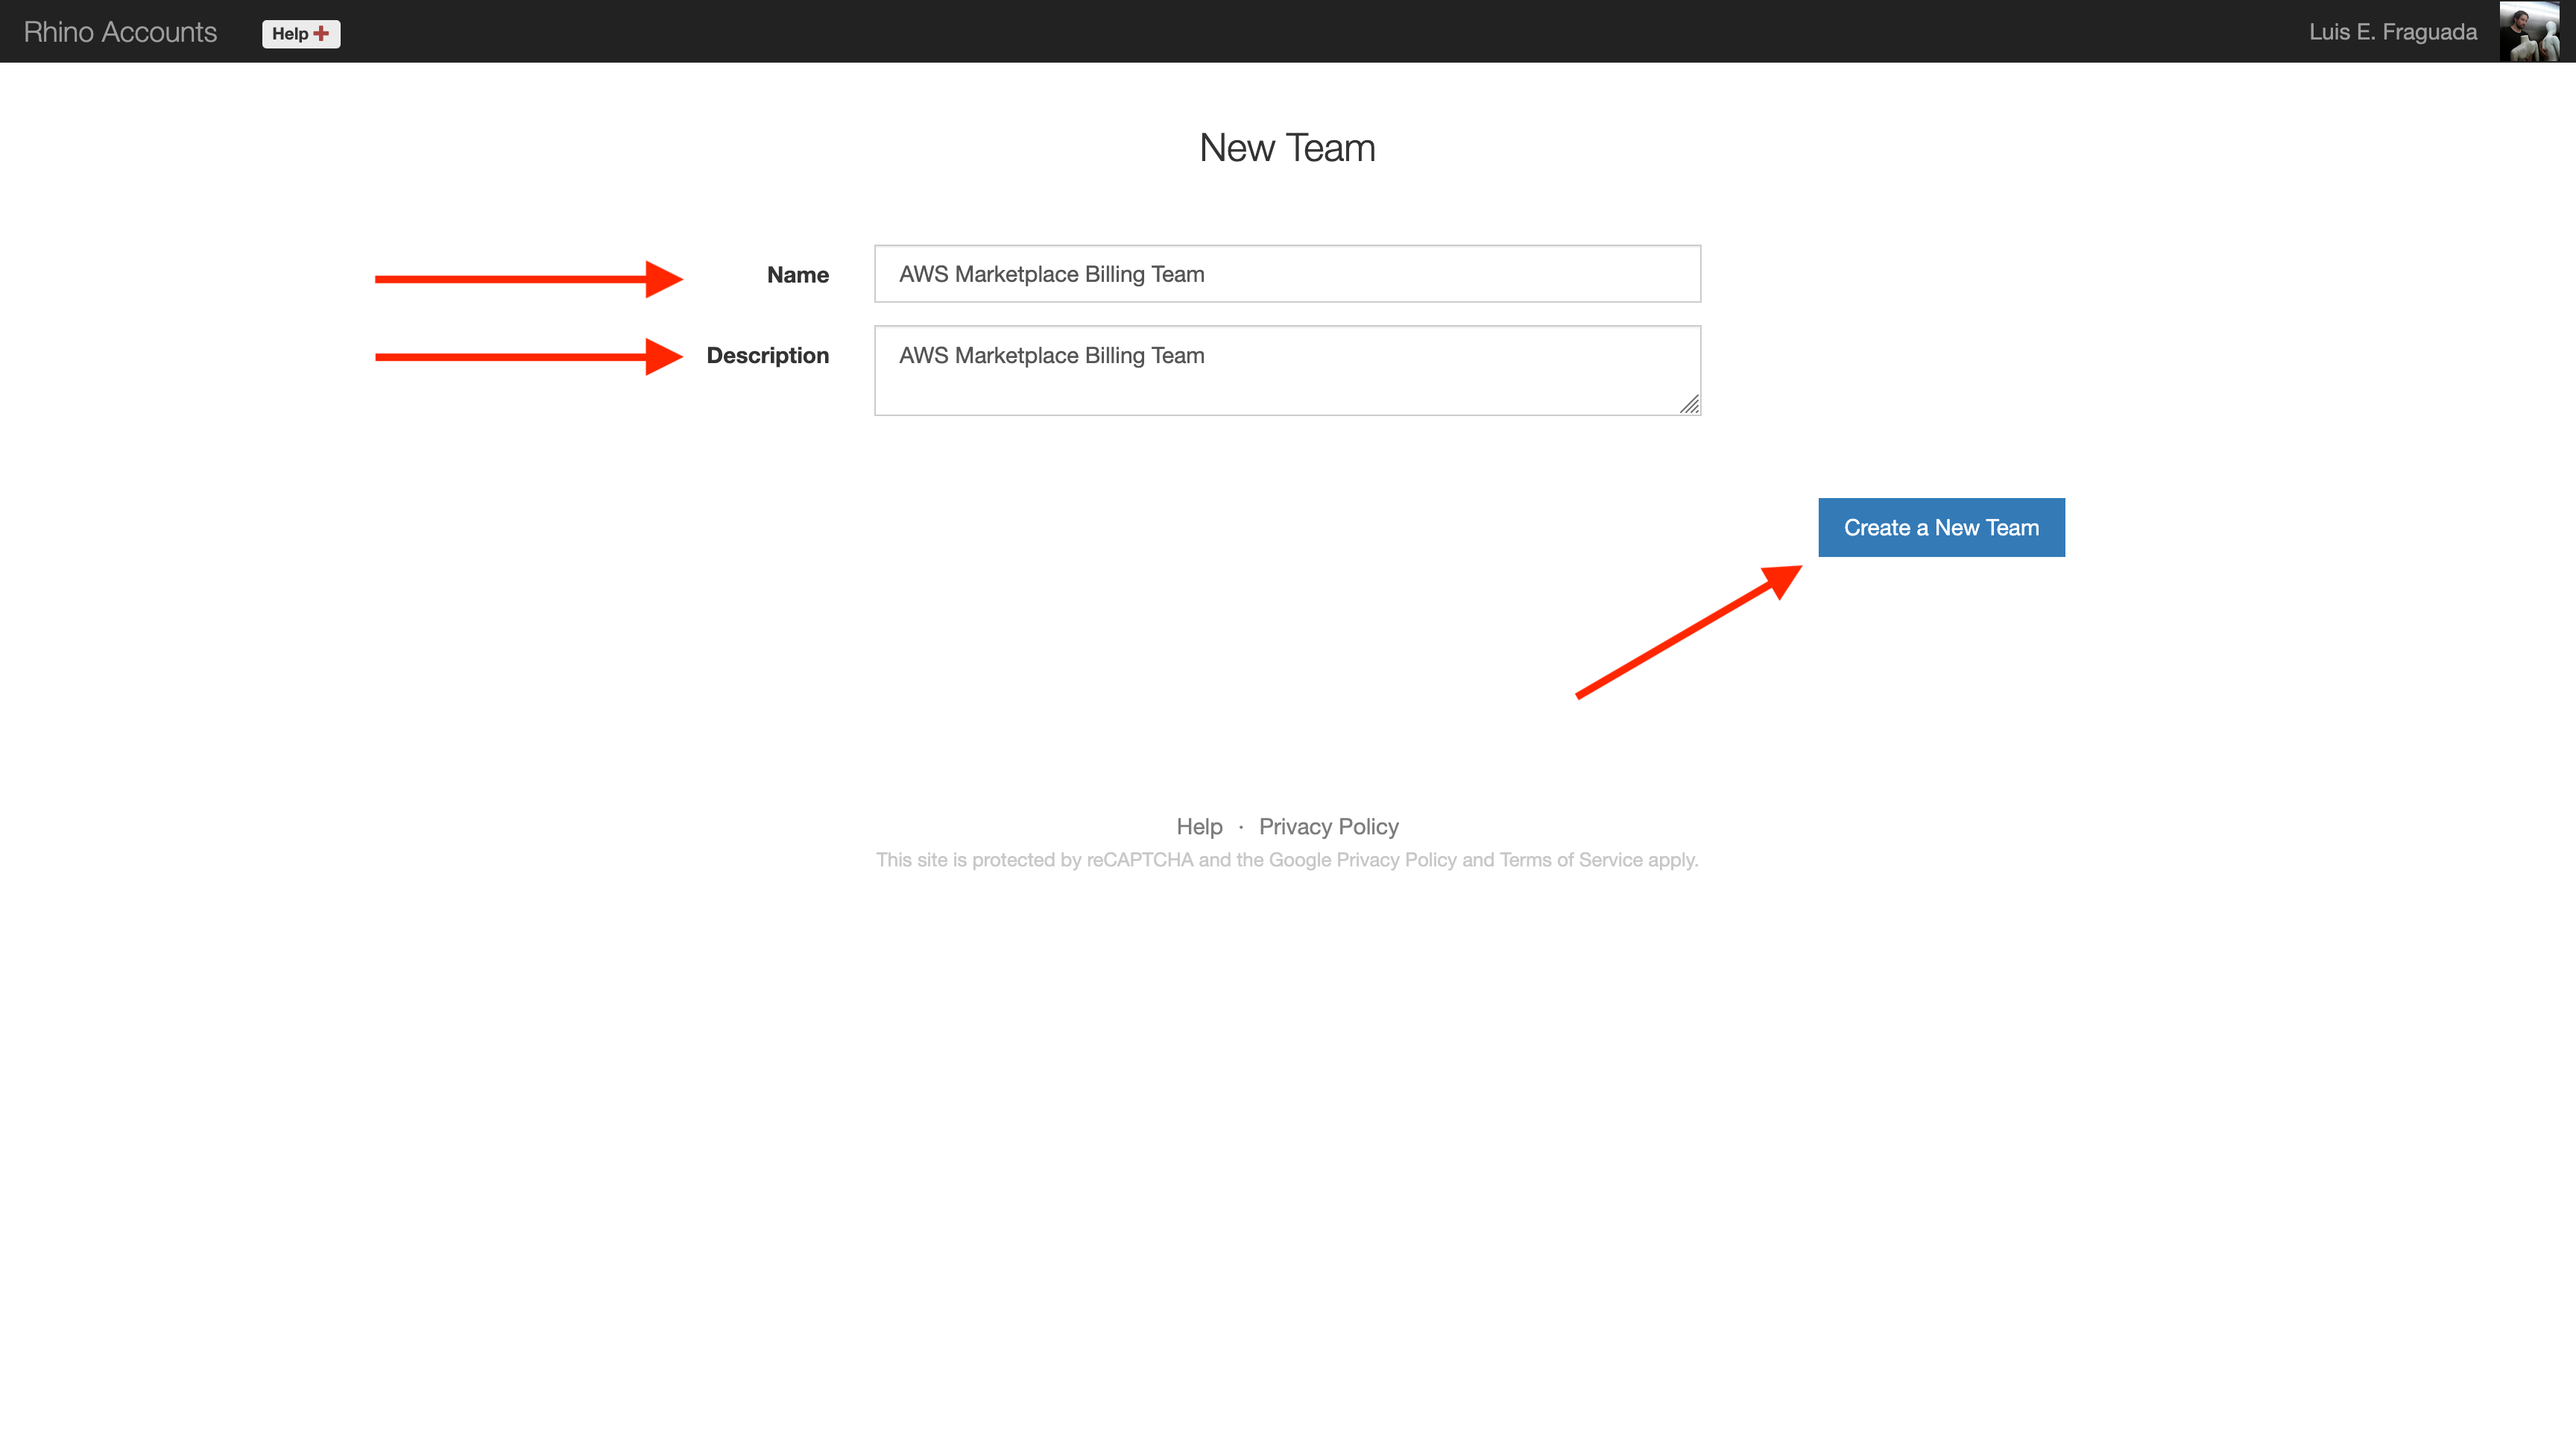
-
Select the team you just created.
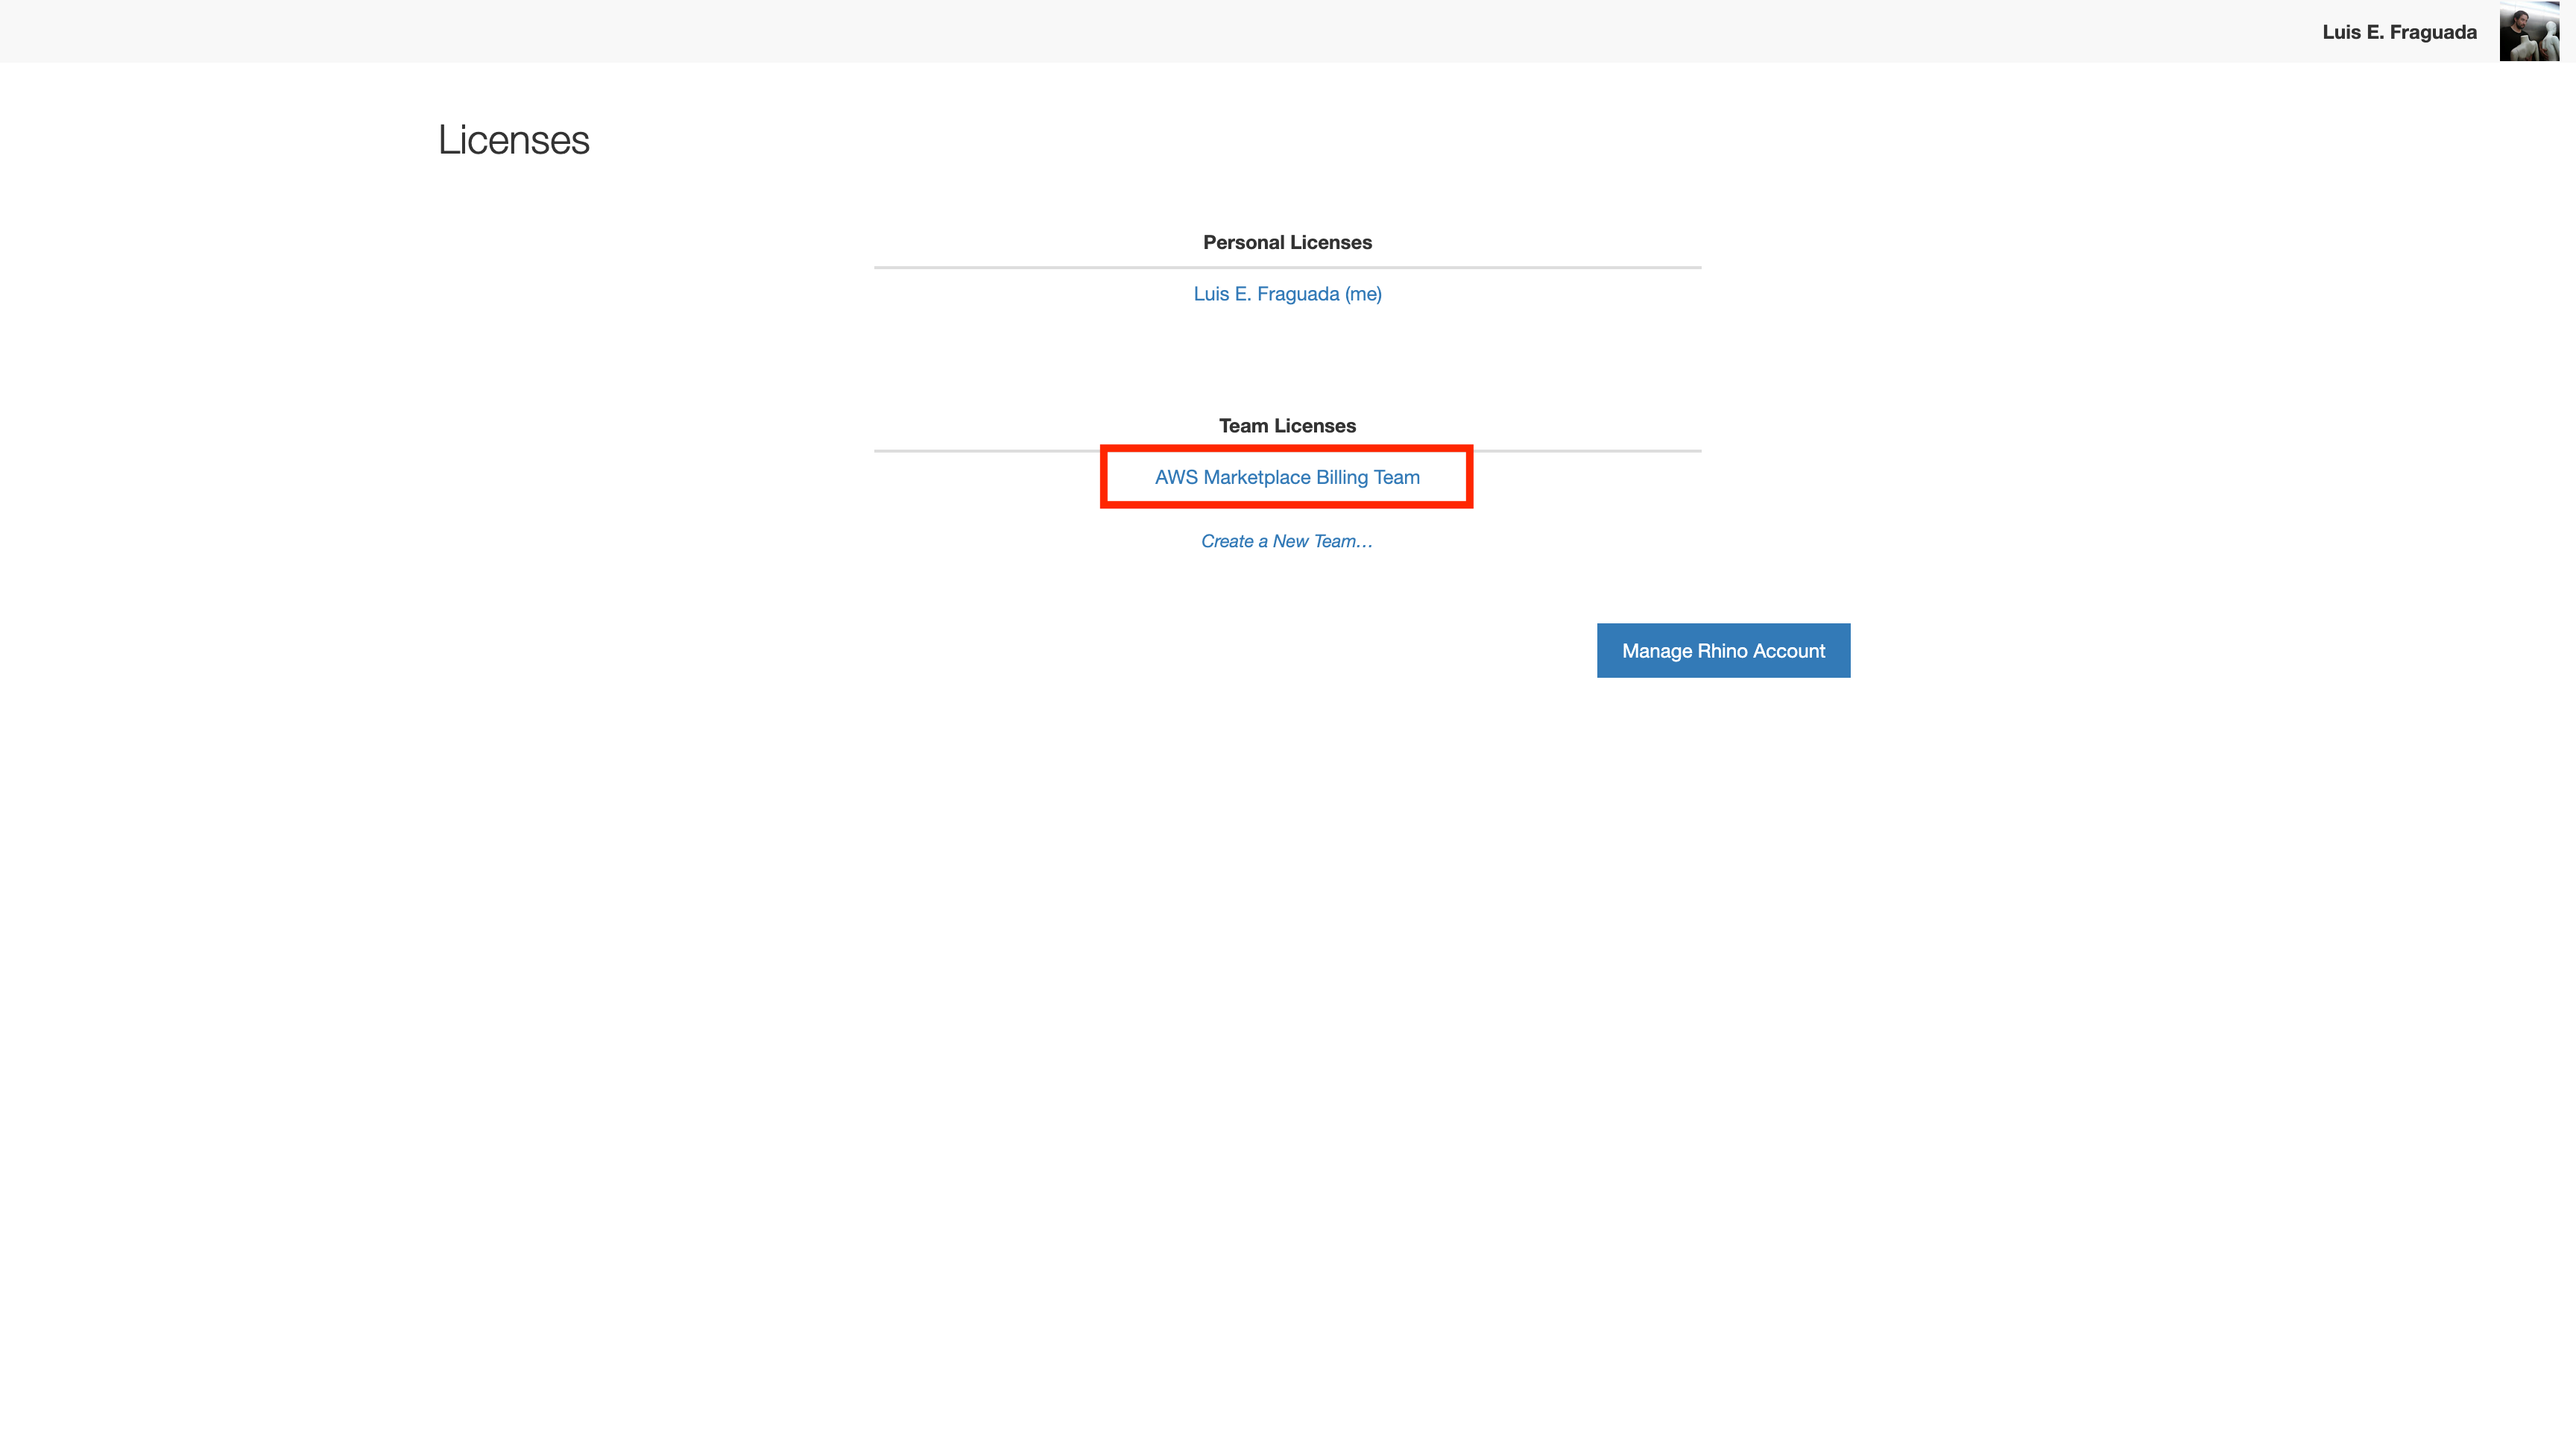
-
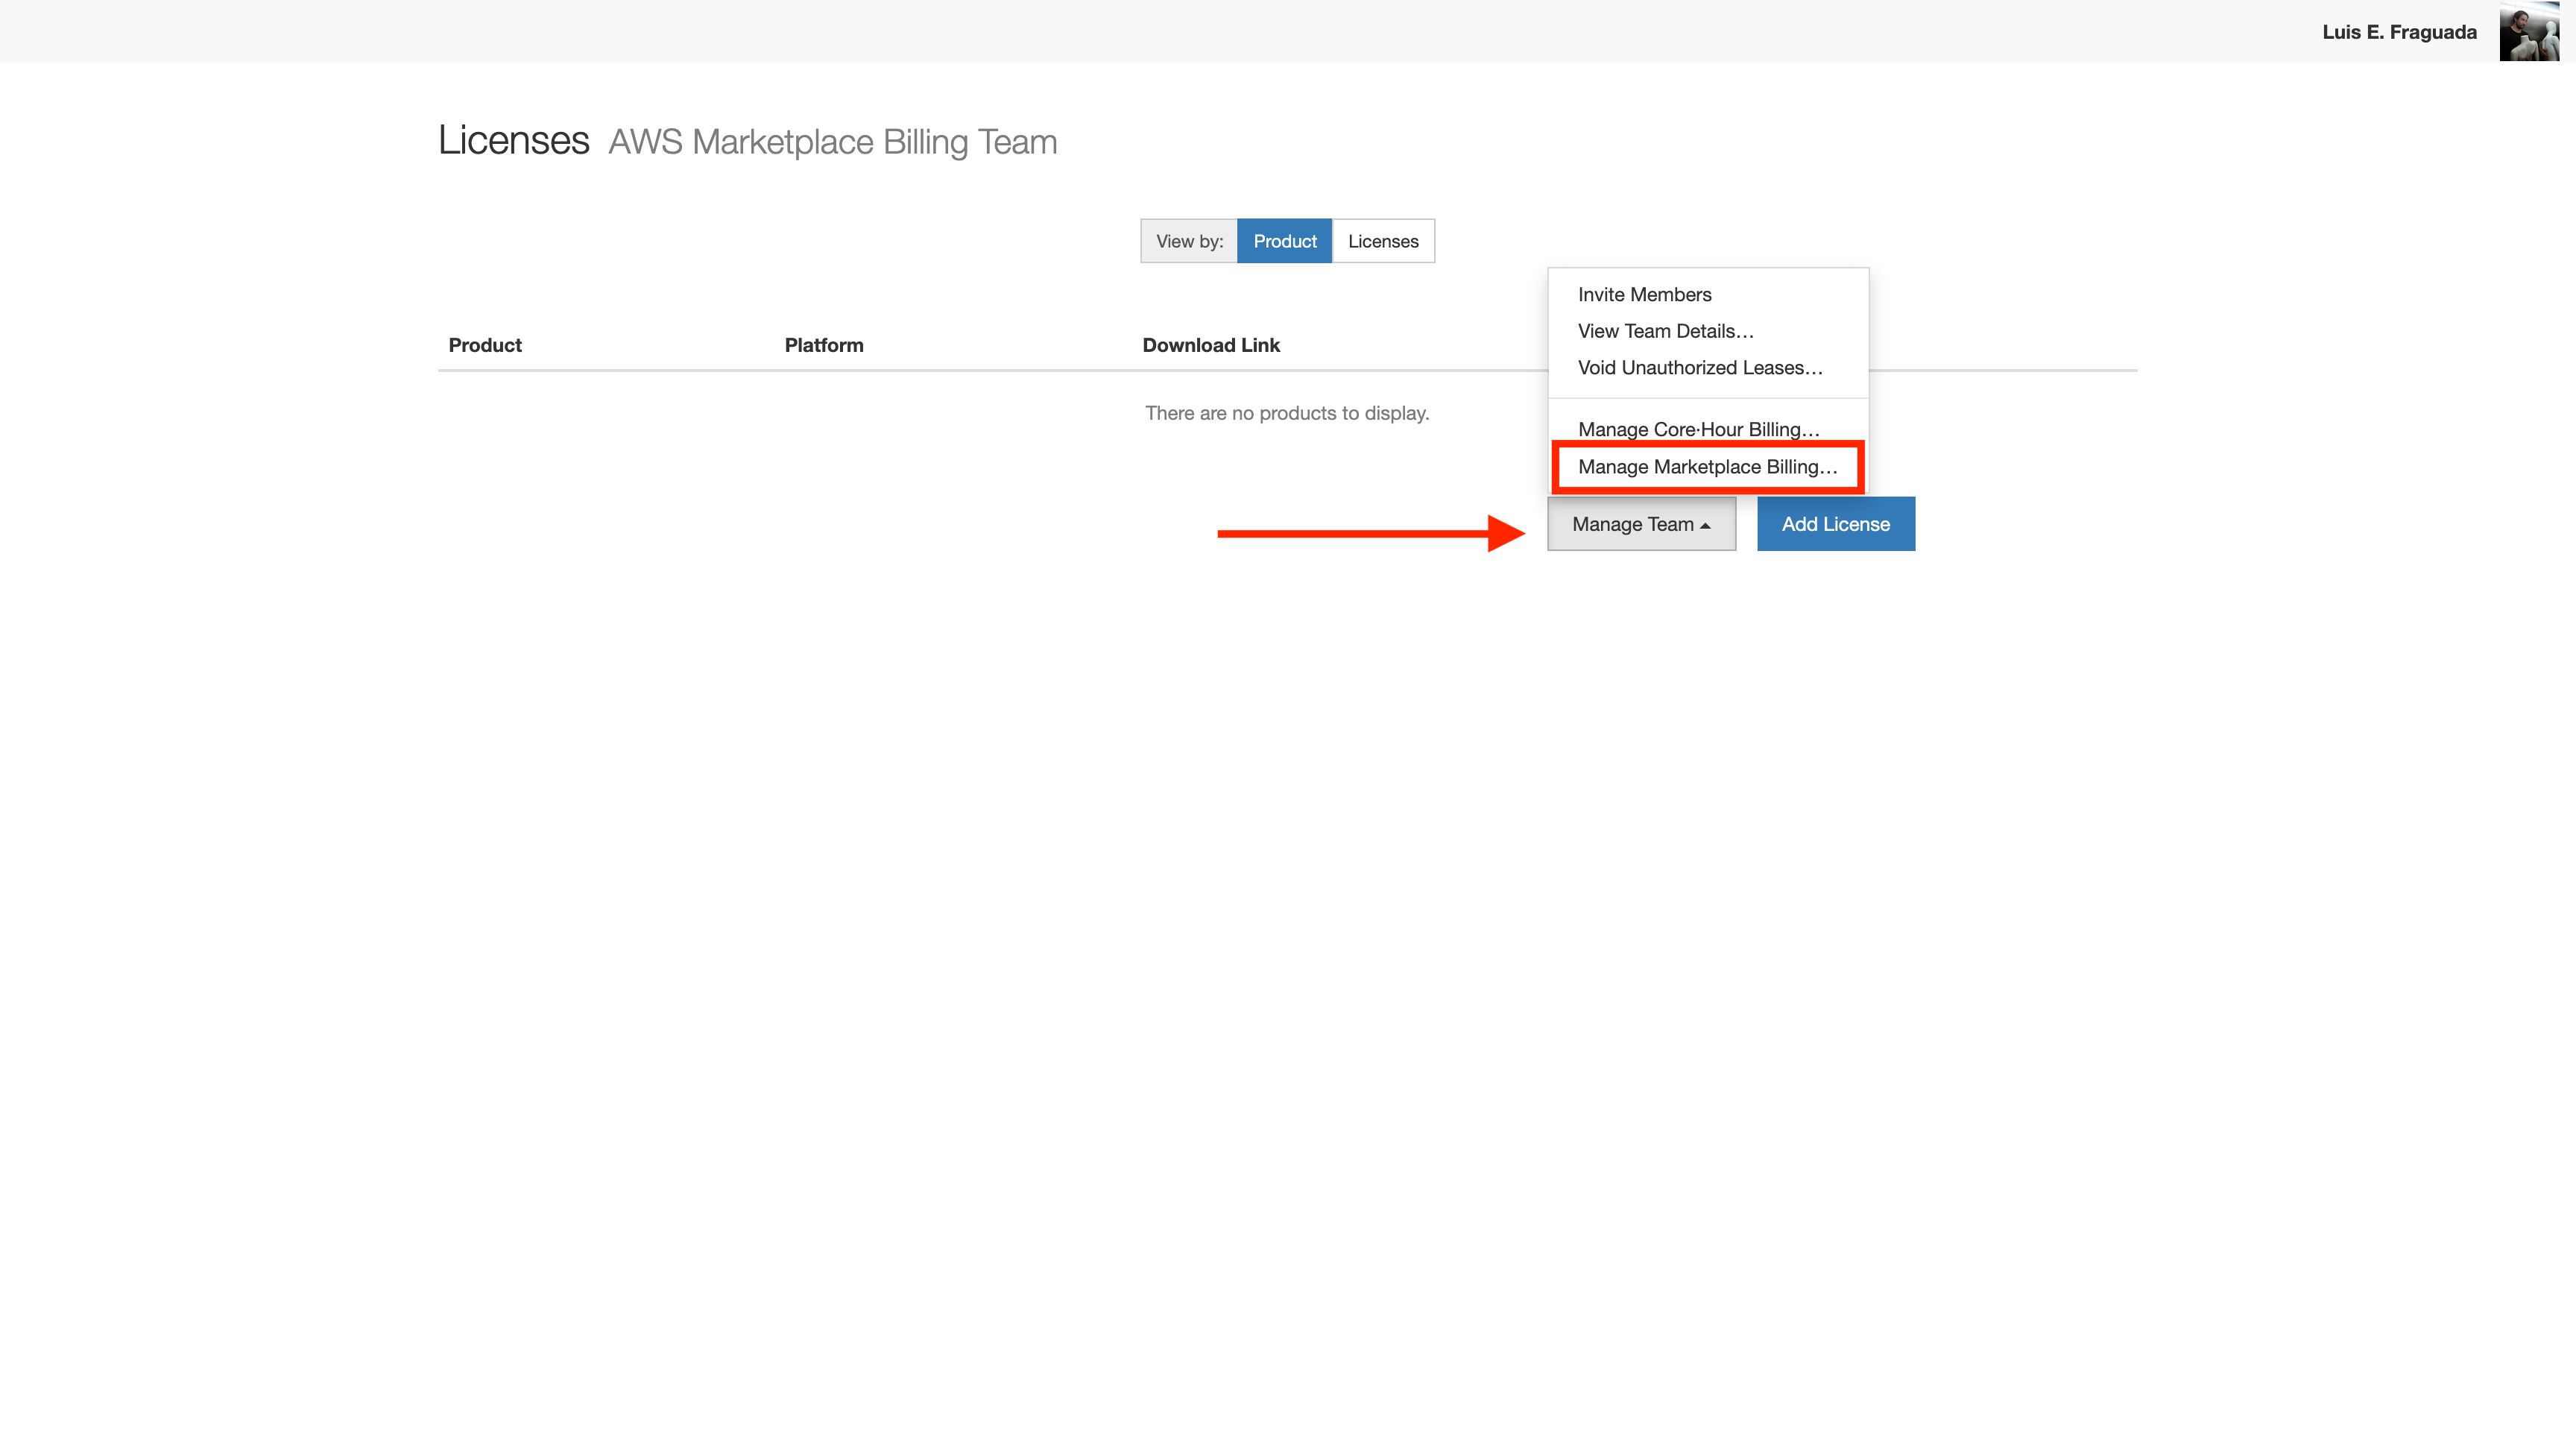
Open the team’s Licenses page.
-
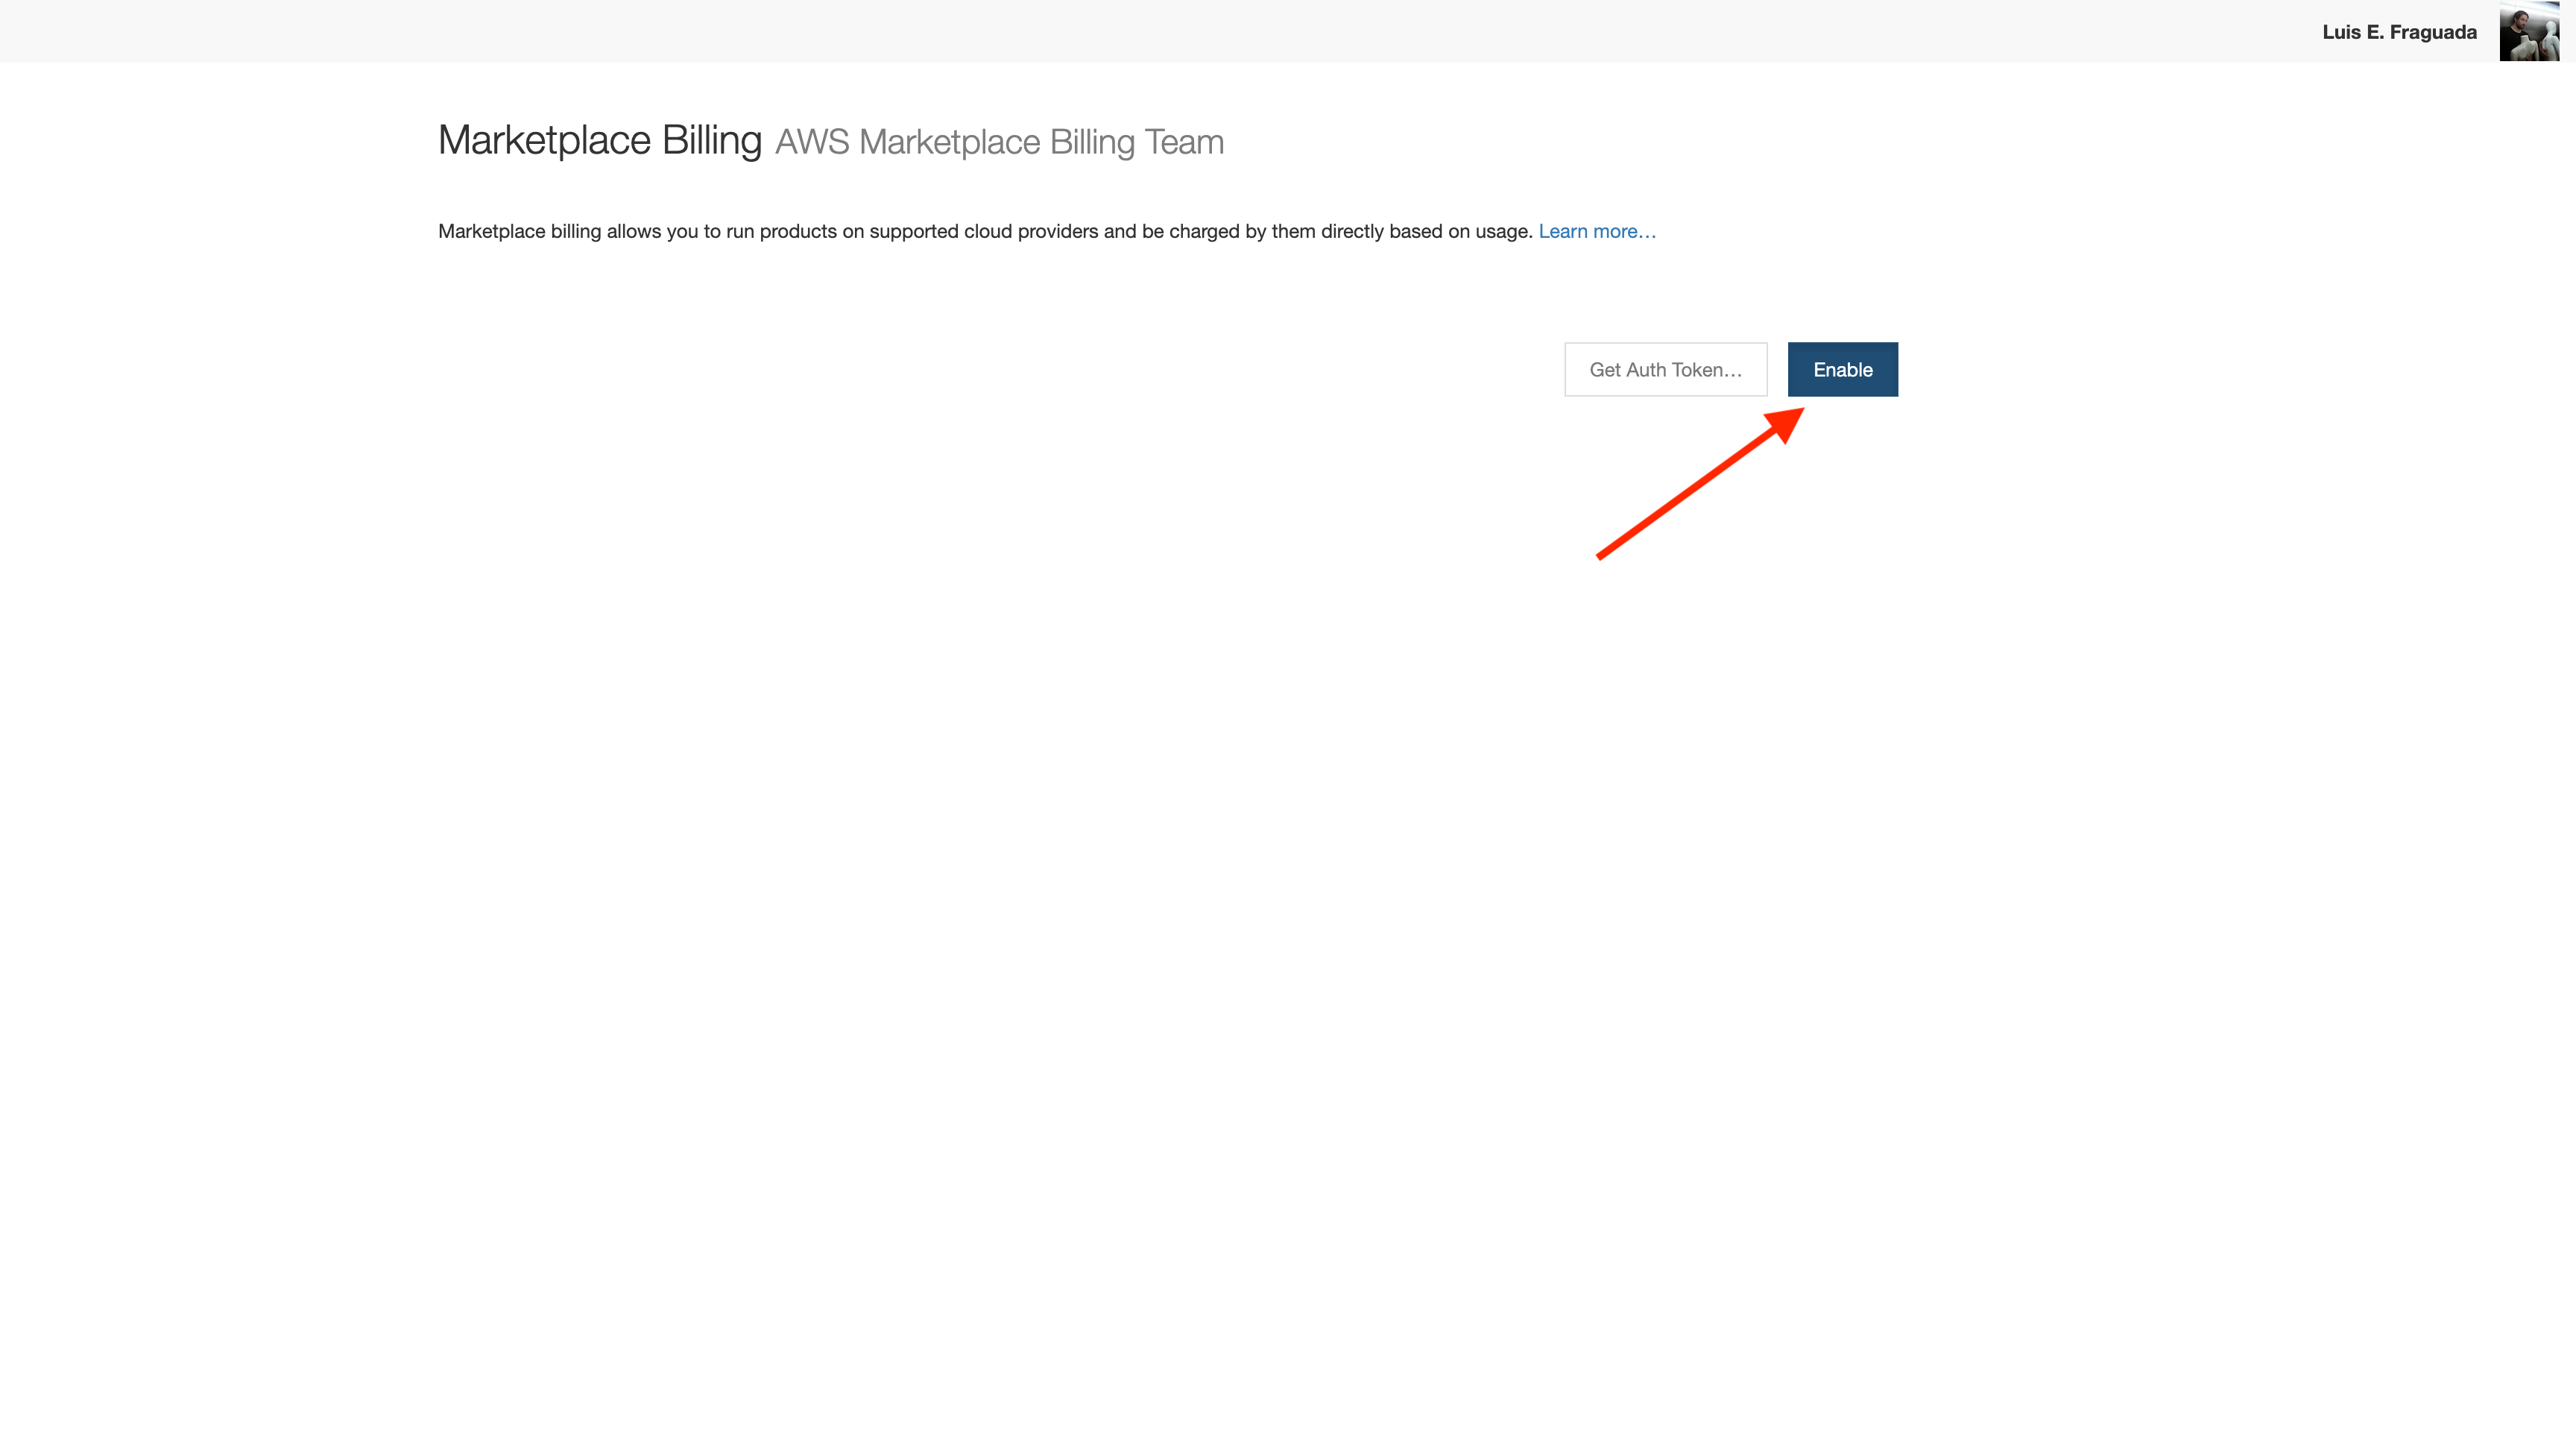
Enable Marketplace Billing for the team.
-
Copy the Marketplace Billing authentication token. This is the value you paste into the
RhinoTokenstack parameter at launch.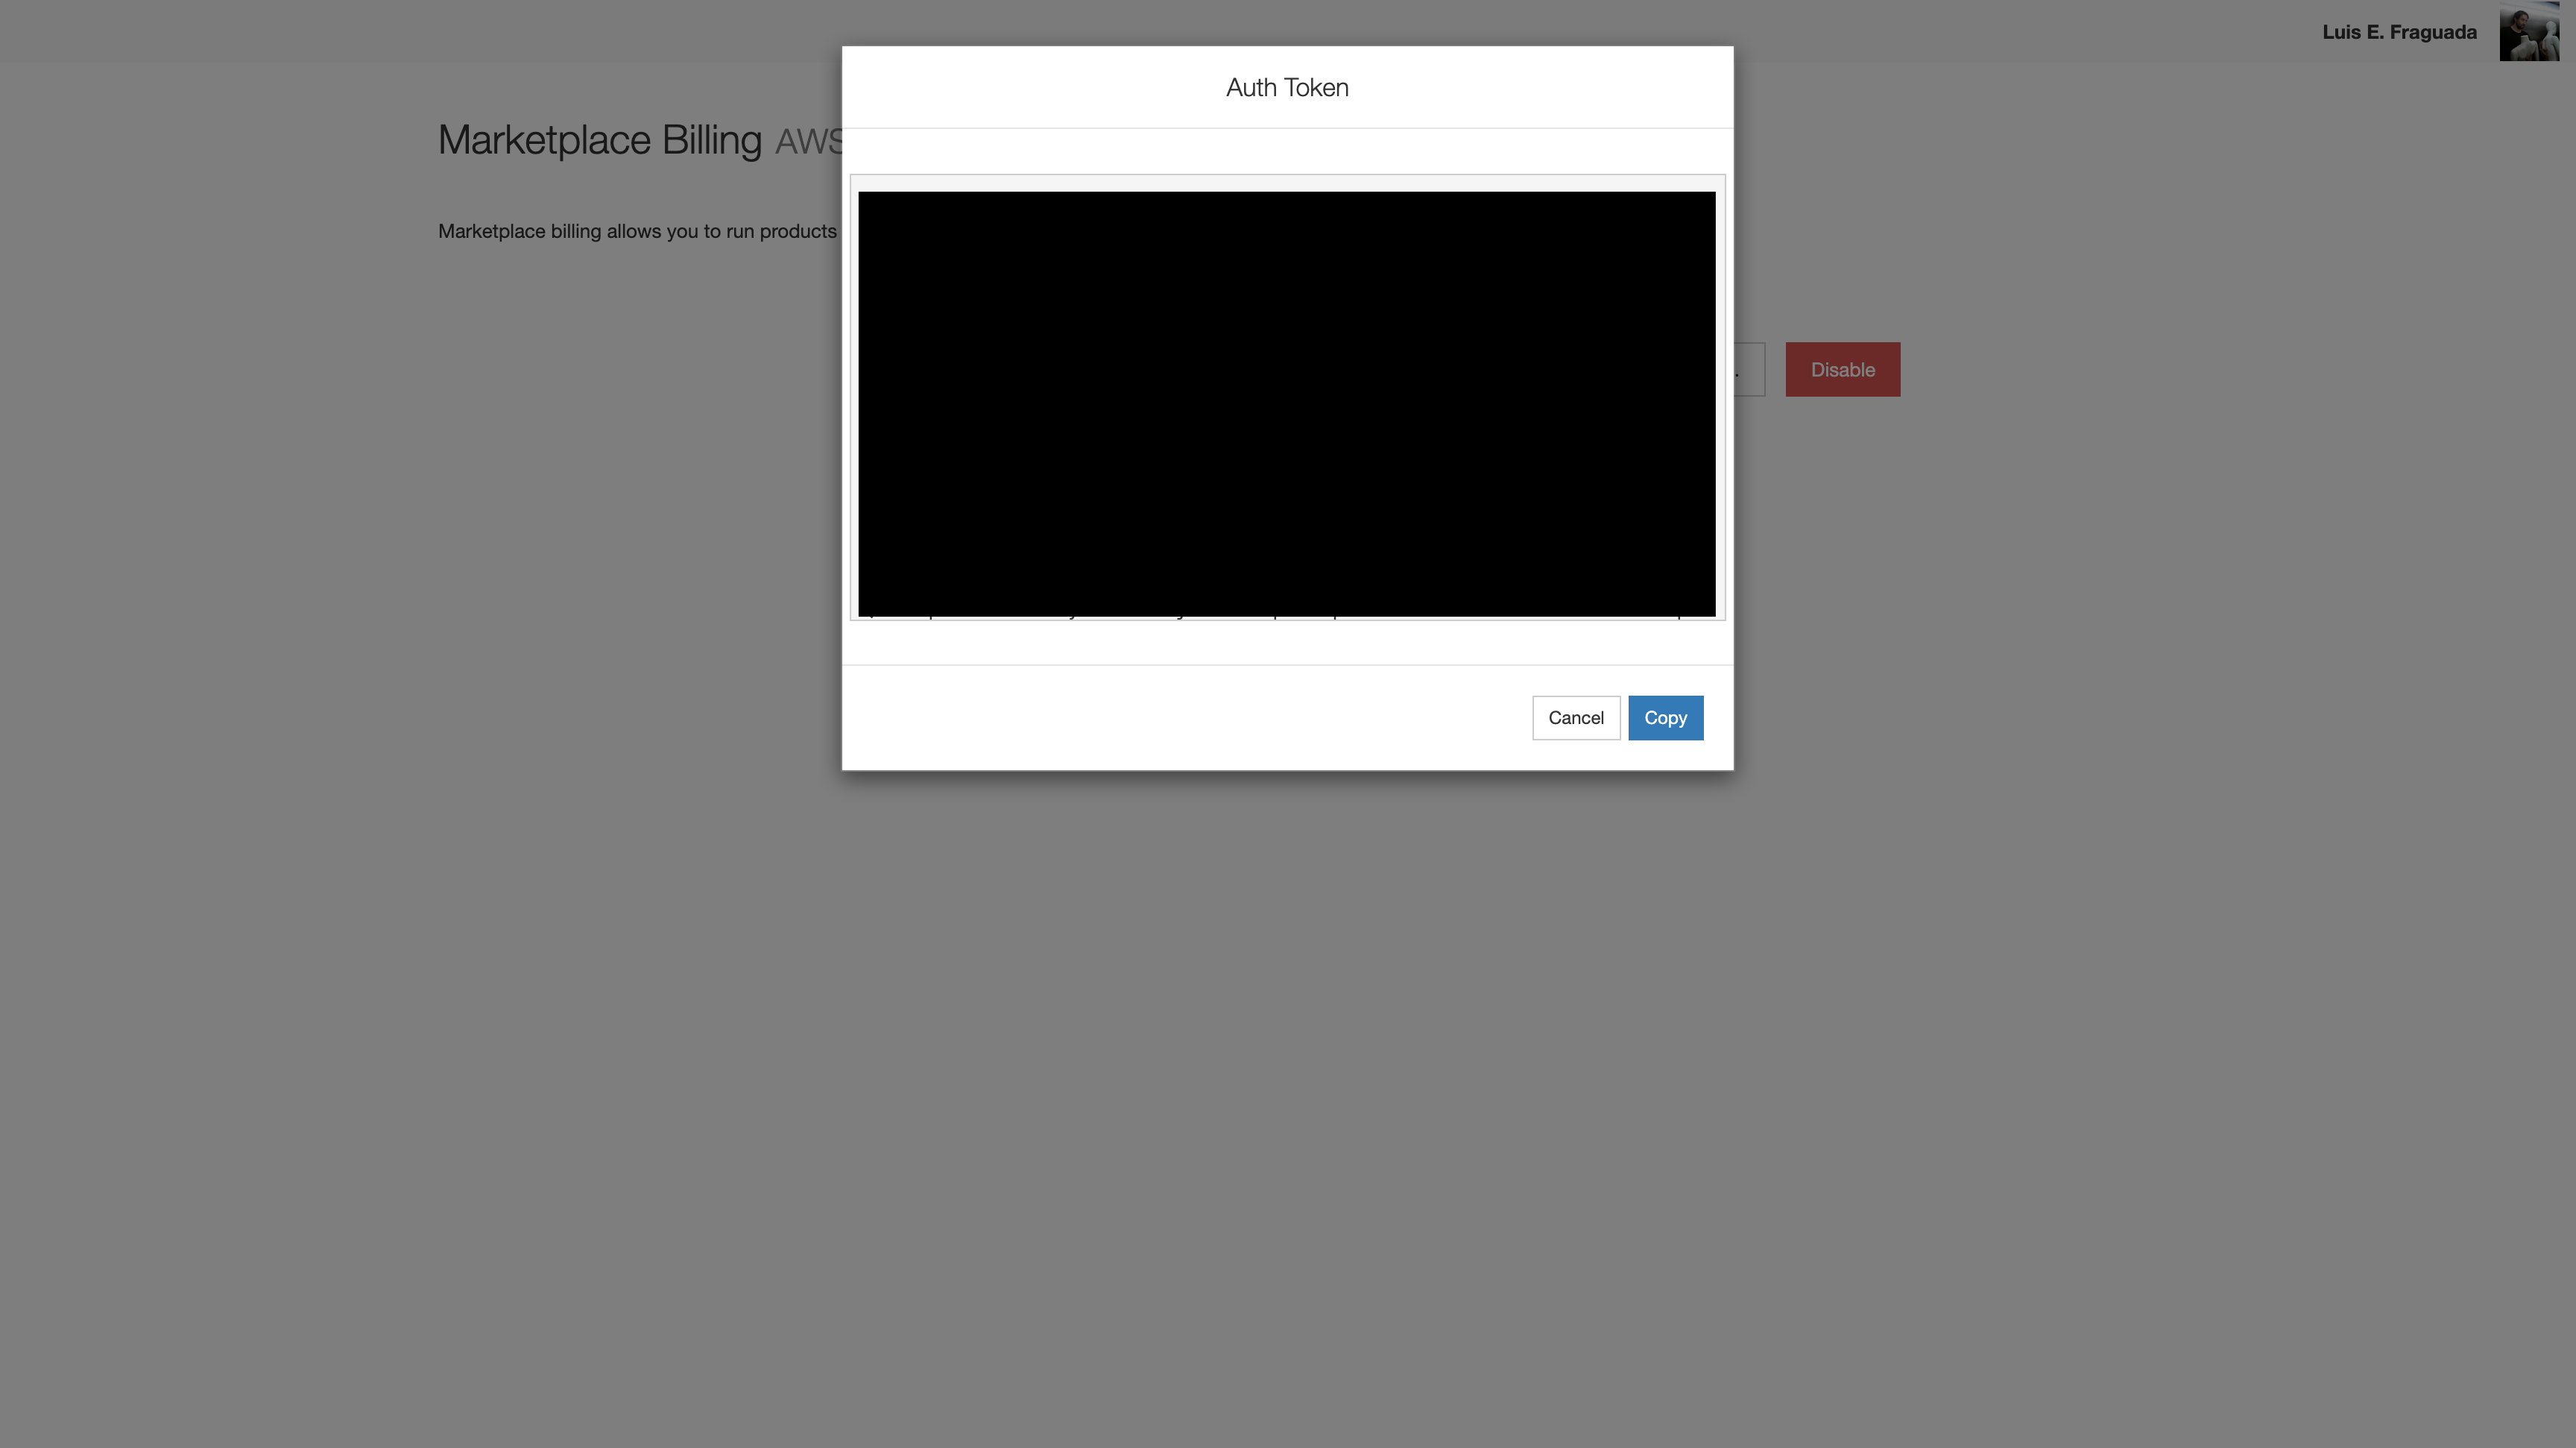
Subscribe in the AWS Marketplace
-
Open the Rhino.Compute 2026 listing in the AWS Marketplace while signed in to your AWS account. During the limited preview this page only opens for accounts that have been granted access (see Requesting access).
-
Click Continue to Subscribe.
-
Review the pricing and the End User License Agreement, then accept the terms. It can take a few minutes for AWS to activate the subscription; the page updates when it is ready.
-
Click Continue to Configuration.
Launch with CloudFormation
The product is delivered as an AMI plus a CloudFormation template that creates the instance, its security group, and the IAM role used for management access. Always launch through the Marketplace configuration page rather than hand-building a stack or launching the AMI directly from the EC2 console; the Marketplace flow selects the correct template and AMI version for you and keeps them in sync with your subscription.
-
On the Configure this software page, choose:
- Fulfillment option: the CloudFormation delivery method.
- Software version: the latest available version.
- Region:
us-east-1(the only supported region at the moment).
-
Click Continue to Launch.
-
Under Choose Action, select Launch CloudFormation and click Launch. This opens the CloudFormation console with the product template preloaded.
-
On the Create stack page, keep the prefilled template and click Next.
-
Give the stack a name (for example
rhino-compute) and fill in the parameters described in the next section. -
Click Next through the remaining pages. If prompted, acknowledge that CloudFormation may create IAM resources, then click Submit.
-
Wait for the stack to reach
CREATE_COMPLETE, then allow a few more minutes for the instance to finish its first boot before testing. Rhino.Compute loads the full Rhino runtime on startup, so the very first request after boot can take noticeably longer than subsequent ones.
Stack parameters
| Parameter | Description |
|---|---|
RhinoEmail |
The email address of your Rhino account. |
RhinoApiKey |
A secret key of your choosing. Every request to the server must include this value in the RhinoComputeKey HTTP header; requests without it are rejected. Treat it like a password. |
RhinoToken |
The token from your Rhino account that licenses the instance. See Prerequisites. |
RhinoComputeUserPassword |
The password for the local Windows account that runs Rhino.Compute. Must be at least 16 characters and meet Windows complexity requirements (mixed case, digits, symbols). It is not echoed back anywhere; store it in your password manager. |
InstanceType |
The EC2 instance type. Currently t3.xlarge (4 vCPUs, 16 GB RAM) is the only supported option. |
VpcId |
The VPC to deploy into. |
SubnetId |
A subnet in that VPC with outbound internet access. |
AllowedHttpCidr |
The CIDR range allowed to reach Rhino.Compute over HTTP (port 80). Scope this to the addresses of your client applications. |
AllowedRdpCidr |
The CIDR range allowed to connect over RDP (port 3389). If you do not plan to use RDP, set this to 127.0.0.1/32 to effectively disable it (see Shell access). |
KeyPair |
(Optional.) An EC2 key pair, only needed if you want to retrieve the Windows administrator password for RDP. |
ImageId |
Auto-populated with the correct AMI for the software version you selected. Leave it as-is. |
AllowedHttpCidr or AllowedRdpCidr to 0.0.0.0/0. That exposes the service (and RDP) to the entire internet. Restrict both to the IP ranges you actually connect from. Your RhinoApiKey protects the compute endpoints, but it is not a substitute for network-level access control.Verify the deployment
Once the stack is complete, find the instance: open the stack in the CloudFormation console, switch to the Resources tab, and click through to the EC2 instance. Note its public IP address (or public DNS name). The examples below use $COMPUTE_IP for the address and $RHINO_COMPUTE_KEY for the value you entered as RhinoApiKey.
Check the healthcheck endpoint
The healthcheck endpoint does not require the API key and confirms the service is up:
curl.exe http://$COMPUTE_IP/healthcheck
An HTTP 200 response means Rhino.Compute is running. If the connection times out, check that the machine you are testing from is inside AllowedHttpCidr, and that the instance has had a few minutes to finish booting.
Make your first request
All other endpoints require the RhinoComputeKey header. A simple authenticated smoke test is the version endpoint:
curl.exe -H "RhinoComputeKey: $RHINO_COMPUTE_KEY" http://$COMPUTE_IP/version
This returns a JSON object with the Rhino and Compute versions running on the instance. A 401 response means the header is missing or does not match the RhinoApiKey you set at launch.
From here, the server behaves exactly like any other Rhino.Compute deployment: you can POST to the geometry endpoints or solve Grasshopper definitions via /grasshopper, using the same request shapes described in the existing Compute guides. Rather than repeating them here, see:
Point the client at http://$COMPUTE_IP/ and pass your key in the RhinoComputeKey header (the client libraries expose this as the API key).
Shell access with Session Manager
The intended way to get a shell on the instance is AWS Systems Manager Session Manager (no open inbound ports, no key pair, and access is governed by your AWS IAM permissions):
- In the EC2 console, select the instance and click Connect.
- Choose the Session Manager tab and click Connect. A PowerShell session opens in your browser.
RDP remains available as a fallback if you prefer a desktop session: set AllowedRdpCidr to your address range at launch, provide a KeyPair, and retrieve the administrator password from the EC2 console. If you launched with RDP disabled (127.0.0.1/32), you can edit the security group later to enable it.
Operating notes
Stopping and starting
Software charges are metered only while the instance is running. If you do not need the server around the clock, stop the instance from the EC2 console when idle. This pauses both the EC2 infrastructure charge and the Rhino.Compute software charge. Start it again when needed; the service comes back automatically after boot.
Pinning a version for automation
If you script your deployments, AWS publishes the AMI IDs for each released version as public SSM parameters under the product code (see Product Identifiers):
/aws/service/marketplace/<product-code>/<version>
.../latest alias; it currently does not reliably track the newest released version, so automation built on latest can silently launch an outdated image.Updating to a new version
Marketplace AMI products do not upgrade in place. To move to a newer version: launch a new stack from the Marketplace configuration page with the new version selected, point your clients at the new instance, and delete the old stack once you have cut over.
Limitations
This is an early release. Here are some known limitations:
- Traffic is plain HTTP on port 80. The instance does not terminate TLS, so requests and responses, including your API key, are unencrypted in transit. Workaround: keep the server inside your VPC and restrict
AllowedHttpCidrto your own network, or put an HTTPS load balancer or CloudFront distribution in front of it and let that terminate TLS. - One server, with no autoscaling or failover. The template deploys a single instance: no load balancing, no automatic scaling, no redundancy. Concurrency is bounded by the worker processes on one
t3.xlarge. Workaround: launch multiple stacks and distribute requests yourself if you need more throughput or redundancy. - One region and one instance size. This version offers
us-east-1andt3.xlargeonly. Other regions and larger instance types are not yet available. - The address changes if you stop and start. The instance has no persistent address, so stopping and starting produces a new public DNS name and IP. Workaround: attach an Elastic IP, or read the address from the stack outputs each time.
- After a long idle period, the next request may be slow again. The web front end recycles idle worker processes, so the first request after a quiet spell pays part of the warm-up cost again, seconds rather than the full startup time. Workaround: send a periodic keep-alive request if consistent latency matters.
- Installing non-Yak plug-ins may require Remote Desktop. Plug-ins available through Yak (the Rhino package manager) can be installed from a Session Manager shell. Plug-ins that are not on Yak must be installed by hand in an interactive Rhino session, which means enabling RDP and using the Windows administrator password (which requires the optional
KeyPairat launch). - Cancelling your subscription does not stop a running server immediately. If the subscription is cancelled while the server is running, the worker processes already running keep answering requests until they are recycled or the instance restarts. What to do: stop or terminate the instance when you are finished; that is the reliable way to end both software and EC2 charges.
- Windows only. The Marketplace image runs on Windows Server; a Linux build is not offered yet, though we plan to add one. Workaround: if you need Linux today, self-host Rhino.Compute following the Rhino.Compute on Linux guide.
- AWS Only. We will eventually offer this on other cloud providers.
Billing
Rhino.Compute on AWS Marketplace is billed per vCPU-hour, currently $0.10 per vCPU-hour. A t3.xlarge has 4 vCPUs, so a running instance accrues about 4 × $0.10 = $0.40 per hour of software charge, plus the standard EC2 cost for the instance, its EBS volume, and data transfer.
How it works, plainly:
- While the instance is running, it reports its usage to AWS Marketplace every hour.
- Usage is measured from the minutes the server was actually running, so a partial hour is billed as a partial hour, not rounded up to a full one.
- The software charge appears on your regular AWS bill, itemized under the Rhino.Compute product, alongside your other AWS charges.
- There is no separate invoice or payment to McNeel; AWS handles all billing and payment collection.
- When the instance is stopped or terminated, software charges stop with it.
For the authoritative current price, see the Marketplace listing.
Getting help
- Questions and issues: post in the compute.rhino3d category on the McNeel Forum.
- General Rhino.Compute documentation: the Compute guides on this site.