
Introduction
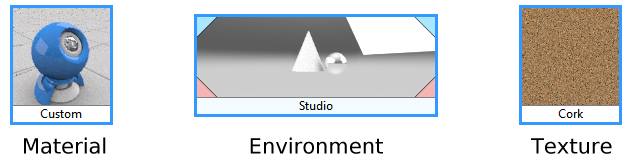
Probably the most important object in the Rhino RDK is the Render Content (AKA ‘Content’) object. This object is an abstraction that represents one of three possible ways of describing something that is going to be drawn (rendered) on the screen. There are three kinds of contents: Materials, Environments and Textures. A material describes how a surface will be rendered. It has properties such as color, glossiness, etc. An environment describes how the surroundings of a model affect its appearance. A texture describes the texture of a surface. In addition to color and glossiness, all real-world surfaces have a detailed appearance such as a wood grain. This appearance is described by RDK textures. Objects and layers in the document can have a material assigned to them. This material is usually (but not always) associated with an RDK Material. The Ground Plane can also have such a material assigned to it. As you will see later, render contents are actually a tree hierarchy. The assigned RDK material is always the top-level material which means it has no parent. It can, however, have children.
Classes
The base class for contents is CRhRdkContent. This is an abstraction that controls the features common to all contents. For example, all contents have a unique identifier called the instance id which identifies each instance of CRhRdkContent. They also have a unique type id which defines their type and an instance name which is the user-defined name that appears on the screen. They can also have any number of children which means that a content is usually considered as a hierarchy because these children can also have children to any depth. The hierarchy is therefore a tree structure.
This flexibility allows the user to create very complex materials if so desired. All these properties and more are stored in and managed by the base class called CRhRdkContent. This base class has a single immediate subclass called CRhRdkCoreContent which provides default implementations of some of the more complicated functions, mostly to do with the user interface. Derived from this are the three main content kinds; CRhRdkMaterial, CRhRdkEnvironment and CRhRdkTexture. It is from these latter three objects that a plug-in should derive its own specialized materials, environments and textures. To do this, it is necessary to choose a base class from one of those three and write a subclass that overrides or implements all the necessary virtual functions, implement a factory class that knows how to create an instance of the class, and register the factory with the RDK. Once this is done, your content will start to appear in the Rhino user interface, specifically in the Material Editor if the content is a material (or the Environment Editor or Texture Palette if it is an environment or texture). You can choose to use the default user interface provided by CRhRdkCoreContent or you can create a custom user interface of your own design. You can also avoid having to create a user interface at all by using the RDK’s built-in Automatic UI system.
Code examples showing how to do this can be found in the SampleRdkMarmalade sample.
Lifetime and ownership
There are two flavors of content in the RDK – temporary and persistent. It is very important to understand the distinction between a temporary content instance and a persistent content instance, and the fact that a temporary instance (and all its children) can become persistent.
Temporary contents get created and deleted very often during the normal operation of the RDK. In fact, just about anything the user clicks on might result in a temporary content being created and deleted again. They are created by the content browser, the preview rendering, and so on. They are ‘free floating’ and are owned by whomever created them. They do not appear in the modeless UI, they do not get saved in the 3dm file, and they can freely be deleted again after use.
Contrast this with persistent contents which are attached to a document. They are always owned by the RDK, appear in the modeless UI and get saved in the 3dm file. You should never store pointers to persistent contents; you should only store their instance ids and look them up again using CRhRdkDocument::FindContentInstance(). They can be deleted only after detaching them from the document. The preferred way to access document-resident contents is by using the document contents interface.
This is an example code sequence showing the main stages in the lifetime of a content.
  // Create a new content owned by you.
  auto* pContent = new CMyContent;

  // Initialize the content.
  pContent->Initialize();

  // Attach the content to a document. The content is now owned by
  // the document and it will appear in the various user interfaces.
  doc.Contents().Attach(*pContent);

  // Detach the content from the document. The content will disappear
  // from any user interfaces and it is once again owned by you.
  doc.Contents().Detach(*pContent);

  // Uninitialize the content to prepare it for deletion.
  pContent->Uninitialize();

  // Delete the content. This is possible because the content is owned by you.
  delete pContent;
You can also create a free-floating content that is not attached to a document. This content will not appear in any modeless UIs, but it is possible to edit it in a modal UI by calling the Edit() method.
  auto* pContent = new CMyMaterial;

  // Initialize the content.
  pContent->Initialize();

  // Edit the content in the Modal Editor. If the user clicks OK, this returns an edited version
  // of the content (the original is unaltered) and you own this object as well as the original one.
  auto* pEdited = pContent->Edit();
  if (nullptr != pEdited) // Returns null if the editor is canceled.
  {
    // Uninitialize the edited content to prepare it for deletion.
    pEdited->Uninitialize();

    // Delete the edited content. This is possible because the content is owned by you.
    delete pEdited;
  }

  // Uninitialize the original content to prepare it for deletion.
  pContent->Uninitialize();

  // Delete the original content. This is possible because the content is owned by you.
  delete pContent;
In an ideal world, the call to delete would both uninitialize and delete the content. But since Uninitialize() is a virtual function, this is not possible. So every call to delete must be preceded by a call to Uninitialize(). Remember that you can only do this if you own the object. Contents that are owned by a document (attached) cannot be deleted by the client without first being detached.
The most important thing to understand is that if you want to delete a content, you must know who owns it and act accordingly. The RDK tries to enforce good practice by using constness. For example, the function CRhRdkDocument::FindContentInstance() returns a const pointer to the content. This has two implications:
- This content is not owned by you and you can’t delete it.
- This content can’t be modified; it’s read-only. See below under Modifying Contents for information on how a const content can be modified.
| Who owns it? | Procedure for deletion |
|---|---|
| You | Uninitialize it. Delete it. |
| A document | Detach it from the document. Uninitialize it. Delete it. |
| Unknown | You have no right to delete it. Doing so will most likely crash Rhino. |
Modifying Contents
If a content is owned by you, for example immediately after you create it, then it is generally non-const and you can modify it by calling any non-const method such as SetParameter(). But if the content is const, for example after being found in a document, then you have to open it for modification. This is done by calling BeginChange() which begins a change bracket. BeginChange() takes a parameter called the change context. This is one of the values of the enum RhRdkChangeContext. The most common one used by plug-ins is RhRdkChangeContext::UI which means the change is being done by the user inside some user interface. BeginChange() also returns a non-const reference to the same content, allowing you to call any non-const method such as SetParameter(). It is important to call the Changed() method on the content if you detect that a change to the parameter has occurred. If this is not done, the user interface will not update. More than one parameter can be changed inside the change bracket. When all the desired changes have been made, you must call EndChange(). Calls to BeginChange() and EndChange() can be nested but there must always be exactly one call to EndChange() for every call to BeginChange(). The final call to EndChange() closes the content and sends the events necessary to update the user interface.
Creating your own specialized material
The most commonly specialized render content is probably the material. When creating your own render content, most of the steps that apply to materials also apply to the other two kinds.
Rhino is commonly used for designing things. Whether these things are phones, boats, jewelry or dinosaurs makes very little difference to the bulk of the plug-in developer’s work. But where it does make a difference is in the creation of the specialized materials and textures. If your plug-in is intended for designing cars for example, it will need materials and textures that describe what a car looks like. In the real world, the look of a car is heavily influenced by the kind of paint used on the car’s body. In this discussion, we will assume you are writing a render plug-in for designing cars and we will show how to create a car paint material.
The first thing we notice when looking at a painted surface is likely to be the color of the paint. After that, we notice that the paint is either gloss or matte. In the case of car paint, there is also sometimes a glittery texture and often a candied appearance. Sometimes the color of the surface changes depending on the viewing angle. These properties of the car paint material will be defined by fields in the material. We will create a simple car paint material with the following fields:
- Paint color
- Gloss amount
- Glitter color
- Glitter size
- Glitter amount
This will allow our car paint to have a basic paint color and some glitter. Other more advanced features such as candy color could be added but this will be left as an exercise for the reader (as will writing the actual car paint shader).
As mentioned earlier, every render content has the ability to host any number of fields which describe the properties of the content. It is possible to ignore the fields and just provide one’s own data members, but this is more difficult and requires more work than using fields, because when fields are used, a lot of the functionality is provided automatically by the RDK. So using fields is highly recommended for all kinds of content.
First let’s define the class for our new car paint material. Because it is a material, it should be derived from CRhRdkMaterial. The first thing to do is implement some important virtual functions:
class CCarPaintMaterial : public CRhRdkMaterial
{
protected:
	virtual UUID TypeId(void) const override { return _unique_type_id_ }
	virtual UUID PlugInId(void) const override { return _unique_plug_in_id_; }
	virtual UUID RenderEngineId(void) const override { return _unique_render_engine_id_; }
	virtual ON_wString InternalName(void) const override { return L"car-paint-material"; }
	virtual ON_wString TypeName(void) const override { return L"Car Paint"; }
	virtual ON_wString TypeDescription(void) const override { return L"Demo car paint material"; }
};
Then override the BitFlags() method and switch on the fields option. This tells the RDK that the material uses fields and allows a lot of automation to take place by default. At the same time we remove the Texture Summary option which would cause our UI to display a panel containing a texture list. Since this material has no child textures, this would not be useful here.
class CCarPaintMaterial : public CRhRdkMaterial
{
	...
	virtual unsigned int BitFlags(void) const override;
};

unsigned int CCarPaintMaterial::BitFlags(void) const
{
	auto flags = __super::BitFlags(); // Get the default flags.
 	flags &= ~bfTextureSummary;       // Remove the Texture Summary option.
	flags |=  bfFields;               // Add the fields option.

	return flags;
}
Recall that CRhRdkMaterial is derived from CRhRdkContent. This base class contains a field collection which is accessible by calling the Fields() method to obtain a reference to the CRhRdkContentFields object containing the fields. Each field is implemented by CRhRdkContentField and they must be defined and initialized. They are best defined as members of the class and initialized in the constructor. Let’s add the constructor and field members for the paint properties:
class CCarPaintMaterial : public CRhRdkMaterial
{
public:
	CCarPaintMaterial();
	...

private:
	CRhRdkContentField m_PaintColor;
	CRhRdkContentField m_GlossAmount;
	CRhRdkContentField m_GlitterColor;
	CRhRdkContentField m_GlitterSize;
	CRhRdkContentField m_GlitterAmount;
};
Notice that this says nothing about the type of the fields. Some will need to be colors and others may be floats or doubles. This is defined when the fields are initialized in the material constructor. Let’s do that now:
CCarPaintMaterial::CCarPaintMaterial()
	:
	m_PaintColor   (*this, L"paint-color",    L"Paint Color",    L"Paint Color"),
	m_GlossAmount  (*this, L"gloss-amount",   L"Gloss Amount",   L"Gloss Amount"),
	m_GlitterColor (*this, L"glitter-color",  L"Glitter Color",  L"Glitter Color"),
	m_GlitterSize  (*this, L"glitter-size",   L"Glitter Size",   L"Glitter Size"),
	m_GlitterAmount(*this, L"glitter-amount", L"Glitter Amount", L"Glitter Amount")
{
	m_PaintColor   = CRhRdkColor(28, 122, 230);
	m_GlitterColor = CRhRdkColor(80, 200, 250);

	m_GlossAmount = 1.0;
	m_GlossAmount.SetLimits(0.0, 1.0);

	m_GlitterSize = 0.5;
	m_GlitterSize.SetLimits(0.0, 20.0);

	m_GlitterAmount = 0.5;
	m_GlitterAmount.SetLimits(0.0, 1.0);
}
In the example above, each field is first constructed and then initialized. The constructor of CRhRdkContentField is quite involved and has many parameters for expert users, but we just set the most important ones here. Every field must have, at the very least, a reference back to the content that owns it, an internal name, a localized name and an English name. If your plug-in does not support localization, you can just repeat the English name as shown above. After construction, the fields are initialized by assigning a value of the required type. This initializes the field to its type and default value. For example, setting the field to be a color is done by assigning a CRhRdkColor to it. Fields can have many types from simple POD types like int to more elaborate types such as ON_Xform. The default values will be changed when the user edits them, but they will be restored whenever ResetParametersToDefaults() is called. If the material is attached to a document, the fields’ values will be stored when the document is saved, referenced by the internal name. For this reason, once a field’s type and internal name have been set, they should never be changed. The English and localized names are free to change if so desired. The localized name will be displayed to the user if you choose to use the automatic UI system. The constructor above also sets some minimum and maximum limits on each field which prevents the user from setting them to nonsensical values.
It is important to understand a few things about this method of using fields. First, the field objects are owned by your material because they are embedded in it. They are constructed and destructed at the same time as your material. These are known as static fields. There is another kind of field called a dynamic field, the use of which is an advanced topic which will be covered in a different article.
Fast material copying
When a material is copied the default implementation of MakeCopy() has to assume that the properties are stored in some user-defined way, so it must convert the whole material to XML, copy the XML and convert it back to properties in the copy. This can be very slow. Because we are exclusively using fields to store our material’s properties, we can take advantage of an optimization provided by the RDK. If you override MakeCopy() and have it call FastMakeCopy(), you can make the copying much faster. The default implementation of FastMakeCopy() does the bulk of the work by simply copying the fields.
class CCarPaintMaterial : public CRhRdkMaterial
{
	...
	virtual CRhRdkContent* MakeCopy(CopyMethods m) const override { return FastMakeCopy(m); }
};
Getting and setting material parameters
The content user interface displays and allows editing of content parameters (i.e., properties). Although your material could provide methods for getting and setting each parameter, it is not necessary to do this. As long as the UI knows the internal names of the material’s fields, it need call only two methods: GetParameter() and SetParameter(). These methods work with the CRhRdkVariant class to get or set parameters by name. When using the field system, this name is the field’s internal name. The default implementations of these methods usually do everything you need, but it is possible to override and specialize them if necessary.
The material simulation
All render contents must provide a method for other renderers, including the standard Rhino display, to represent them visually. This method is called simulation. Without simulation, the rendered mode in Rhino would not update to reflect your custom definitions. In addition, simulation makes it possible for users to render objects with your content objects attached without having your plug-in installed. Furthermore, when the RDK displays a material in the Material Editor, it first shows a simple rendition of the material preview using OpenGL. After that it renders the material preview using the current render engine. The OpenGL rendition uses the simulation of the material. This is essentially an ON_Material that has been set up to look as much like your material as possible. For complex materials, it can be difficult to produce a good simulation, but the most important properties to get right are the diffuse color and the glossiness. So we must implement an override of CRhRdkMaterial::SimulateMaterial() as follows:
class CCarPaintMaterial : public CRhRdkMaterial
{
	...
	virtual void SimulateMaterial(ON_Material& matOut, CRhRdkTexture::TextureGeneration tg,
	                              int iSimulatedTextureSize, const CRhinoObject* pObject) const
	                              override;
};

void CCarPaintMaterial::SimulateMaterial(ON_Material& matOut, CRhRdkTexture::TextureGeneration tg,
                                        int iSimulatedTextureSize, const CRhinoObject* pObject) const
{
	__super::SimulateMaterial(matOut, tg, iSimulatedTextureSize, pObject);

	const auto col = m_PaintColor.Value().AsOnColor();
	matOut.SetDiffuse(col);

	const auto gloss = m_GlossAmount.Value().AsDouble();
	matOut.SetShine(gloss * ON_Material::MaxShine);
}
In the above example, only the output material matOut is used. The other parameters are for more advanced use and will not be covered here.
The material shader
Most render engines have custom binary definitions for their materials, environments and textures. Usually these will be instances of classes with filled in “parameter blocks” initialized from the data in a content object. Sometimes they will simply be strings pointing to files or locations in a library. These objects are termed shaders in the RDK. When an object needs to be rendered by your render engine, you will need to access these objects. As part of your content object implementation you should override CRhRdkContent::GetShader() to return a pointer to this object. The reason the return value is void* is because the RDK does not know anything about the shader; it’s an internal render-engine object, but the material interface must have a method for getting it. The render engine will cast the returned pointer to the correct type before use. Since you are both the provider and client of this function, how you implement it is up to you. The data is private and its type and allocation details are also completely up to you. However, you must check the incoming render engine id to ensure that you can render shaders of that type. Usually you will call IsCompatible() passing the id and only proceed if it returns true.
class CCarPaintMaterial : public CRhRdkMaterial
{
	...
	virtual void* GetShader(const UUID& uuidRenderEngine, void* pvData) const override;
};

void* CCarPaintMaterial::GetShader(const UUID& uuidRenderEngine, void* pvData) const
{
	if (!IsCompatible(uuidRenderEngine))
		return nullptr;

	void* pShader = nullptr;

	// TODO: Get a pointer to the shader used to render this material.

	return pShader;
}
The material factory
The RDK uses the factory pattern to allow render plug-ins to provide custom render content. This means that in order to have our new car paint material show up in the Material Editor’s list of available materials, we must create a factory object that knows how to create an instance of the material. Because the factory produces materials, it must be derived from CRhRdkMaterialFactory. It must also implement the NewMaterial() method to create the material instance:
class CCarPaintMaterialFactory : public CRhRdkMaterialFactory
{
protected:
	virtual CRhRdkMaterial* NewMaterial(void) const override { return new CCarPaintMaterial; }
};
Finally, we register the factory with the RDK in our override of CRhRdkRenderPlugIn::RegisterExtensions():
void CCarDesignerPlugIn::RegisterExtensions(void) const
{
	...
	AddExtension(new CCarPaintMaterialFactory);
	...
}
Creating the user interface
 The above code is enough to get us a car paint material that the user can choose and create in the editor. But this is not very useful because we haven’t provided a user interface, so the only things the user can edit are the material’s name and notes. In order to edit the actual material properties, we need to supply a UI. This can be done (on Windows, at least) by creating an MFC dialog with an IDD and a resource in the usual way. This can be a lot of work. Sometimes it’s enough to just be able to see and edit the parameters, for example when prototyping, and sometimes even for the final product. We will do this for our car paint material by using the RDK’s Automatic UI system.
In order to create a UI for your material, you must override CRhRdkCoreContent::AddUISections(). This is true in almost all cases, except when you want to create a completely customized user interface. To use the automatic UI, you must call AddAutomaticUISection() in your override. This will get you an automatic UI section (AKA roll-up) in the user interface, but it will be blank because it is necessary to tell the RDK which fields you want to display. The automatic UI uses an object called a param block which is accessed through the IRhRdkParamBlock interface. This param block contains the information about what parameters to display in the user interface and it accepts the changes made by the user. It can be thought of as a conduit that enables the transfer of the parameters between the render content and the user interface. When using fields, it’s easy to get all of this functionality. You just have to override AddAutoParameters() and have the fields add themselves to the param block. When the user changes a value in the UI, it is necessary for your material to accept to change and modify the relevent field. All you need do is override GetAutoParameters() and have the fields load themselves from the param block. You can also sort the parameters according to either their internal (field) name or their display name. This is commonly done in AddAutoParameters() just after adding them.
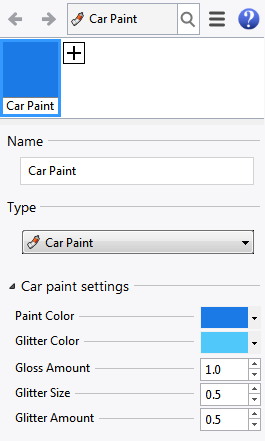
The following code will get us a working automatic UI for the entire car paint material:
class CCarPaintMaterial : public CRhRdkMaterial
{
	...
	virtual void AddUISections(IRhRdkExpandableContentUI& ui) override;
	virtual void AddAutoParameters(IRhRdkParamBlock& paramBlock, int id) const override;
	virtual void GetAutoParameters(const IRhRdkParamBlock& paramBlock, int id) override;
};

void CCarPaintMaterial::AddUISections(IRhRdkExpandableContentUI& ui)
{
	const wchar_t* wsz = L"Car paint settings";
	AddAutomaticUISection(ui, wsz, wsz, 0);

	__super::AddUISections(ui);
}

void CCarPaintMaterial::AddAutoParameters(IRhRdkParamBlock& paramBlock, int id) const
{
	Fields().AddValuesToParamBlock(paramBlock, id);

	paramBlock.Sort(IRhRdkParamBlock::SortBy::DisplayName);
}

void CCarPaintMaterial::GetAutoParameters(const IRhRdkParamBlock& paramBlock, int id)
{
	Fields().GetValuesFromParamBlock(paramBlock, id);
}
Using multiple automatic sections
Our car paint material only has a few fields, but some customized materials will have many more. If you don’t want all the fields to appear in the same UI section, you can have the automatic UI distribute the fields between multiple sections. To do this, you first decide which fields should appear together and give them the same identifier. This is one of the constructor parameters, sectionId which defaults to zero. In this example we will put the color fields on one section and the other fields on a different section. The color fields are given the id 1 and the others 2. The sectionId parameter appears after two other ‘filter’ parameters that are not relevant to this example, so we will fill them in as the default value, CRhRdkContentField::Filter::All:
static const int idColor = 1;
static const int idOther = 2;
static const auto f = CRhRdkContentField::Filter::All;

CCarPaintMaterial::CCarPaintMaterial()
	:
	m_PaintColor   (*this, L"paint-color",    L"Paint Color",    L"Paint Color"    , f, f, idColor),
	m_GlossAmount  (*this, L"gloss-amount",   L"Gloss Amount",   L"Gloss Amount"   , f, f, idOther),
	m_GlitterColor (*this, L"glitter-color",  L"Glitter Color",  L"Glitter Color"  , f, f, idColor),
	m_GlitterSize  (*this, L"glitter-size",   L"Glitter Size",   L"Glitter Size"   , f, f, idOther),
	m_GlitterAmount(*this, L"glitter-amount", L"Glitter Amount", L"Glitter Amount" , f, f, idOther)
	...
Now that the fields have been separated by this id, we just have to add a second section to the UI and specify which id appears on which section:
void CCarPaintMaterial::AddUISections(IRhRdkExpandableContentUI& ui)
{
	const wchar_t* wsz1 = L"Car paint color settings";
	AddAutomaticUISection(ui, wsz1, wsz1, idColor);

	const wchar_t* wsz2 = L"Car paint other settings";
	AddAutomaticUISection(ui, wsz2, wsz2, idOther);

	__super::AddUISections(ui);
}
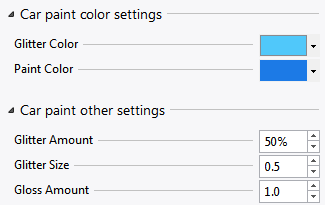
Extra requirements
It is possible to enhance the automatic UI a little more by making use of extra requirements. These are essentially a set of special options that can applied to the parameters so their display can be tweaked. Let’s demonstrate this by changing one of the parameters, Glitter Amount to show its value as a percentage. Any float or double value that has a nominal range of 0 to 1 can be displayed as 0% to 100% by adding the RDK_NUMBER_EDIT_TWEAKS extra requirement and then specifying its RDK_PERCENTILE option. The requirement is specified when parameters are added to the param block.
void CCarPaintMaterial::AddAutoParameters(IRhRdkParamBlock& paramBlock, int id) const
{
	Fields().AddValuesToParamBlock(paramBlock, id, RDK_NUMBER_EDIT_TWEAKS);
	...
}
After this is done, all the parameters will support this extra requirement, but it won’t have any effect until you specify an option within the scope of that requirement. In this case, the RDK_PERCENTILE option must be specified. To do this, your material needs to override GetExtraRequirementParameter() as follows:
class CCarPaintMaterial : public CRhRdkMaterial
{
	...
	virtual bool GetExtraRequirementParameter(const wchar_t* wszParamName,
	                                          const wchar_t* wszExtraReqName,
	                                          CRhRdkVariant& vValueOut) const override;
};

bool CCarPaintMaterial::GetExtraRequirementParameter(
                                const wchar_t* wszParamName,
                                const wchar_t* wszExtraReqName, CRhRdkVariant& vValueOut) const
{
	if (__super::GetExtraRequirementParameter(wszParamName, wszExtraReqName, vValueOut))
		return true;

	if (0 == _wcsicmp(L"glitter-amount", wszParamName))
	{
		if (0 == _wcsicmp(RDK_PERCENTILE, wszExtraReqName))
		{
			vValueOut = true;
			return true;
		}
	}

	return false;
}
This is how the user interface appears after the above changes have been made. It is possible to have as many fields as you need split among as many sections as you need, limited only by available computer resources.
Summary
This article introduced render contents and covered the most important aspects of using them in your render plug-in. It explained ownership, modification, copying, and showed how to create a customized material and a simple user interface for it.
