
This guide covers information relevant to Rhino 5-7 for Mac. Rhino 8 is the current shipping version.
For updated guides see:
Prerequisites
This guide presumes that you have a RhinoCommon plugin that has commands that can be run from a tool palette. In Rhino for Windows, this UI is normally stored in an rui file that includes the buttons, the icons, and their associated commands. If you do not yet have a plugin, please begin with the Your First Plugin (Mac) guide.
Overview
There are three steps in creating and loading a tool palette collection for your plugin in Rhino for Mac:
- The first step is to create (or convert) a tool palette collection that calls the appropriate commands - or to convert a Rhino for Windows .rui file - to ToolPaletteCollection.plist file.
- The second step is to add this .plist in your plugin project as a resource.
- The third and final step is to tell Rhino for Mac to load the tool palette from the appropriate file when your plugin is being loaded.
Create or Convert A Tool Palette Collection
If you are familiar with the Command Editor in Rhino for Mac, you are already well on your way to understanding how to create a custom tool palette collection for use in your plugin. If not, don’t worry: creating a tool palette collection is relatively easy.
If you already have an existing rui file from Rhino for Windows, this job is even easier: you can import that rui and convert it to a plist.
Creating from Scratch
- Open Rhino - if it is not already open - and start a new modeling window.
- Enter the
TestEditToolPaletteCollectioncommand. (You will need to type the entire command; it will not autocomplete). This launches a developer tool similar to the Command Editor where tool palette collections can be created, organized, and saved to plist files… - By default, the
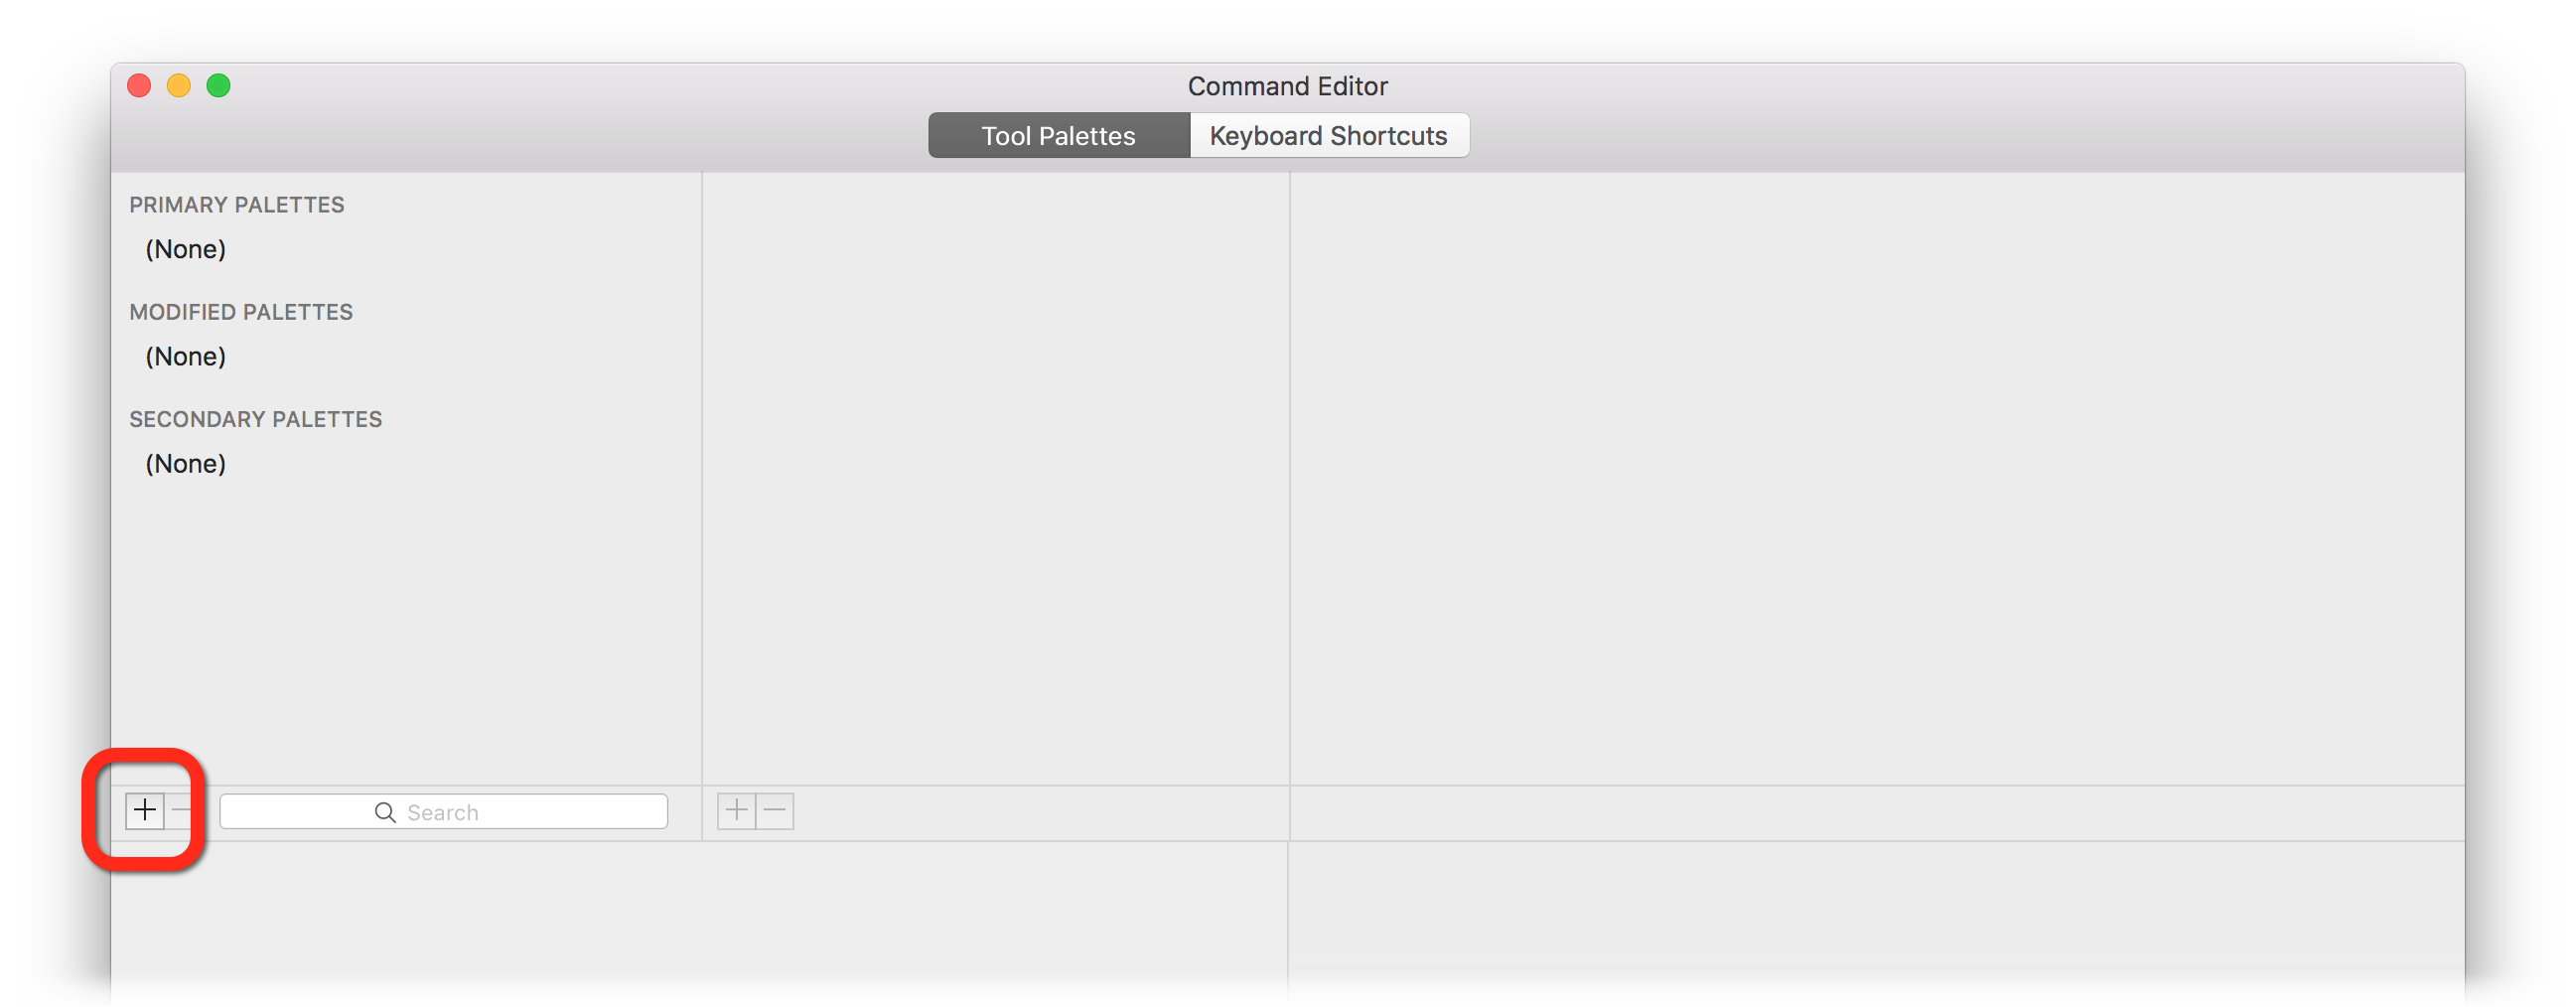
TestEditToolPaletteCollectioneditor presumes you have a Rhino for Windows rui file you would like to convert. A finder window opens where you can navigate to the rui file to import. - If you do not have a Rhino for Windows rui file that you would like to convert, you will need to create your Tool Palette Collection “from scratch.” On the finder window, press Cancel. An interface much like the Command Editor window appears. This is where you can create, configure, organize, and save your tool palette collection.
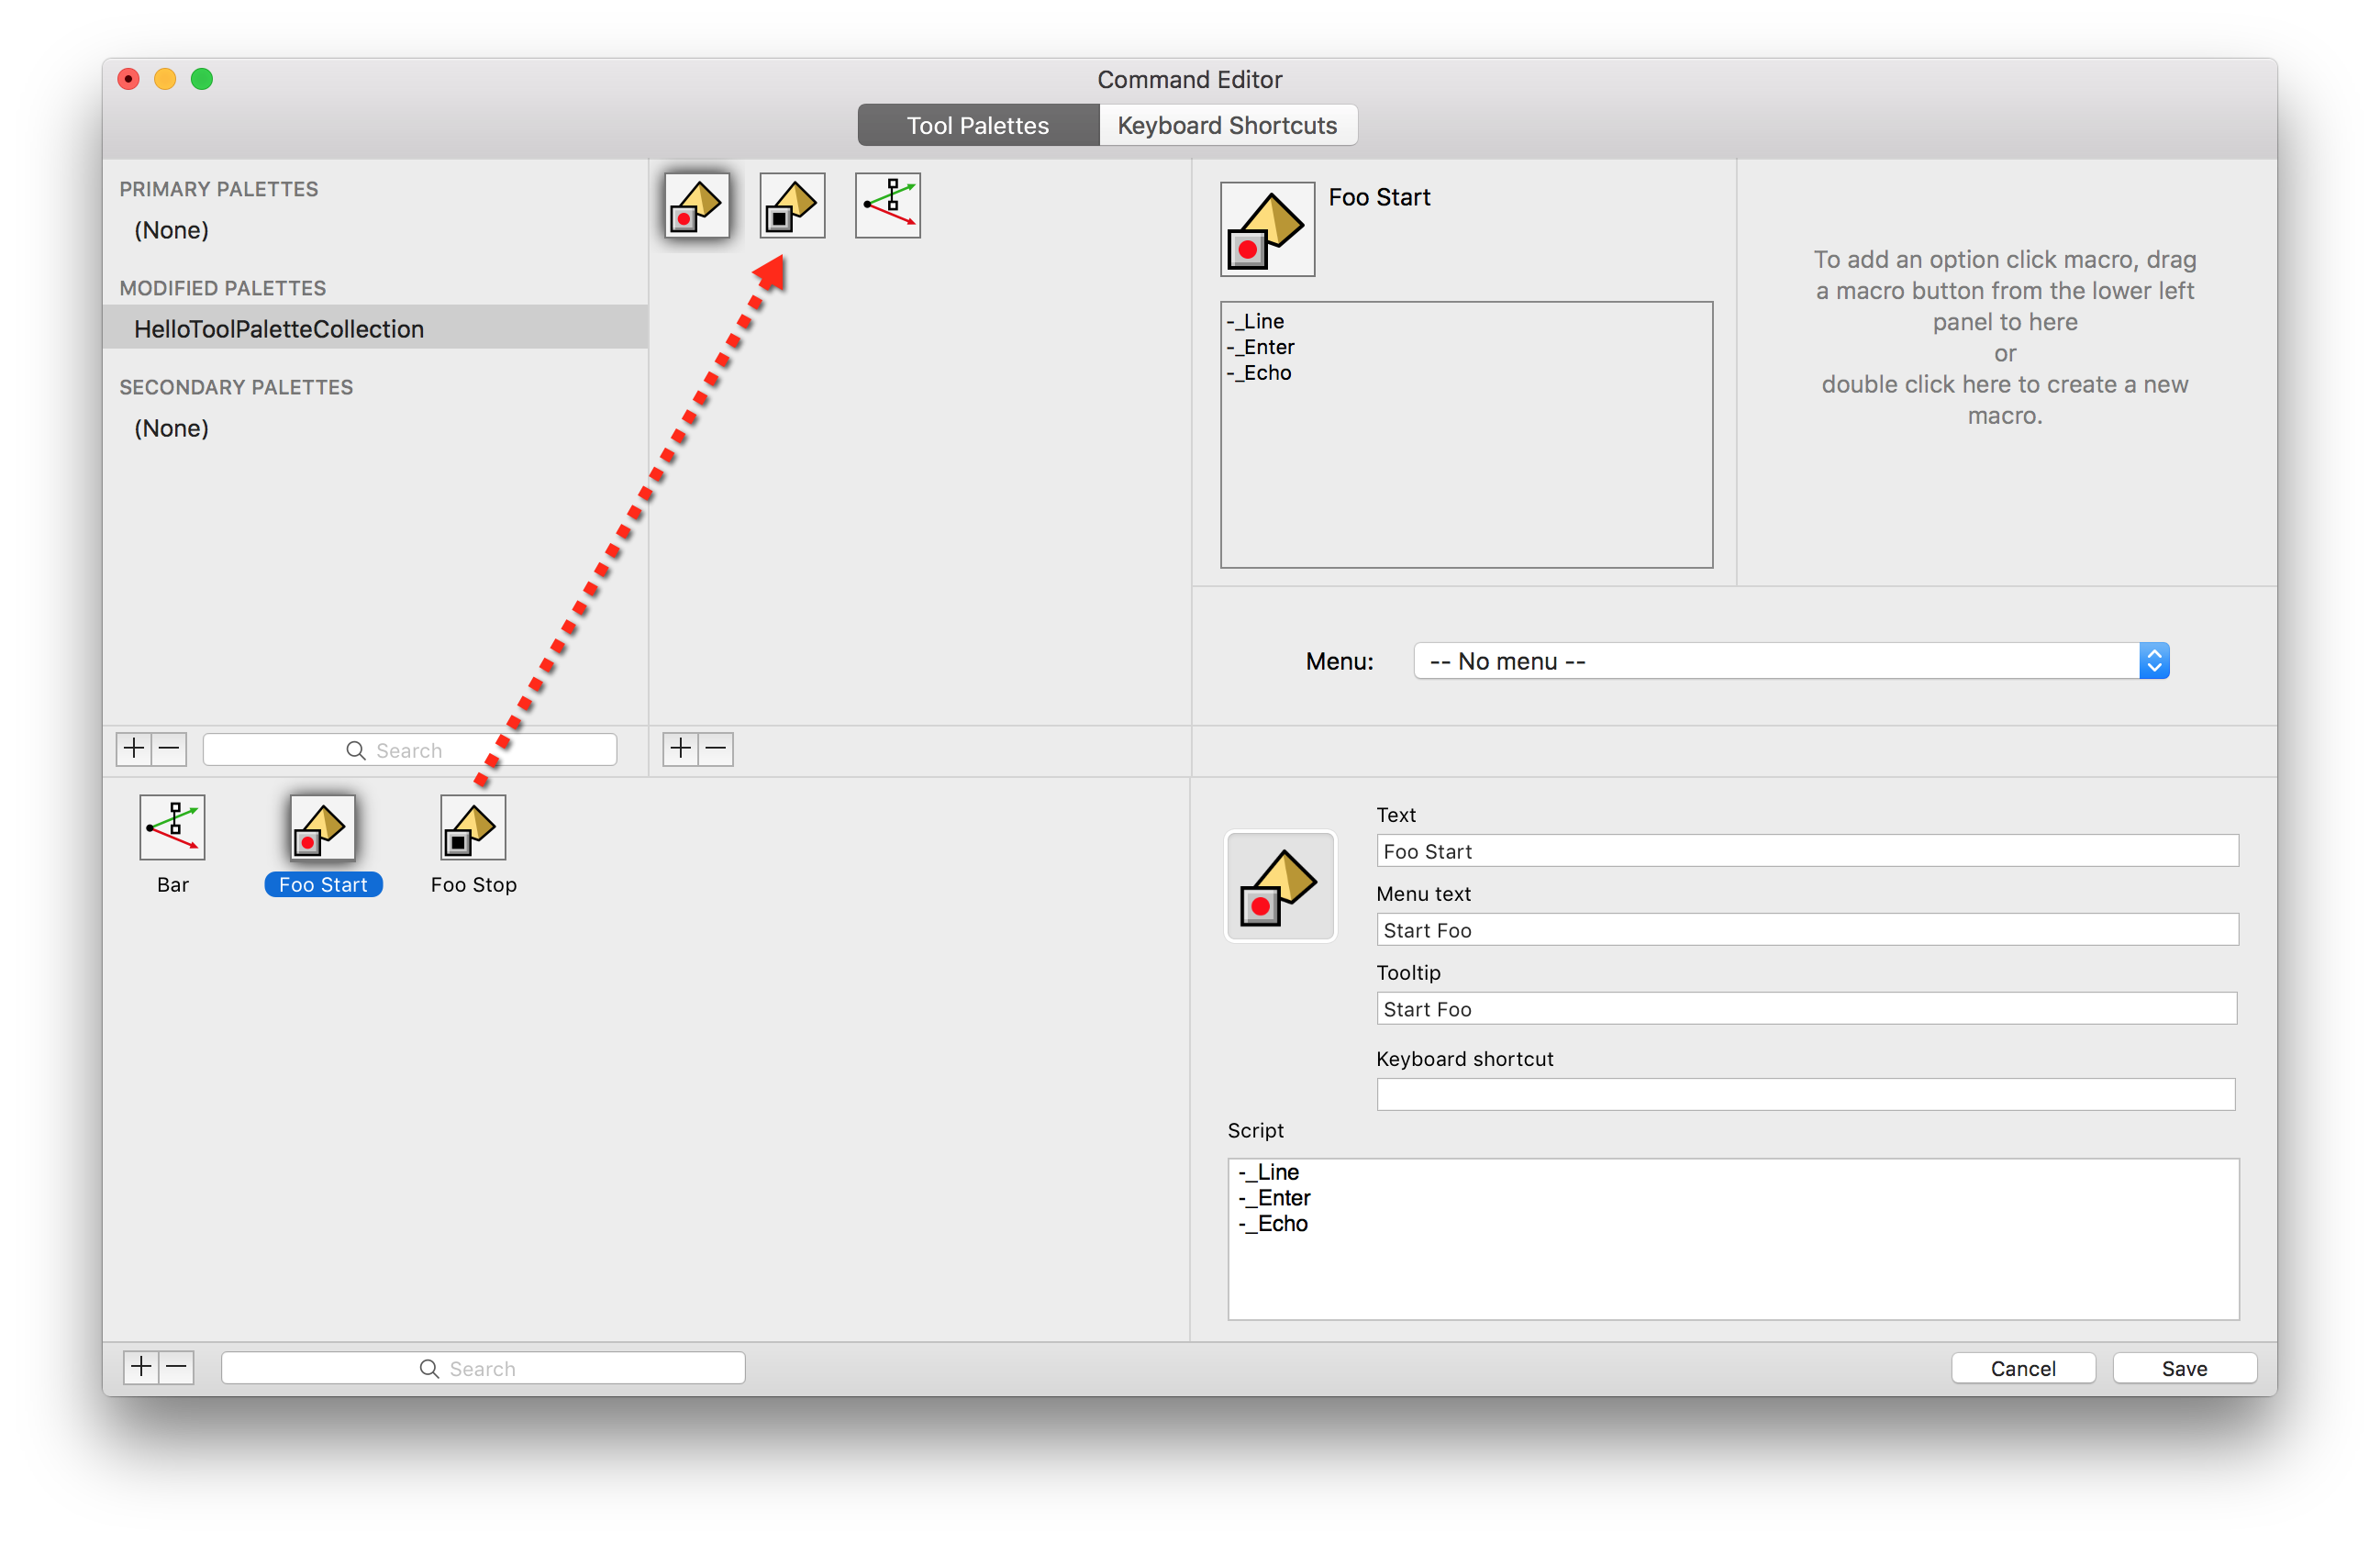
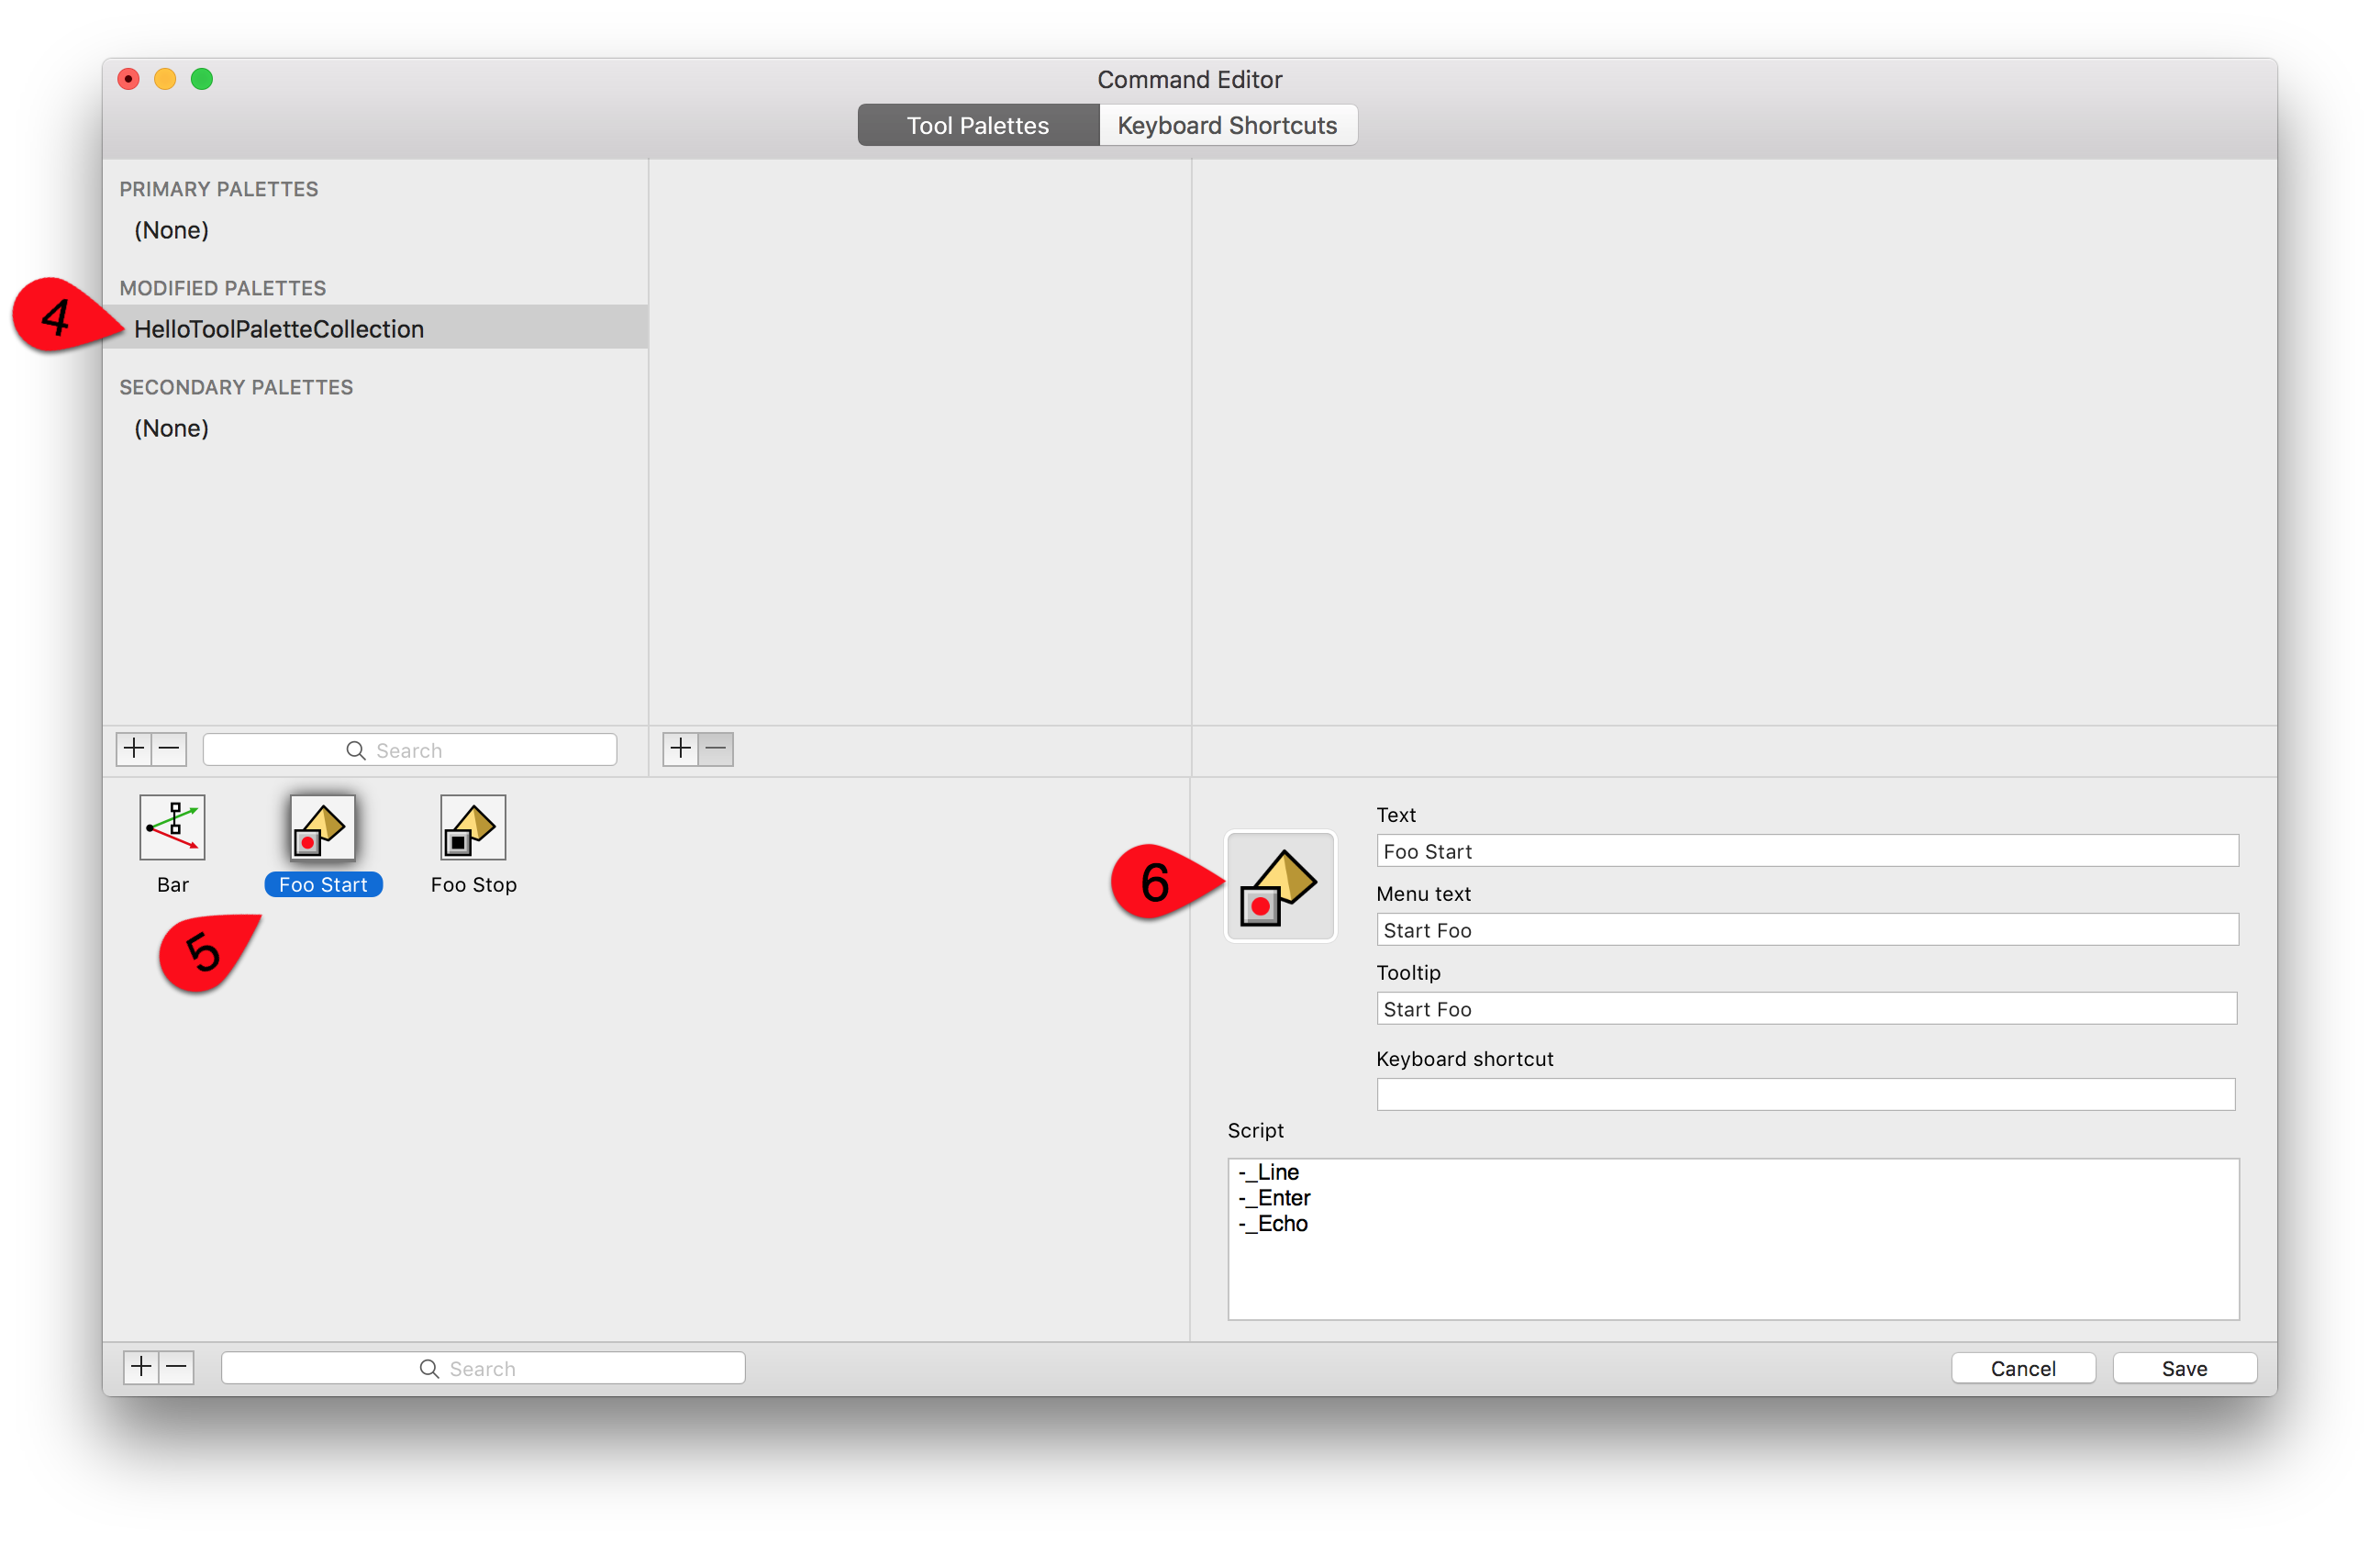
- Press the + (add) button in the Palette Browser…
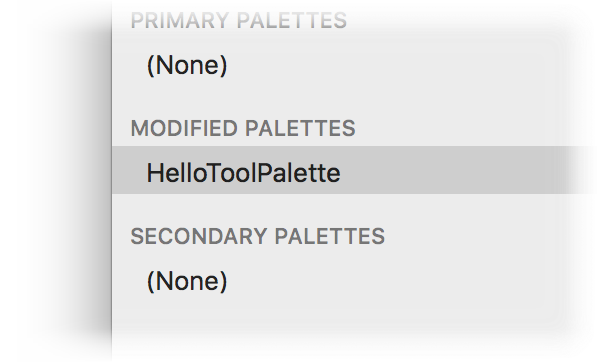
- An Untitled tool palette appears in the Palette Browser (upper left). Click on the name of the Untitled palette and give your tool palette a name…
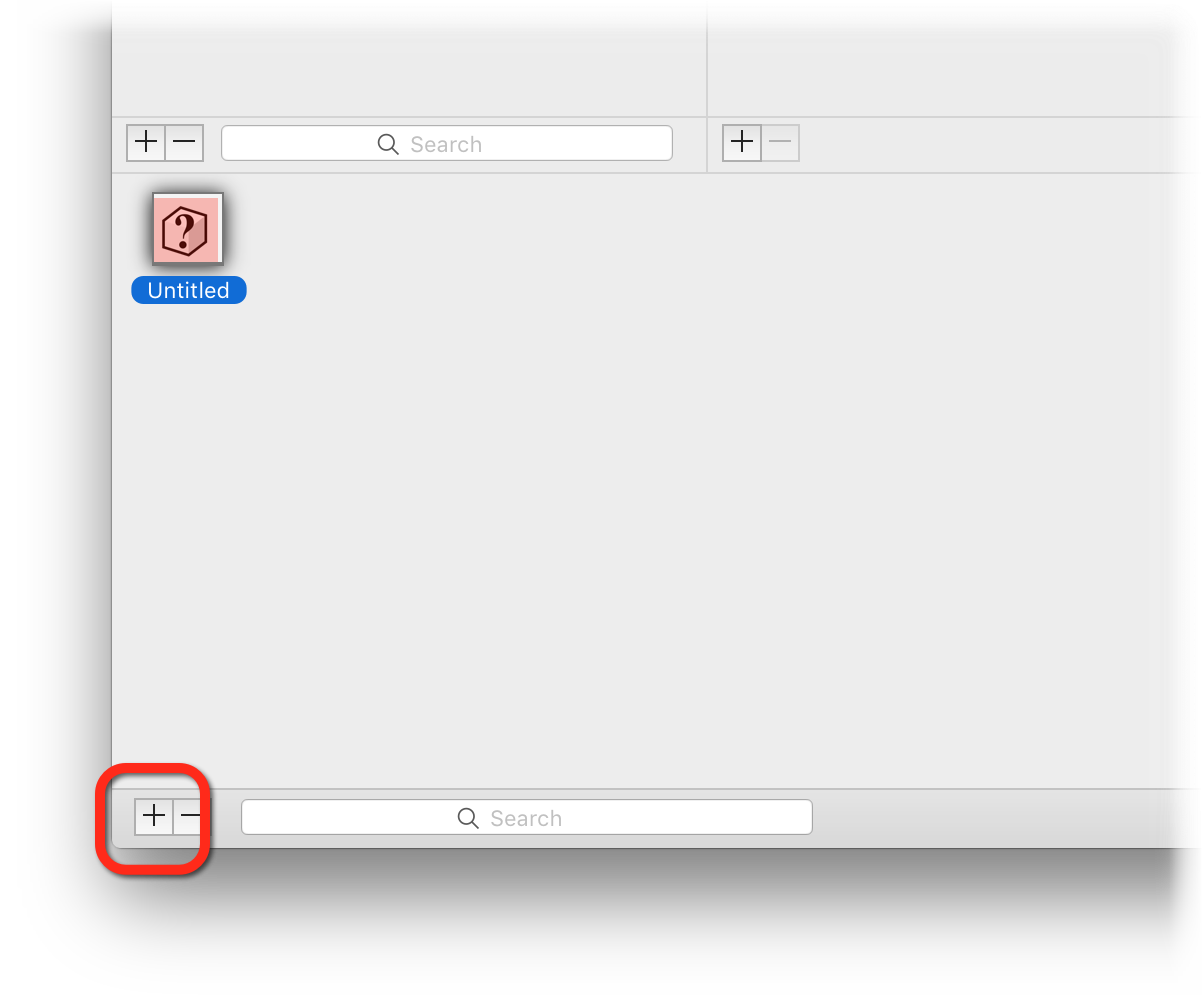
- In the Command Button Browser (the area in the lower-left corner), click the + button to add a new button. An Untitled button should appear. Select it.
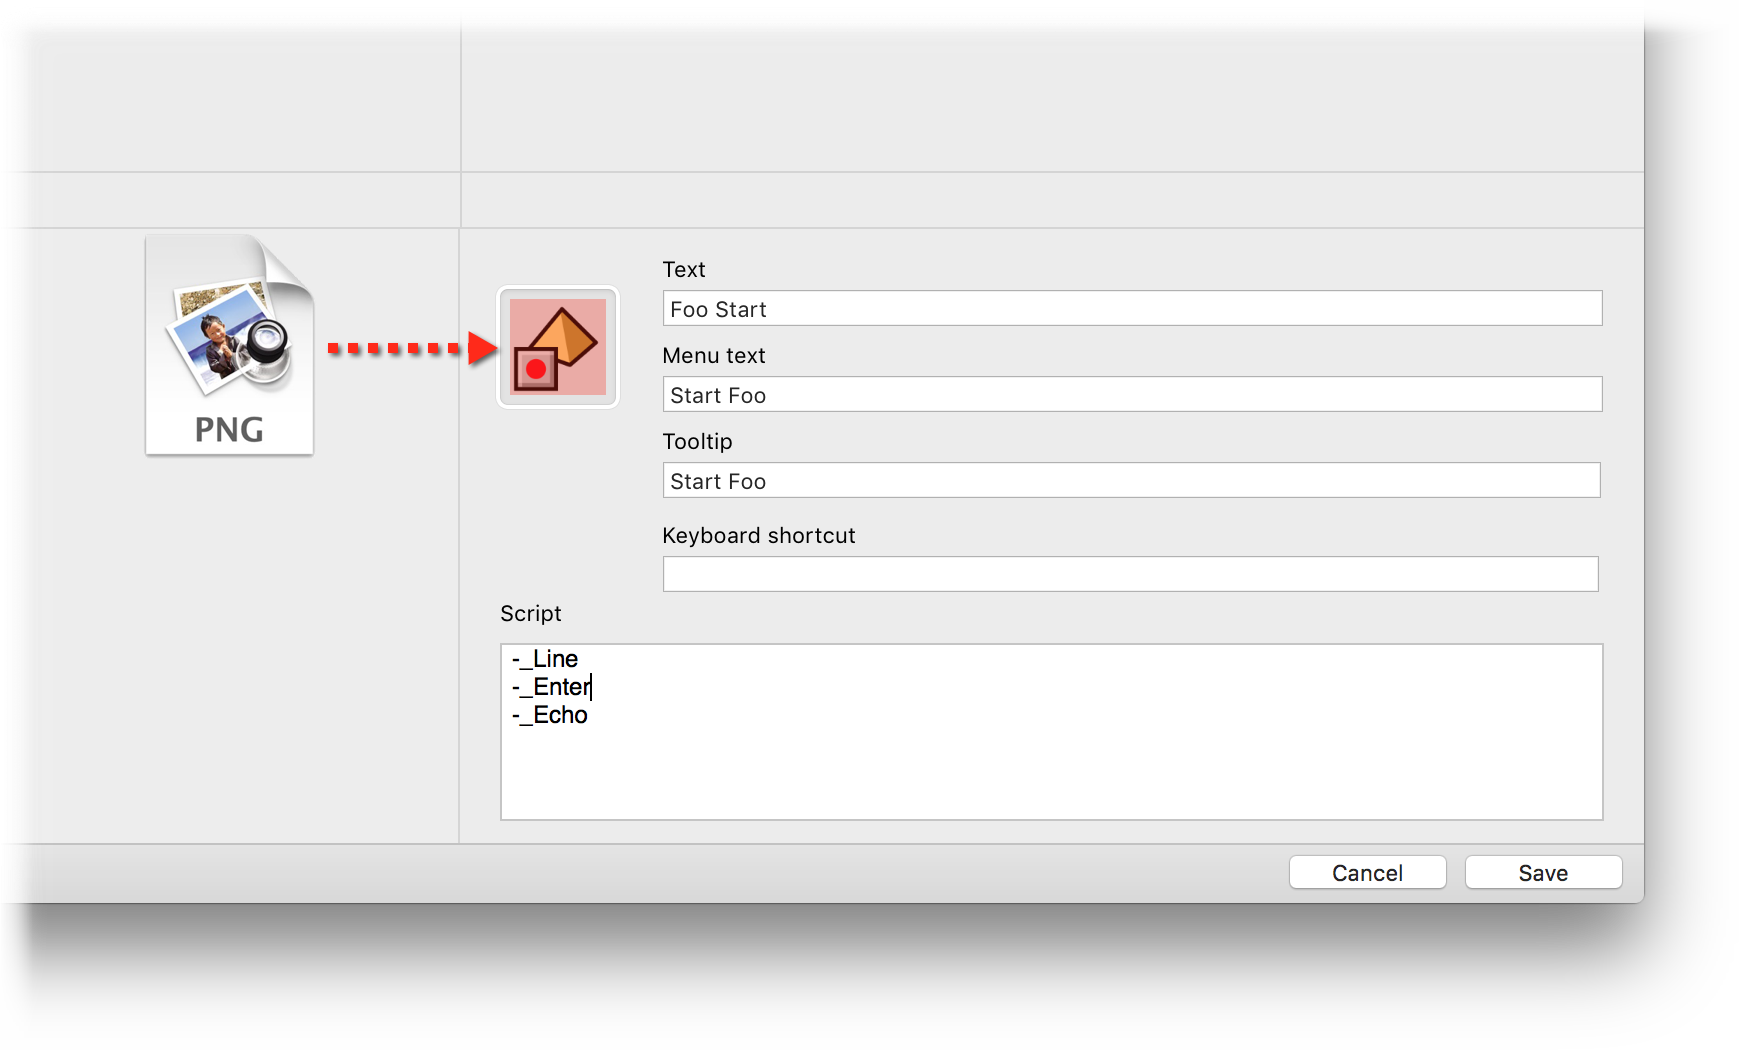
- In the Button Editor (area at lower-right), you can configure your button. Add a Text title, some Menu text, some informative tooltip, and - most importantly - the macro or command (from your plugin) that you wish to run when this button is clicked.
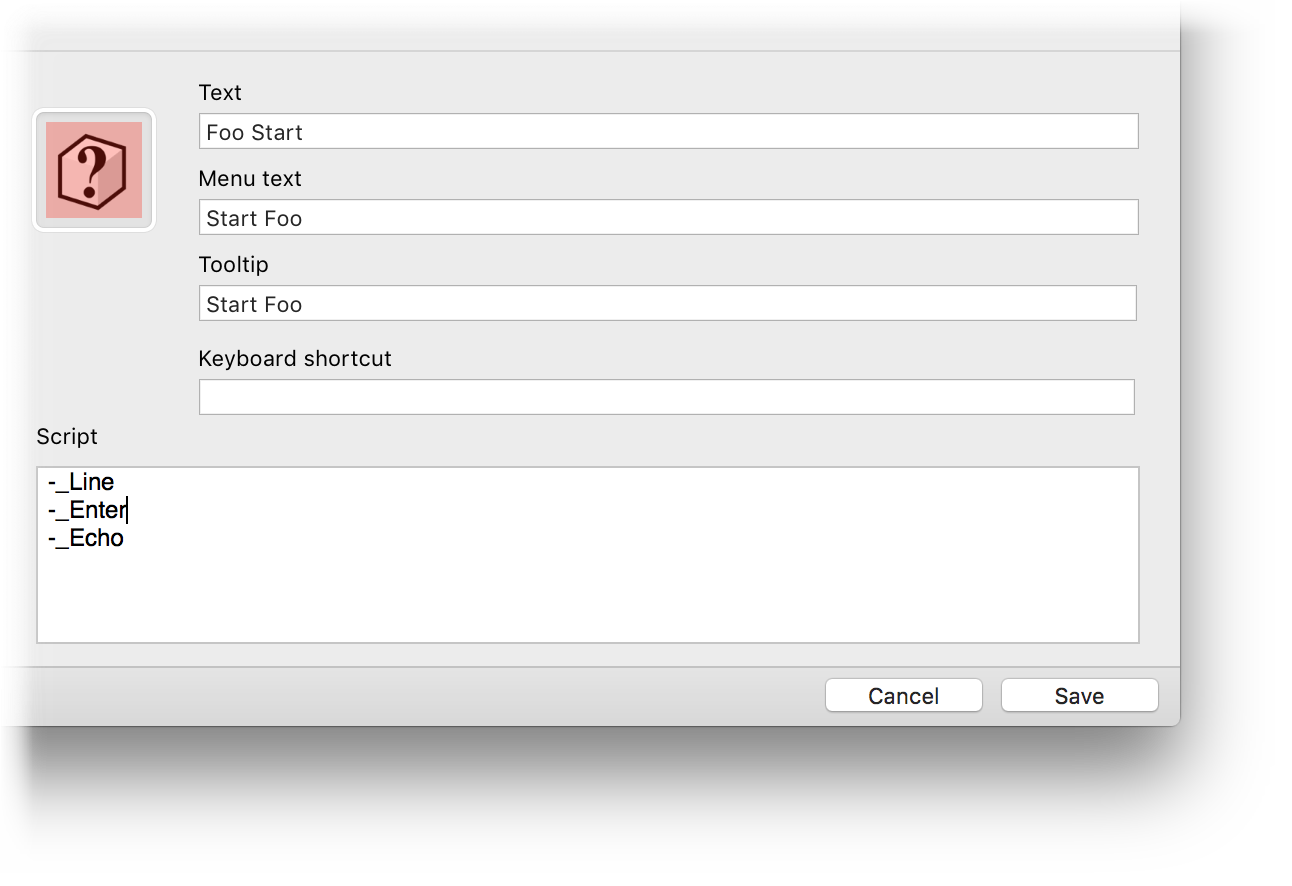
- You can drag new images onto the button icon displayed in the Button Editor. Rhino for Mac prefers PDF icons as they will scale nicely between Retina and non-Retina displays. If you do not have PDF assets for your icons, use 64 x 64 png images.
- You may add as many buttons as you need to the Command Button Browser. These are the buttons that can be added to Tool Palettes.
- With the tool palette you want to add buttons to, drag buttons from the Command Button Browser into the Palette Contents area (top, center)…
- When you are satisfied with the contents of your tool palette(s), you can save your converted tool palette collection to a plist by clicking on the Save button in the lower-right corner of the Command Editor window.
- NOTE: Should you want to make changes to this tool palette collection, you can always reload the tool palette collection by re-running the
TestEditToolPaletteCollectioncommand and opening the plist file you created. In order to add a menu to a tool palette button you must save and reload the tool palette in order for the menu to show up in the available menus.
Convert RUI to plist
- Open Rhino - if it is not already open - and start a new modeling window.
- Enter the
TestEditToolPaletteCollectioncommand. (You will need to type the entire command; it will not autocomplete). This launches a developer tool similar to the Command Editor where tool palette collections can be created, organized, and saved to plist files… - By default, the
TestEditToolPaletteCollectioneditor presumes you have a Rhino for Windows rui file you would like to convert. A finder window opens where you can navigate to the rui file to import. Navigate to the folder containing your rui, select it, click Open. Rhino for Mac imports this rui and uses it as a template. - The contents of your rui should appear. Notice that there is a Modified Tool Palette with the name of your toolbar(s)…
- The buttons with their associated icons should appear in the Command Button Browser (the area in the lower-left corner). If you select buttons in this area, you will notice their editable details appear in the Button Editor (area at lower-right).
- You can drag new images onto the button icon displayed in the Button Editor. Rhino for Mac prefers PDF icons as they will scale nicely between Retina and non-Retina displays. If you do not have PDF assets for your icons, use 64 x 64 png images.
- With the tool palette you want to add buttons to, drag buttons from the Command Button Browser into the Palette Contents area (top, center)…
- When you are satisfied with the contents of your tool palette(s), you can save your converted tool palette collection to a plist by clicking on the Save button in the lower-right corner of the Command Editor window.
- NOTE: Should you want to make changes to this tool palette collection, you can always reload the tool palette collection by re-running the
TestEditToolPaletteCollectioncommand and opening the plist file you created. In order to add a menu to a tool palette button you must save and reload the tool palette in order for the menu to show up in the available menus.
Add the Palette to your Project
Now that you have Tool Palette Collection plist, you need to add it to your plugin as a resource. The best practice is to create a folder within your project called Resources (or similar) and move your Tool Palette Collection plist into to that folder. NOTE: You are free to place your plist anywhere you think appropriate.
- Open Visual Studio for Mac if you have not done so already and open your plugin project.
- Right-click your plugin project in the Solution Explorer and select Add > New Folder…
- Name this folder Resources (or similar).
- Right-click the new Resources folder in the Solution Explorer and select Add > Add Files….
- Navigate to the plist you saved and add it to the plugin project Resources folder. When prompted, Move the plist to the plugin Resources project folder.
- Select your ToolPaletteCollection.plist in Solution Explorer and open the Properties panel.
- In the Build section of Properties, in the Copy the output directory entry, select Copy if newer.
Load the Tool Palette
- In order to load the tool palette, you must reference RhinoMac.dll and Rhino.UI.dll. In Visual Studio for Mac, right-click on the project entry in the Solution Explorer and select Tools > Edit File. This opens up the csproj file for your project as xml text in the code editor.
- Find the area of the xml near where RhinoCommon is being referenced and add the following entries:
<Reference Include="Rhino.UI">
  <HintPath>\Applications\Rhinoceros.app\Contents\Frameworks\RhCore.framework\Versions\Current\Resources\Rhino.UI.dll</HintPath>
  <Private>False</Private>
</Reference>
<Reference Include="RhinoMac">
  <HintPath>\Applications\Rhinoceros.app\Contents\Frameworks\RhCore.framework\Versions\Current\Resources\RhinoMac.dll</HintPath>
  <Private>False</Private>
</Reference>
- Close the csproj that is open in the code editor. Visual Studio for Mac reloads the project. If you check in the References section of your project in the Solution Explorer, you should see references to RhinoMac and Rhino.UI.
- In your
Pluginclass, if you have not done so already, override theOnLoadmethod. - Load your tool palette plist from your desired location by calling the
RhinoMac.Runtime.MacPlatformService.LoadToolPaletteCollectionand passing in the full path to your plist. For example, if your plist is in the Resources folder of your rhp, use the following example:
protected override Rhino.PlugIns.LoadReturnCode OnLoad (ref string errorMessage)
{
  var pluginPath = System.IO.Path.GetDirectoryName(Assembly.Location);
  var resourcesPath = System.IO.Path.Combine (pluginPath, "Resources");
  var plistPath = System.IO.Path.Combine (resourcesPath, "ToolPalette.plist");
  bool didLoad = RhinoMac.Runtime.MacPlatformService.LoadToolPaletteCollection (plistPath);
  if (!didLoad)
    System.Diagnostics.Debug.WriteLine("WARNING: Failed to load tool palette.");

  return base.OnLoad (ref errorMessage);
}
Your tool palette collection will be loaded and displayed when Rhino loads your plugin.
