
Overview
We present a sample solution that uses Platform Invoke (PInvoke), which allows .NET code to call functions that are implemented in a C/C++ DLL (Windows) or dylib (macOS). It is important to understand that the main utility of this advanced approach is in the ability to call the same C/C++ code on both platforms from .NET.
First, we will build a simple C/C++ library that adds two numbers together. After that, we will examine the wrapping .NET code required to call into our library from a RhinoCommon plugin on both Windows and Mac.
Prerequisites
This guide does not presume you are a C/C++ or .NET expert, but assumes you have a functional working knowledge of both. This is an advanced guide; that said, the intent of this guide is to illustrate basic considerations of wrapping a C/C++ library and the logistical issues calling it from a RhinoCommon plugin on both Windows and Mac.
We will be analyzing a sample solution called SampleNativeLibrary. Please clone or download this repository. SampleNativeLibrary builds against the RhinoWIP (on Windows) and Rhino 5 for Mac (on macOS). (On Windows, it is possible to use Rhino 6, but you will have to change the RhinoCommon references).
It is presumed you already have all the necessary tools installed and are ready to go. If you are not there yet, see both Installing Tools (Windows) and Installing Tools (Mac). It is also helpful to have read and understood Your First Plugin (Windows) and Your First Plugin (Mac).
WARNING
Other methods to create a .NET binding to a C# library exist. A notorious one is based on the compilation of the C++ library with the C++/CLI compiler. To keep things compatible with the Apple macOS, and because the IJW (it just works) technology sometimes does not, we suggest the use of PInvoke.
SampleLibrary
Let’s begin by taking a look at an absurdly simple C/C++ “library” - SampleLibrary - that does one thing: add two numbers together. We’ll start on Windows, but it really doesn’t matter if you start on a macOS, nearly everything that follows applies on each platform…
Windows
-
Open SampleNativeLibrary.sln in Visual Studio.
-
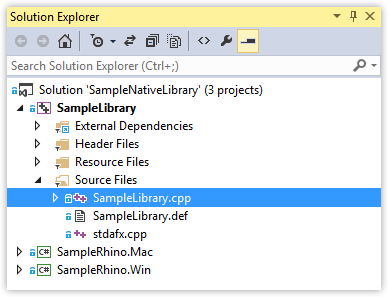
In the Solution Explorer, you will notice there are three projects…two C# (.csproj) projects and one C++ project. Expand the SampleLibrary C++ project…
-
The SampleLibrary (.vcxproj) is just a boilerplate C++ project (created using the regular Shared MFC C++ project wizard) that was created by Visual Studio. There is nothing fancy going on here at all; much of the code is not even relevant to this guide.
-
Open the SampleLibrary.cpp file and take a look. Nearly all of the code in this file is auto-generated boilerplate. The only important section to pay attention to is:
 SAMPLELIBRARY_C_FUNCTION
 double Add(int a, double b)
 {
   return a + b;
 }
…even if you are not a C/C++ programmer, this C function should be clear to you.
Addtakes a nativeintand a nativedouble, and returns the sum of the inputs as a nativedouble. Take note of theSAMPLELIBRARY_C_FUNCTIONdecoration above the implementation…we will talk about that in a moment. -
In the Header Files filter, find and open the SampleLibraryInclude.h header file. The first thing to note is that there are two well
#definedsections to this header: one that relates to Windows (#if defined (_WIN32)) and one that relates to Mac (#if defined(__APPLE__)). The code in these #defines are basically telling the linker to export functions in a specific way. The reason they are different on each platform is that Dynamic Link Libraries (DLLs) are implemented differently in Windows and macOS - each platform has a unique way of telling the linker what to do with the library. How this works is not really important at this juncture, just know that these MACROs tell the linker to export the functions. More importantly… -
Take a look at the function declaration at the bottom of the file:
 SAMPLELIBRARY_C_FUNCTION
 double Add(int a, double b);
…is decorated with the same
SAMPLELIBRARY_C_FUNCTION. -
This is the decoration that tells the linker to make the function available to outside callers. By decorating with this macro, the linker adds information to the DLL that makes these functions public. Without this decoration, these functions would not be available outside the the assembly (.dll or .dylib). By providing this decoration, we are doing the .NET equivalent of making them “public”.
-
Do a “sanity check” and Build SampleLibrary to make sure that all your tools are working as expected. SampleLibrary should build without errors as the native SampleLibrary.dll in the project /bin folder. Ok, now that we know roughly what is in the native SampleLibrary on Windows, let’s take a look at it on macOS…
Mac
- Launch Xcode and open SampleLibrary.xcodeproj. (Unlike Visual Studio on Windows, on macOS, we cannot do all of our development in a single IDE, but we have to build our native C/C++ SampleLibrary using the native Apple Tools - Xcode and xcodebuild).
- In the Project Navigator, notice that this project is referencing the exact same source code as its Windows counterpart…
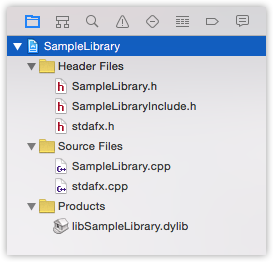
- Instead of building a .dll, on macOS we are building libSampleLibrary.dylib which - despite the extension - amounts to exactly the same thing as a dll. For all intents and purposes, SampleLibrary does exactly the same thing on macOS that it does on Windows and the source is the same.
- Build SampleLibrary using Xcode to make sure that it builds successfully.
- Quit Xcode. On macOS, we are actually going to use command line
xcodebuildfrom Visual Studio for Mac to build our native library, but we’ll talk about that below.
Now that we have examined the simple native SampleLibrary, let’s turn our attention to the .NET portion of our wrapping code…
SampleNativeLibrary
SampleNativeLibrary is the .NET project that calls into the SampleLibrary. On each platform, we are using the exact same wrapping source code, just using cloned .csproj projects on each platform.
Let’s take a look at SampleNativeLibrary on Windows using Visual Studio first…
Windows
-
If you have not done so already, open the SampleNativeLibrary.sln in Visual Studio.
-
If you have not done so already, build SampleLibrary. Verify that SampleLibrary.dll is present in your /bin folder.
-
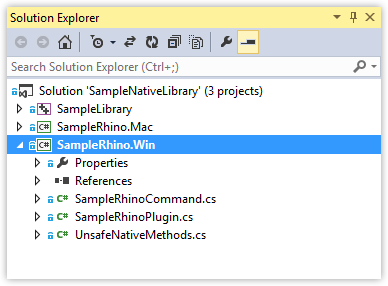
Now, let’s turn our attention to the SampleRhino.Win project. Make sure that SampleRhino.Win is set as the Startup Project and expand it so you can see the source files…
-
Before we do anything, let’s build and test the plugin. Build SampleRhino.Win.
-
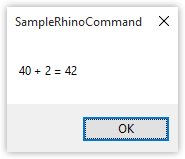
Load the SampleRhino.rhp in Rhino and run the SampleRhinoCommand. You will be prompted to enter two numbers. Once you have done that you should see the result in a dialog box…
-
The “additional” calculation for this command was all performed in the native C/C++ SampleLibrary.dll. Return to Visual Studio. Let’s take a look at how the
Addfunction is being called. -
Open SampleRhinoCommand.cs and find the
RunCommandmethod. After prompting the user to enter two numbers, we see the following codevar result = RhinoMath.UnsetValue; try { result = UnsafeNativeMethods.Add(first, second); } catch (Exception ex) { RhinoApp.WriteLine(ex.Message); return Result.Failure; } -
The
Add(first, second)method is being called on theUnsafeNativeMethodsclass. Open UnsafeNativeMethods.cs. Let’s go through this class line-by-line. -
The necessary functionality to use PInvoke is contained in the
System.Runtime.InteropServicesnamespace, specifically theDllImportfunction. -
UnsafeNativeMethods.cs contains the class:
 internal static class Import
 {
   public const string lib = "SampleLibrary.dll";
 }
…which declares a
libstring member. On Windows, it is necessary to explicitly state the name of the native dll being called (on macOS, a .dll.config file is used to point to a .dylib - see below). -
The
UnsafeNativeMethodsclass itself contains a single function…internal static extern double Add(int a, double b);…does this look familiar?
-
The
Addfunction is decorated with an Attribute:[DllImport(Import.lib, CallingConvention = CallingConvention.Cdecl)]…this important bit of metadata tells the runtime to look in the native library and call the associated function with a specific language (C) calling convention when the
Addmethod is called from .NET. This is the point at which the link between the managed .NET code and the unmanaged C/C++ code is established. -
Since we are bridging the world of managed and unmanaged code, we need to be very careful about the types of variables we are using. To illustrate this point, let’s change the code and see what happens…
-
In UnsafeNativeMethods change the function declaration of
Addto acceptdoubles (instead ofints) as the first argument…internal static extern double Add(double a, double b); -
Build the plugin. No errors or warnings, right? Now run the plugin and test the SampleRhinoCommand with this change. Try adding 2 + 2. What happens? 2 + 2 no longer equals 4. That’s bad (hopefully, Rhino did not crash). The compiler did not detect the error we introduced. Change the type of argument
aback to anint, rather than adoubleand save the file. -
You must ensure that the function in .NET exactly matches the function declaration in the header file made in the unmanaged code (in this case, in SampleLibraryInclude.h). Managing these correspondences is challenging with all but the most trivial libraries. In Using methodgen, we will discuss a way of generating these function signatures using a utility program we wrote to maintain RhinoCommon. Before we do that, let’s turn our attention to…
Mac
-
If you have not done so already, open the SampleNativeLibrary.sln in Visual Studio for Mac.
-
The native SampleLibrary project cannot be built from Visual Studio for Mac. As mentioned above, Visual Studio for Mac is a .NET only IDE; it cannot build C/C++ projects like Visual Studio. (We will work around this limitation in a moment).
-
First, let’s turn our attention to the SampleRhino.Mac project. Make sure that SampleRhino.Mac is set as the Startup Project and expand it so you can see the source files…

-
Just as with SampleLibrary, SampleRhino is exactly the same source on both platform: the platform-specific .csproj files are referencing exactly the same .cs files.
-
Build, run, and test SampleRhinoCommand in Rhino for Mac. Everything should work as expected. No surprises here…all the code is the same (if you skipped the Windows section above, read it now; all of it applies on macOS).
-
There is one critical difference between how the Windows and macOS wrapping works and it has little to do with code. As we saw above, UnsafeNativeMethods.cs contains the class:
 internal static class Import
 {
   public const string lib = "SampleLibrary.dll";
 }
…which declares a
libstring member. On Windows, it was necessary to explicitly state the name of the native dll being called. On macOS, this works a little differently. In order to understand what is different, let’s look at how SampleLibrary.dll gets built on macOS… -
In the SampleLibrary (Mac) section above, we built SampleLibrary using Xcode. We mentioned in passing that we could build this using
xcodebuildcommand line from Visual Studio for Mac. Let’s take a look. -
In the Solution Explorer, double-click the name of the SampleRhino.Mac project to bring up the Project Options dialog. Navigate to the Build > Custom Commands section…
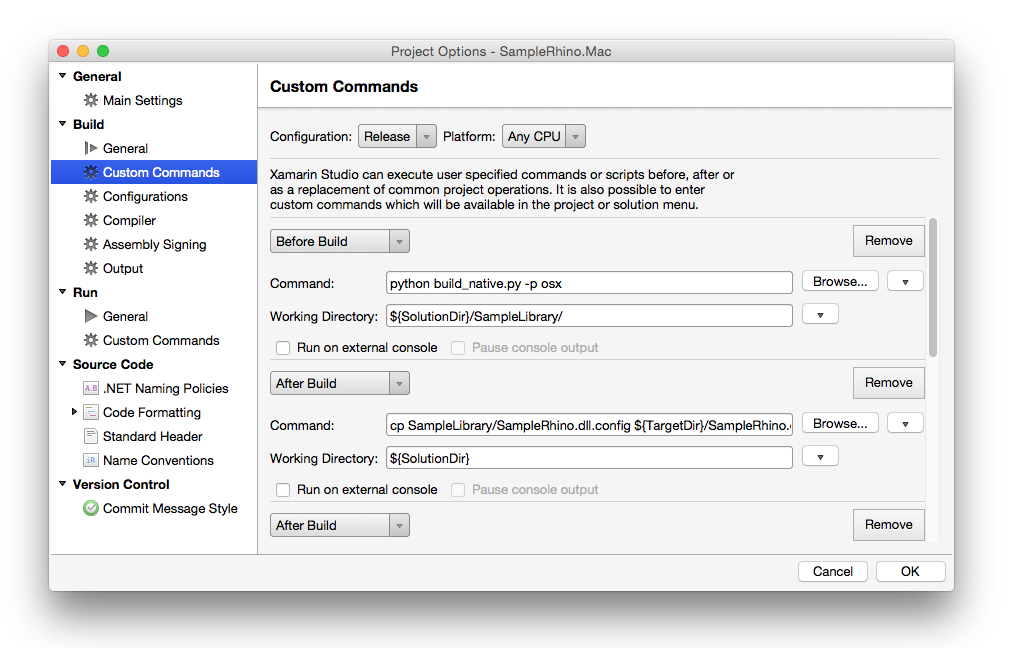
-
There are 5 Custom Commands:
-
Before Build: This before build steps runs a python script called build_native.py that uses
xcodebuildto build the SampleLibrary.xcodeproj, which builds libSampleLibrary.dylib. -
After Build 1: This after build step copies the SampleLibrary.dll.config file from the /SampleLibrary folder to the target folder. SampleLibrary.dll.config creates a mapping between calls to SampleLibrary.dll and libSampleLibrary.dylib…
 <configuration>
    <dllmap dll=“SampleLibrary.dll” target="libSampleLibrary.dylib" />
 </configuration>
On macOS, both the .dll.config file and the .dylib must be in the same folder as the calling .NET dll.
-
After Build 2: This after build step copies libSampleLibrary.dylib to the same folder as the calling .NET dll.
-
After Clean 1: This after build step deletes the libSampleLibrary.dylib when a clean is performed.
-
After Clean 1: This after build step deletes the SampleLibrary.dll.config when a clean is performed.
-
-
When you Build and run SampleRhino.Mac you can watch the build steps in the output (right) side of the Errors panel. You may notice that build_native.py will only build libSampleLibrary.dylib if it does not find a previous version. You can overwrite this with the
-o --overwritecommand argument if you want to build the native library every time you build the .NET wrapping dll.
Next Steps
You have seen how a basic C/C++ library can be wrapped and called from .NET in a Rhino Plugin. You have also seen what can go wrong when a native method’s export declaration is out-of-sync with its .NET counterpart. Now what?
Check out the Using methodgen guide for instructions on programmatically generating UnsafeNativeMethods export declarations.
