
It is presumed you already have the necessary tools installed and are ready to go. If you are not there yet, see Installing Tools (Windows).
Barebones plugin
We will use the RhinoCommon Plugin for Rhino 3D (C#) project template to create a new general purpose plugin. The project template generates the code for a functioning plugin. Follow these steps to build the plugin.
Plugin Template
-
Launch Visual Studio and navigate to File > New > Project….
-
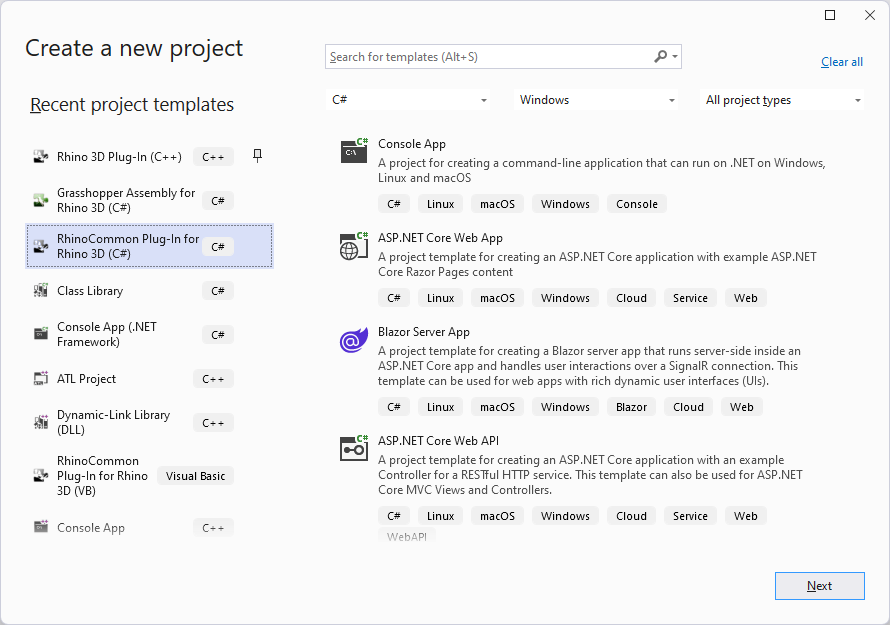
From the Create a new project dialog, select the RhinoCommon Plugin for Rhino 3D (C#) template from the list of installed templates and click Next.
-
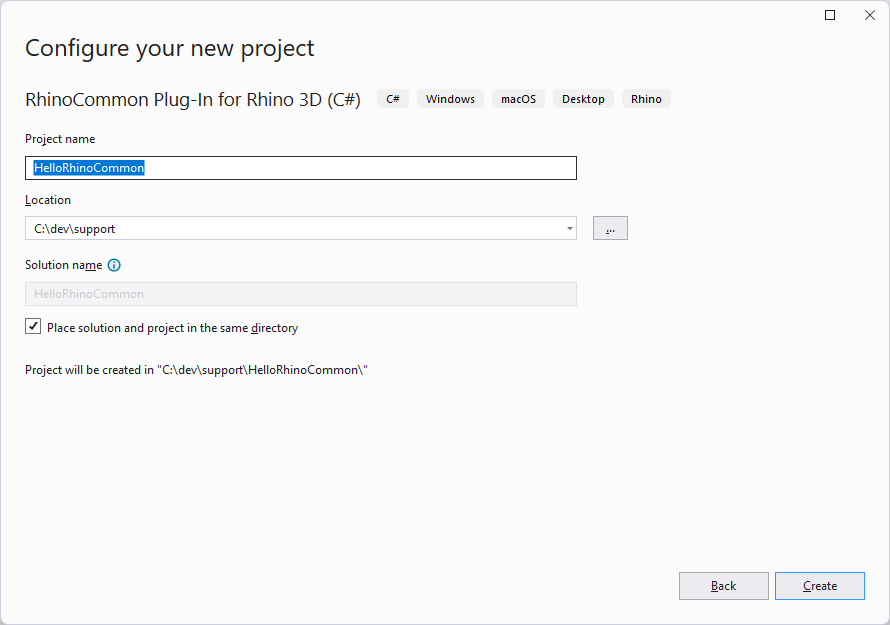
Type the project name as shown below. You can enter a different name if you want. The template uses the project name when it creates files and classes. If you enter a different name, your files and classes will have a name different from that of the files and classes mentioned in this tutorial. Don’t forget to choose a location to store the project. When finished, click Create.
-
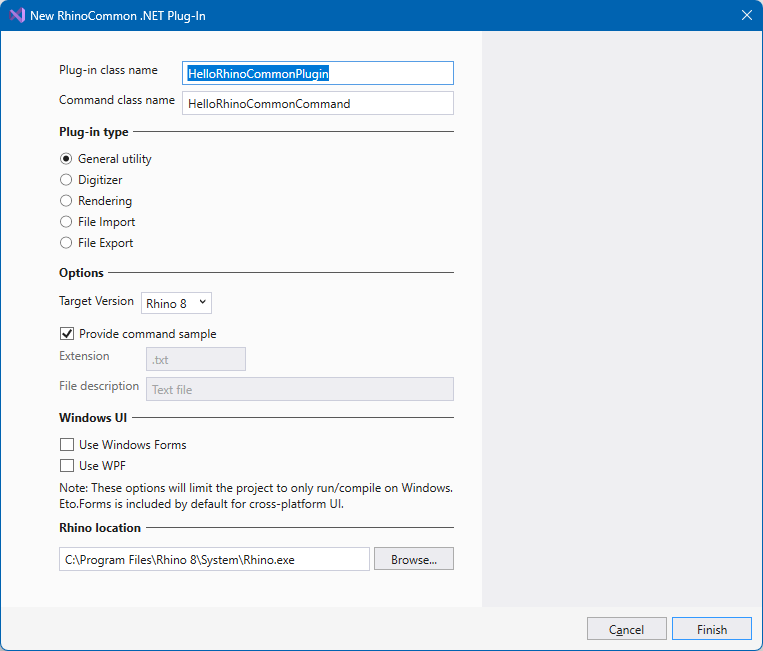
Upon clicking Create, the New Rhino C# Plugin dialog will appear. By default, the template will create a General Utility plugin.
-
The New RhinoCommon .NET Plugin dialog allows you to modify a number of settings used by the template when generating the plugin source code:
- Plugin name: Modify this field if you want to change the name of the plugin’s class name.
- Command class name:: Modify this field if you want to change the name of the plugin’s initial command class name.
- Plugin type: Select the type of plugin that you want the template to create.
- Minimum Target Version: Select the lowest Rhino version to target.
- Build Yak Package: Toggle true to have Rhino build a Yak package automatically from your project
- Include VS Code launch/tasks json files: Includes
.vscodefolder so the plugin can be debugged in VSCode as well (Very handy for Mac). - Wndows UI: If you are planning on using Windows Forms or WPF for user interface, instead of Eto, then check the approprate box.
-
For this tutorial, just accept the default settings. Click the Finish button, and the template begins to generate your plugin project’s folders, files, and classes. When the template is finished, look through the plugin project using Visual Studio’s Solution Explorer…
Plugin Anatomy
Use the Solution Explorer to expand the Solution (.sln) so that it looks like this.

- HelloRhinoCommon: The plugin project (.csproj), which has the same name as its parent solution. The project that was created for us by the project template we just used.
- Dependencies: Contains references to both the .NET Framework 4.8 and .NET 7.0 assemblies required by the plugin. The project obtains RhinoCommon dependencies via NuGet.
- Properties: Contains the AssemblyInfo.cs source file. This file contains the meta-data, such as author and copyright, that appears in Rhino’s Plugin Manager.
- Embedded Resources: Contains icons, bitmaps, and other non-code resources you want embedded in your plugin.
- HelloRhinoCommonCommand.cs: The initial plugin command, which inherits from
Rhino.Commands.Command. - HelloRhinoCommonPlugin.cs: The plugin class, which inherits from
Rhino.Plugins.Plugin.
Testing
-
From Visual Studio, navigate to Debug > Start Debugging. You can also press F5, or click the Debug button on Visual Studio’s toolbar. This will load Rhino.
-
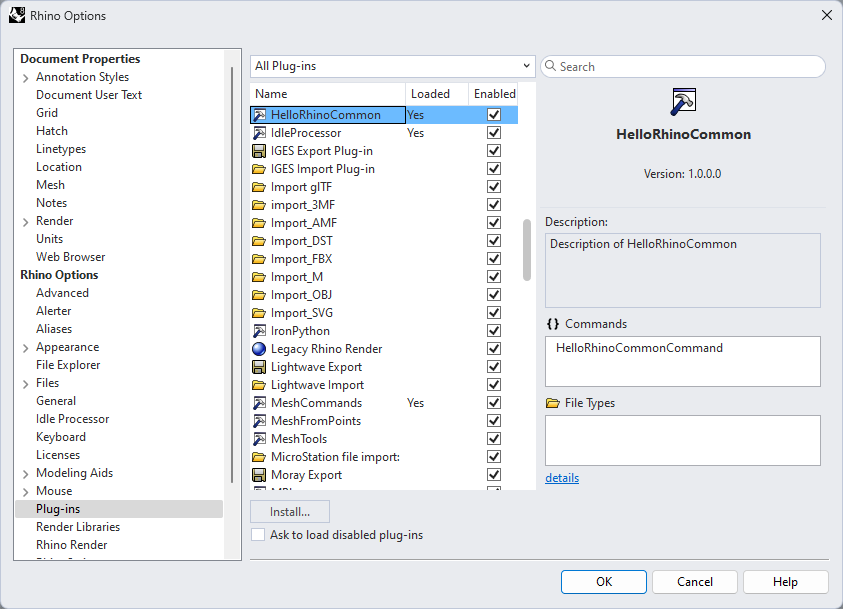
From within Rhino, navigate to Tools > Options. Navigate to the Plugins page under Rhino Options and install your plugin.
-
Once your plugin is loaded, close the options dialog and run your HelloRhinoCommonCommand command.
-
You have finished creating your first plugin!
Adding Additional Commands
Rhino plugins can contain any number of commands. Commands are created by inheriting a new class from Rhino.Commands.Command.
Note, Command classes must return a unique command name. If you try to use a command name that is already in use, then your command will not work.
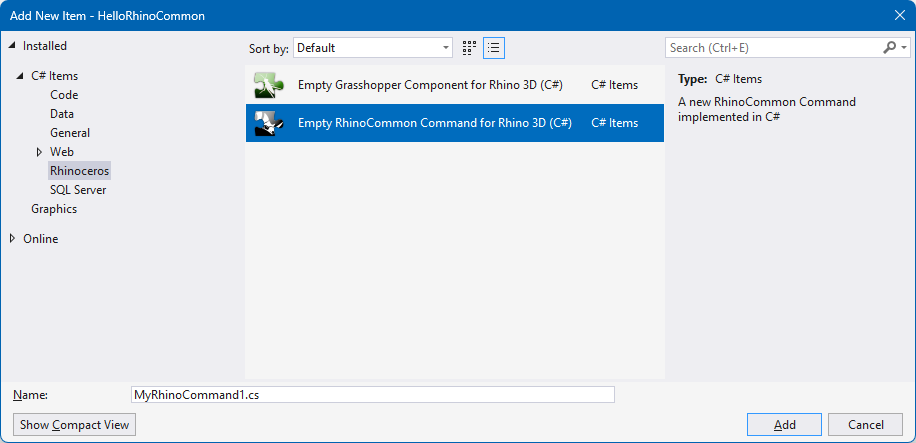
To add a new Rhino command to your plugin project, right-click on the project, in Visual Studio’s Solution Explorer, and click Add > New Item…. From the Add New Item dialog, select Empty RhinoCommon Command for Rhino 3D (C++), specify the name of the command, and click Add.
Example
The following example code demonstrates a simple command class that essentially does nothing:
using Rhino;
using Rhino.Commands;
using Rhino.Geometry;
using Rhino.Input;
using Rhino.Input.Custom;

namespace HelloRhinoCommon
{
  public class HelloRhinoCommonCommand : Command
  {
    public HelloRhinoCommonCommand()
    {
      // Rhino only creates one instance of each command class defined in a
      // plug-in, so it is safe to store a refence in a static property.
      Instance = this;
    }

    ///<summary>The only instance of this command.</summary>
    public static HelloRhinoCommonCommand Instance { get; private set; }

    ///<returns>The command name as it appears on the Rhino command line.</returns>
    public override string EnglishName => "HelloRhinoCommonCommand";

    protected override Result RunCommand(RhinoDoc doc, RunMode mode)
    {
      // TODO: start here modifying the behaviour of your command.
      // ---
      RhinoApp.WriteLine("The {0} command will add a line right now.", EnglishName);

      Point3d pt0;
      using (GetPoint getPointAction = new GetPoint())
      {
        getPointAction.SetCommandPrompt("Please select the start point");
        if (getPointAction.Get() != GetResult.Point)
        {
          RhinoApp.WriteLine("No start point was selected.");
          return getPointAction.CommandResult();
        }
        pt0 = getPointAction.Point();
      }

      Point3d pt1;
      using (GetPoint getPointAction = new GetPoint())
      {
        getPointAction.SetCommandPrompt("Please select the end point");
        getPointAction.SetBasePoint(pt0, true);
        getPointAction.DynamicDraw +=
          (sender, e) => e.Display.DrawLine(pt0, e.CurrentPoint, System.Drawing.Color.DarkRed);
        if (getPointAction.Get() != GetResult.Point)
        {
          RhinoApp.WriteLine("No end point was selected.");
          return getPointAction.CommandResult();
        }
        pt1 = getPointAction.Point();
      }

      doc.Objects.AddLine(pt0, pt1);
      doc.Views.Redraw();
      RhinoApp.WriteLine("The {0} command added one line to the document.", EnglishName);

      // ---
      return Result.Success;
    }
  }
}
Next Steps
If you’d like to push your exciting new plugin to Yak so that everyone can use it, check out the Creating a Yak Package guide.
Try debugging your new plugin on Mac, all plugins using the new templates are now cross-platform by default.
