
Many times it is useful to create a custom component in Grasshopper to bake both geometry and other properties into Rhino in the same component. This guide will cover the varying calls to create these custom components using GhPython.
There are a few different ways to approach baking. This guide set’s up the simplest approach. At the end of this guide is a section on some of the variations possible to fit other bake situations.
For more details any of the concepts in this guide, more details can be found in:
- GHPython editor basics guide
- RhinoScriptSyntax and Python Guide
- RhinoCommon API please refer to the McNeel RhinoCommon Developer site.
Basic GHPython Component
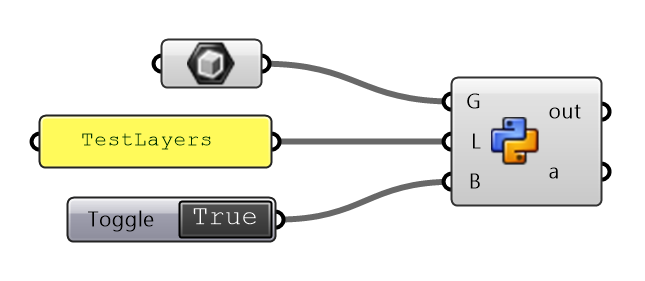
Start with a standard GHPython Component.
Download this sample Gh file here….
In this case we use 3 inputs. Change the names of input and output and the Type hint by right clicking on each input:
G: Geometry to bake (Guid)L: Layer name to bake to (str).B: Activate toggle to bake (bool)
To test this component. the Box Param is the easiest geometry type to use for testing. Add a Layer name using a panel as input. Use a Button or a Switch to toggle True and False.
The Python code
Here is the code for this component. In this case, the geometry is baked to Rhino on the default layer, then through Python we switch the layer to the one input.
"""Provides a scripting component.
    Inputs:
        G: Geometry to bake
        L: Layer name for bake
        B: Bake Activate
    Output:
        a: The a output variable"""

__author__ = "ScottD"
__version__ = "2019.08.10"

import rhinoscriptsyntax as rs
import scriptcontext
import Rhino


if B:

    print(type(G)) #debug message to Python output

    #we obtain the reference in the Rhino doc
    doc_object = scriptcontext.doc.Objects.Find(G)
    print(type(doc_object))

    attributes = doc_object.Attributes
    print('the type of attributes is: ' + str(type(attributes)))     #debug message to Python output

    geometry = doc_object.Geometry
    print('the type of geometry is: ' + str(type(doc_object)))     #debug message to Python output

    #we change the scriptcontext
    scriptcontext.doc = Rhino.RhinoDoc.ActiveDoc

    #we add both the geometry and the attributes to the Rhino doc
    rhino_brep = scriptcontext.doc.Objects.Add(geometry, attributes)
    print('the Rhino doc ID is: ' + str(rhino_brep))     #debug message to Python output

    #we can for example change the layer in Rhino...
    if not rs.IsLayer(L):
        rs.AddLayer(L)
    rs.ObjectLayer(rhino_brep, L)

    #we put back the original Grasshopper document as default
    scriptcontext.doc = ghdoc
    a = G
There are various key lines of code to be understand:
| Line | Description |
|---|---|
| 17 | Standard if statement to activate the bake once the B is set to TRUE. |
| 22 | The doc.Objects.Find method will attempt to take the Object ID and find the actual Rhino Geometry Object. |
| 25 | Split off the object's Attributes. The attributes of an object include such properties as color, layer, linetype, render material, and group membership, amongst others. The Advanced section below covers object attributes some more. |
| 31 | Split off the object's Geometry. Used when baking the object into Rhino. |
| 32 | Grasshopper has its own document. Rhino has its own document also. Make sure the script is talking to the Rhino Document for the following functions. |
| 35 | Add the object to the Rhino document. This is the actual Bake. Take note that if it has been baked previous, there will now be two objects. |
| 39-40 | Check to see if the layer name exists in Rhino. If it does not, then create a new layer with that name. |
| 41 | Change the Rhino object's layer to the requested layer name. |
| 44 | Switch the script context back to the Grasshopper document. |
| 45 | Pass the original component input object to the component output if it is needed in any downstream processes. |
Hopefully this code will serve as a template in taking objects from Grasshopper into Rhino. There are a multitude of variations on this theme. The following section looks at various ways to use more advanced options to better fit the situation.
Advanced Options for Baking
Beyond simply changing an objects layer after adding the new object to Rhino. There are many other properties that can be changed. Here is a discussion of some of the possibilities.
Baking colors materials and other properties
In the sample above using the layername to specify where the object ultimately lands is quite simple. Here are some other properties that may want to be changed:
| Object name | rs.ObjectName(object-id, name) |
| Display color | rs.ObjectColorSource(object_ids, source=None) rs.ObjectColor(object_ids, color=None) |
| Print color | rs.ObjectPrintColorSource(object_ids, source=None) rs.ObjectPrintColor(object_ids, color=None) |
| Unlock object | rs.UnlockObject(object_id) |
| Lock object | rs.LockObject(object_id) |
| Hide object | rs.HideObject(object_id) |
| Set Material | rs.ObjectMaterialSource(object_ids, source=None) rs.ObjectMaterialIndex(object_id, material_index=None) |
Adding Key-Value text to the object
Additional text data can be stored as a Key:Value pair on the Rhino object. THe Keys and Values can be retrieved later in Rhino.
rs.SetUserText(object_id, key, value=None, attach_to_geometry=False)
For more information on RhinoScript User Text help topic.
Changing Object Attributes:
Through the RhinoCommon functions, the attributes of an object can be set. See the Object Attribute Class for more details….
Next Steps
That lays out the basics of the GhPython component. Next is a look into the component Python editor for Grasshopper.
