Rhino Script Editor is designed to utilize the widespread plugin infrastructure in both Rhino and Grasshopper, and generate plugins from your scripts.
Script editor can:
- Convert scripts into Rhino commands and publish as Rhino plugin (
.rhpfile) - Convert scripts into Grasshopper components and publish as Grasshopper plugin (
.ghafile) - Create a Yak package and publish on Rhino package server
It can also:
- Generate toolbar layout files for published Rhino commands (
.ruifile) - Share code libraries and data files with published commands or components
- Generate dotnet project solution for published plugins for furthur customization (
.slnand.csprojfiles)
Create a Project
To create a project:
-
Run
ScriptEditorcommand -
Choose Create Project from main File menu
-
Navigate to where you would like to save the project. Project file will be stored with
.rhprojextension -
Editor displays Edit Project dialog.
This dialog highlights the most important pieces of information about the new project:
- Id: Unique UUID of this project. It should not be changed. See Project Id
- Name: Plugins will be published with this name. See Project Name
- Version: Plugins will be published with this version. See Project Version
- Author: This is required and if there are no authors available, this field will show a No Author error. See Project Authors
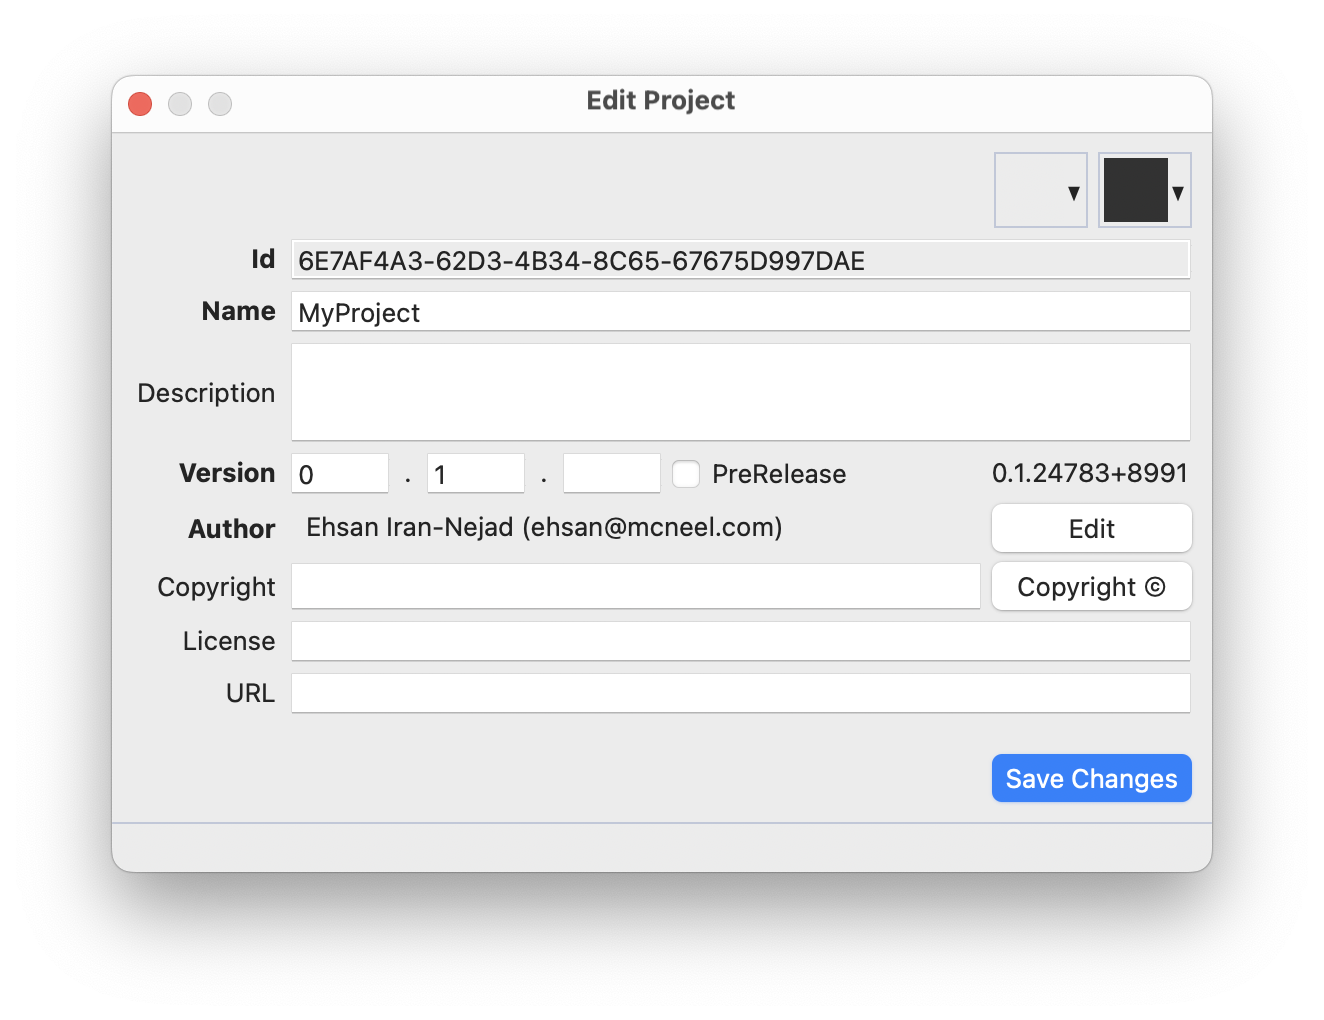
- Choose Save Changes
- Project file is now saved and editor opens the Projects panel on the left browser tray
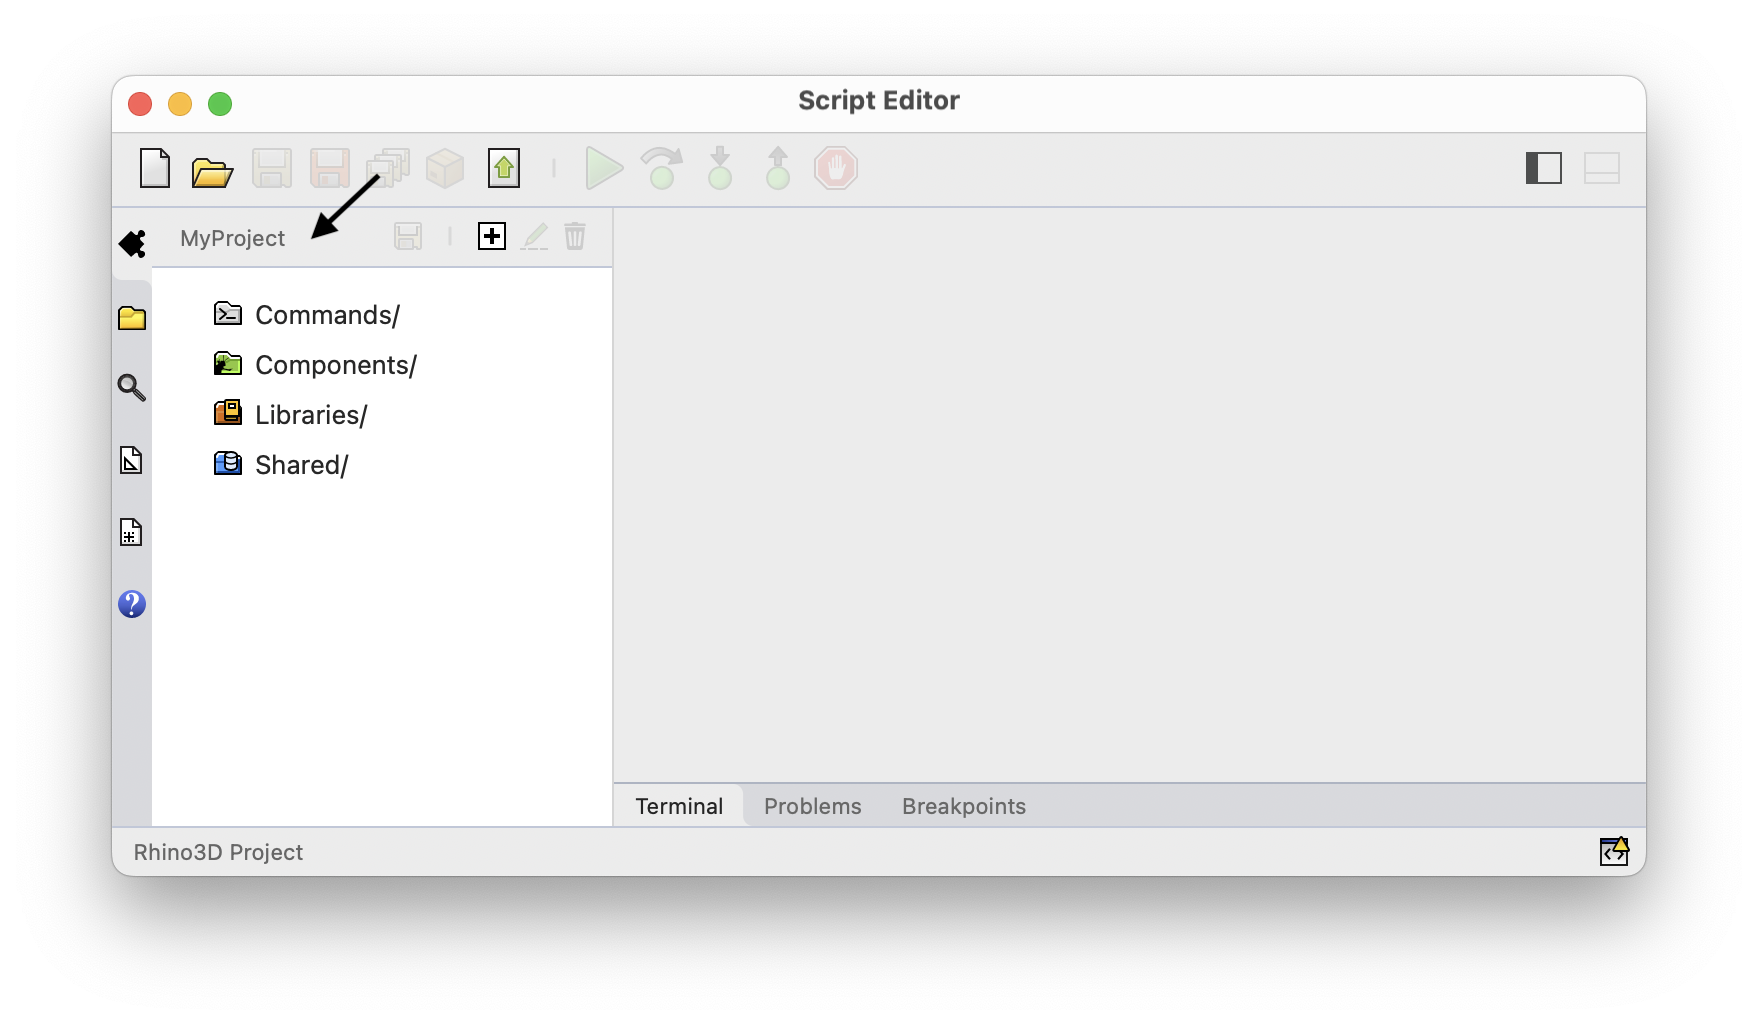
- Now that the project saved and open, we can add command and components. We will get a chance to edit project information before publishing the project as plugins.
Add Commands
To add a command, click on the + icon on the Project Tray toolbar and select Add Commands/ item:
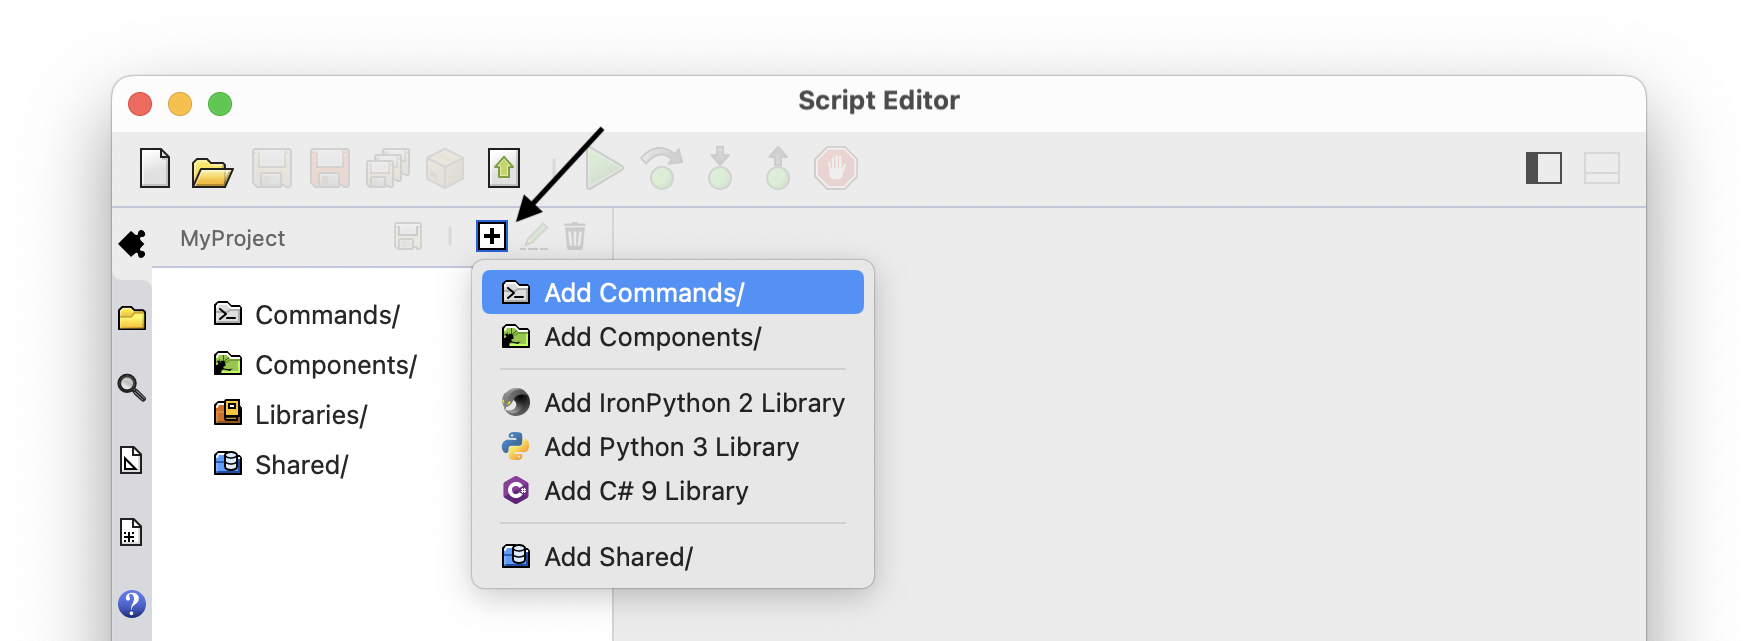
You can also right-click on the Commands/ to add new commands:
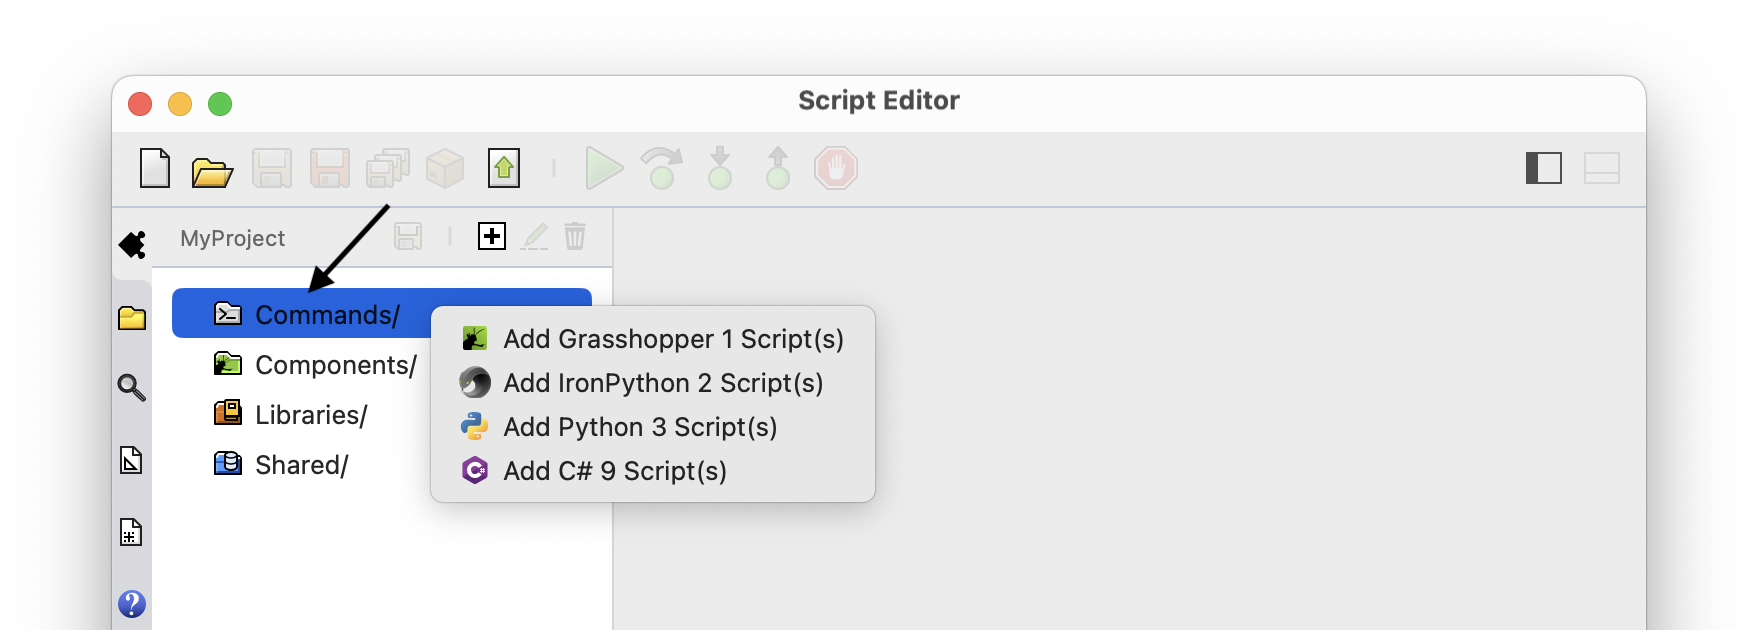
You can select a single or multiple scripts and add them to the project. Once scripts are added, they are opened in the editor and a black circle appears in front of project name in Project Tray to show that project is modified and must be saved. Click the Save Project button in Project Tray toolbar to save the project:

Rhino commands can be created from Grasshopper scripts that contain contextual inputs and outputs. In the example above, Script_C is a Grasshopper 1 definition (Script_C.gh) that contains two contextual integer inputs and a contextual print output component.

See Run Published Commands for information on how the inputs are collected on Rhino command line.
During build, each script under Commands/ is converted into a Rhino command. The script name is the default name of the command. See Project Commands for information on editing command, assigning icons, and changing command types.
To remove a command, select the command in Project Tray and click the trash button on the toolbar:

Grasshopper Previews
Grasshopper calls the components and parameters on the canvas to draw previews and follows the drawing settings and mode that is stored in the document. You can change the mode and settings for each document from the Grasshopper UI. Component previews are also configurable, and there is a Custom Preview component available as well.
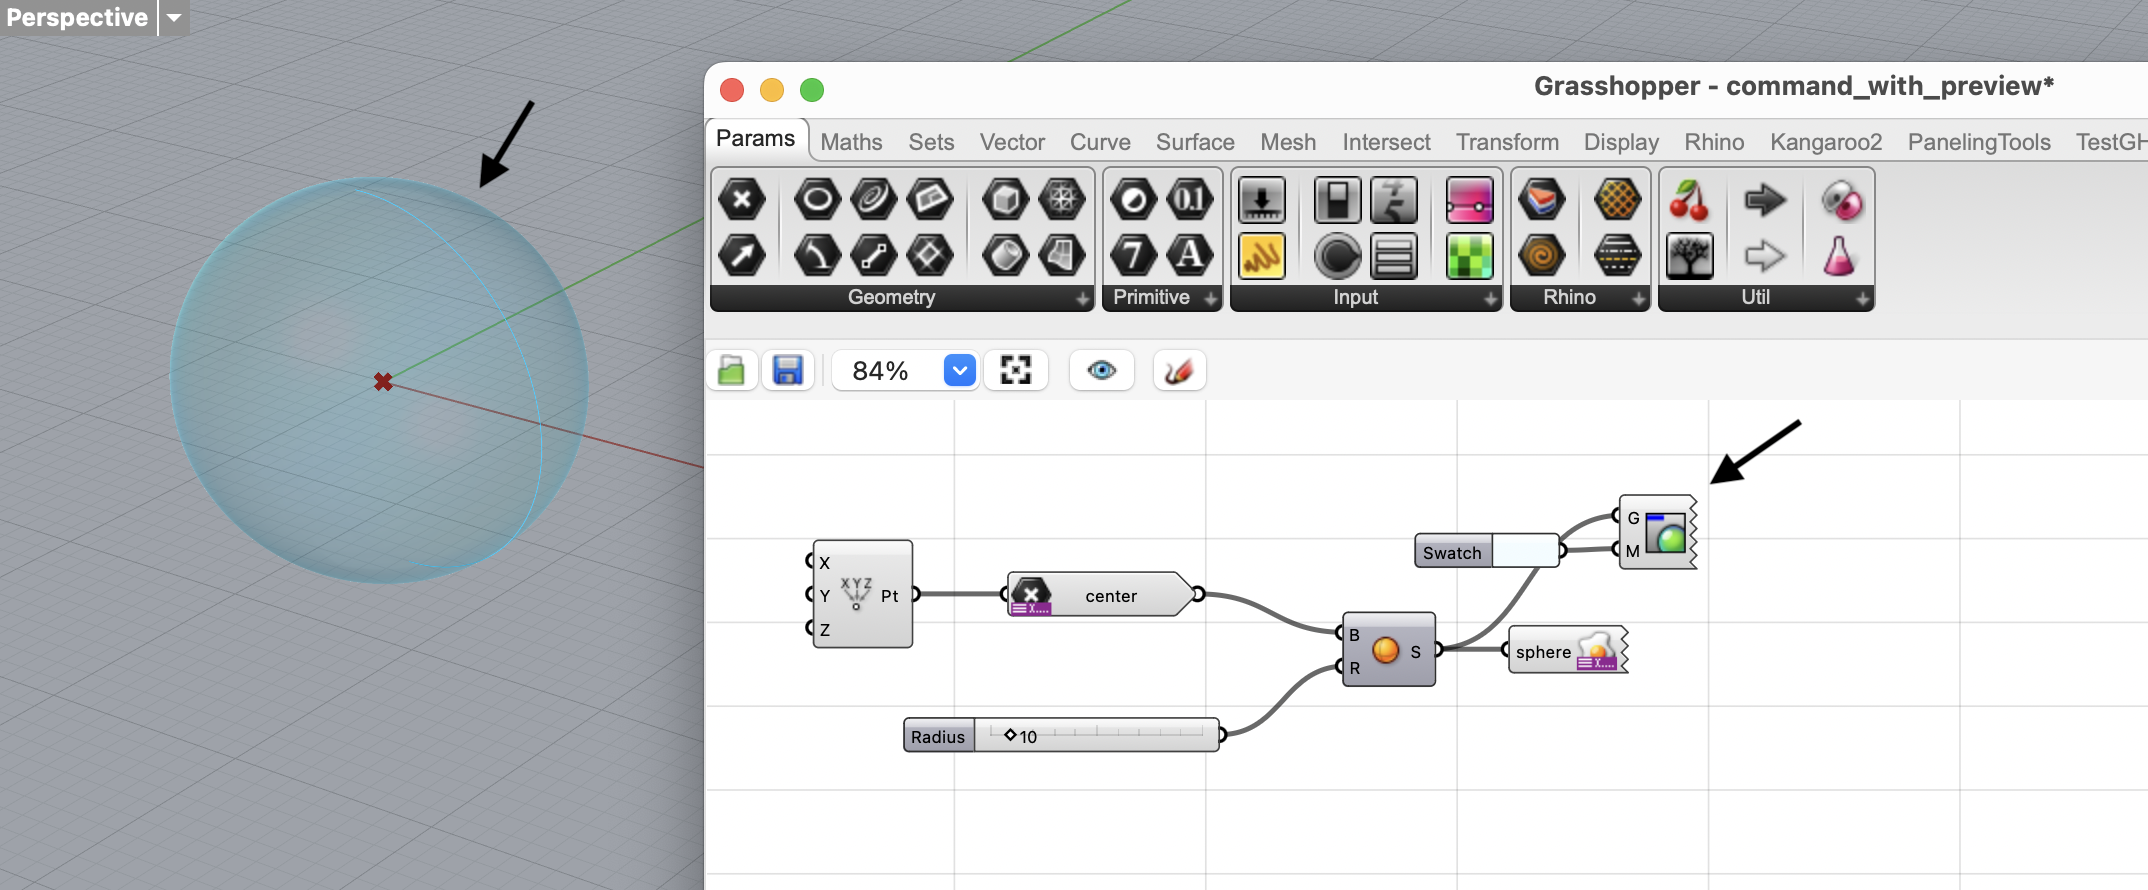
This means that you can customize how your Grasshopper definition previews the geometry it is working with. When running a published command that embeds a Grasshopper definition, previews are drawn in Rhino viewport, in the same way as Grasshopper UI would draw the previews, while command is asking for inputs.
This is an example of a Grasshopper definition that creates a sphere at given point. It draws its own preview of the sphere using Custom Preview component:
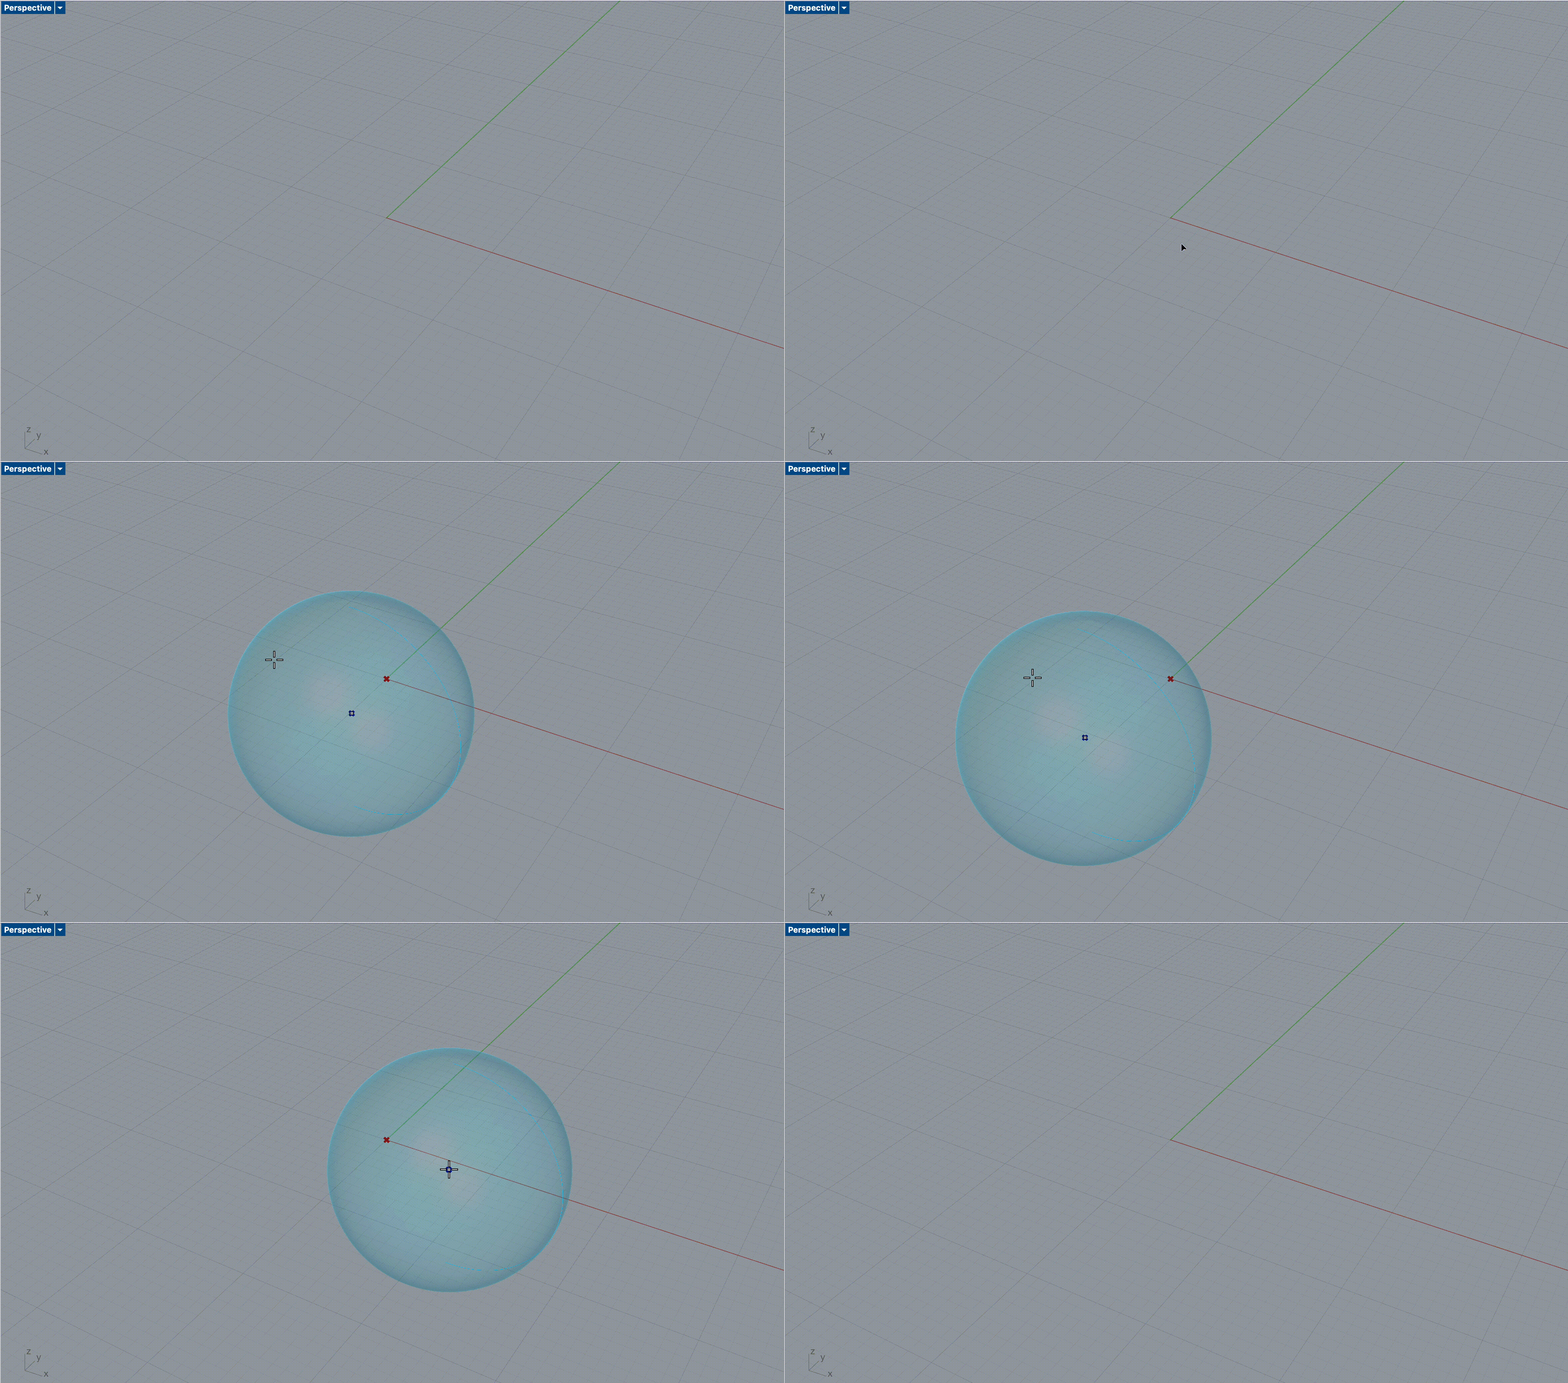
When publishing this Grasshopper definition as a Rhino command and running that command, the same preview is drawn while Rhino is asking for the input point:
Special Variables
There are a few builtin variables available when published scripts are executed as Rhino commands:
__rhino_command__(Rhino.Commands.Command): Rhino command instance. This is the automatically generated command in your plugin, that contains and runs its embedded script.__rhino_doc__(Rhino.RhinoDoc): Active document the command is running on__rhino_runmode__(Rhino.Commands.RunMode): Command Run Mode__is_interactive__(boolean): Whether command is executed interactively (whenRunMode == RunMode.Interactive)
Add Components
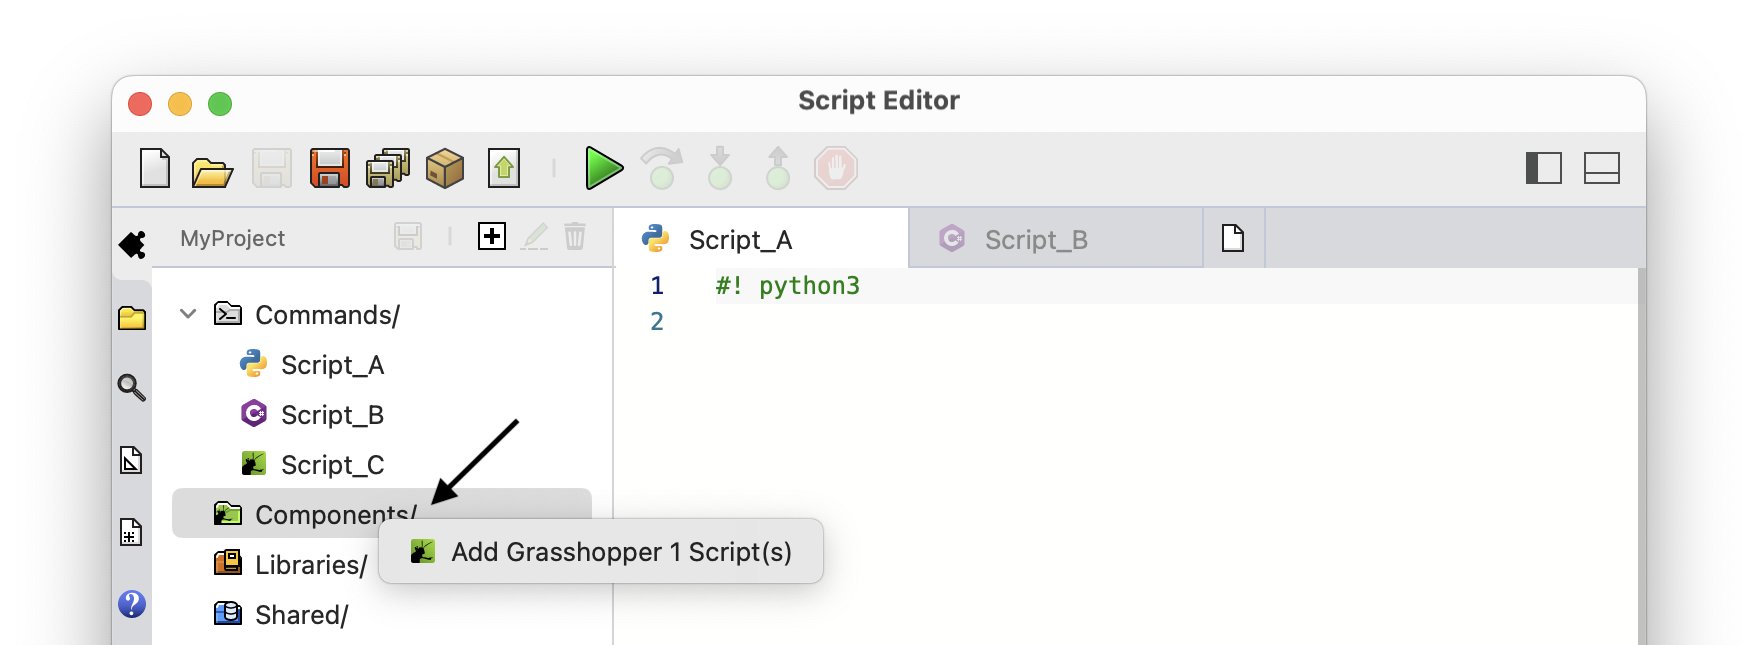
To add components, click on the + icon on the Project Tray toolbar and select Add Components/ item:
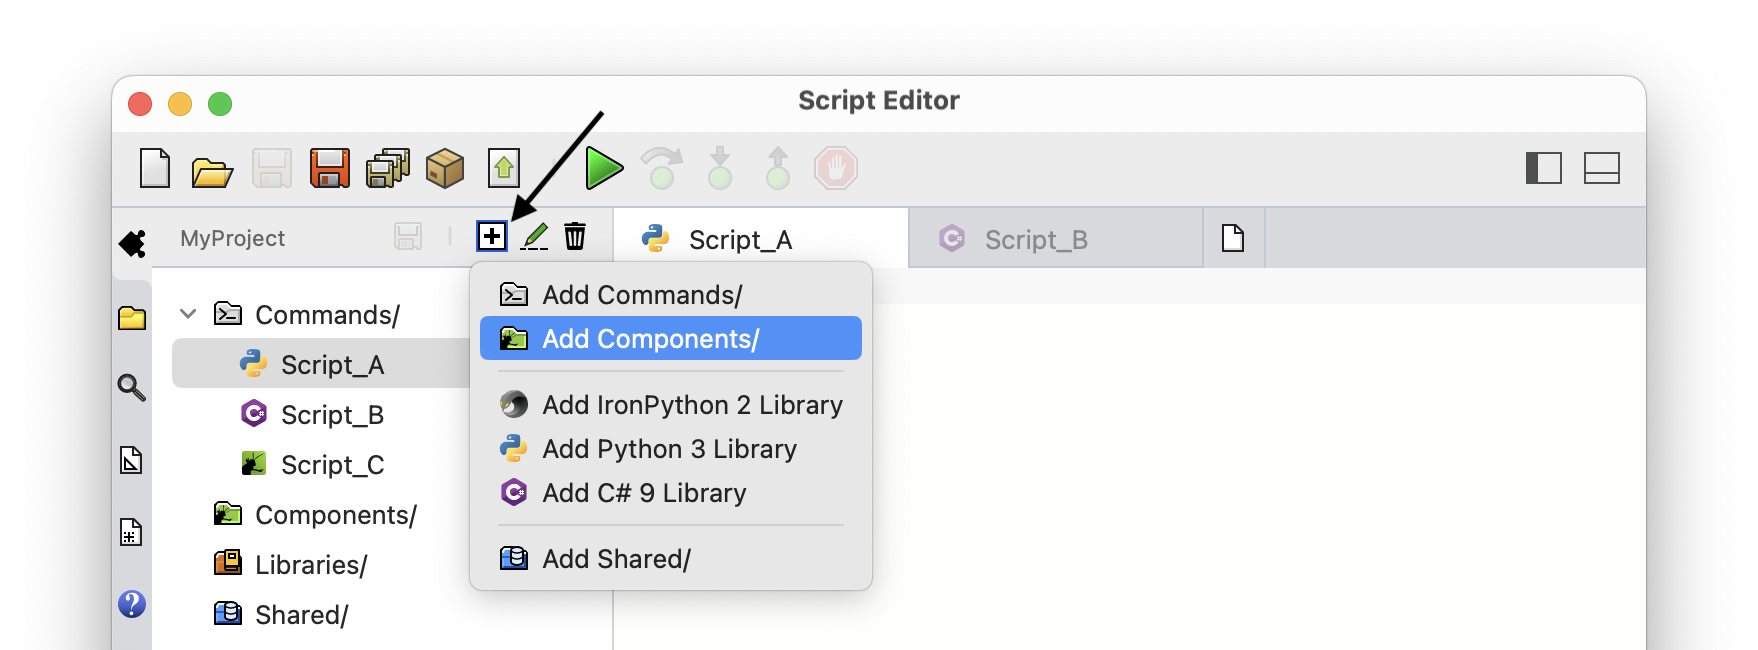
You can also right-click on the Components/ to add new components:
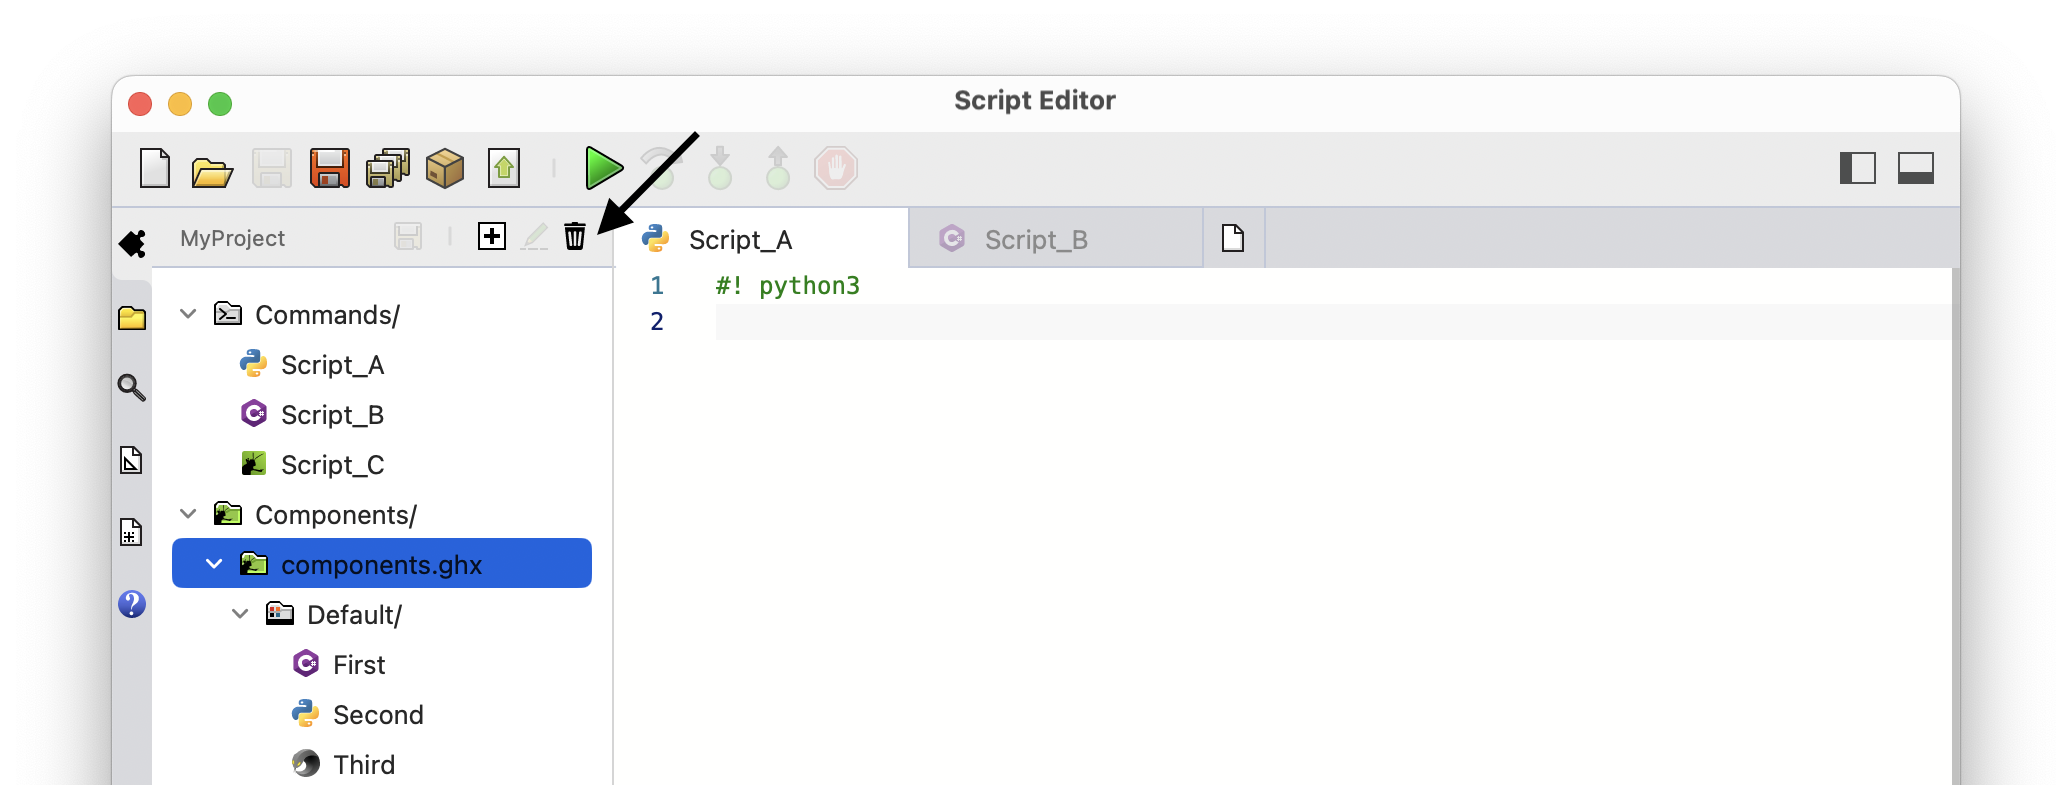
To remove a component, select the source Grasshopper definition in Project Tray and click the trash button on the toolbar. Note that you can only remove complete definitions from Components/ and not the individual components:
Components Types: Script
When adding components to a project, an open dialog appears asking for Grasshopper definitions (.gh or .ghx). Depending on the contents of the definition, one of these two types of components are created in the project:
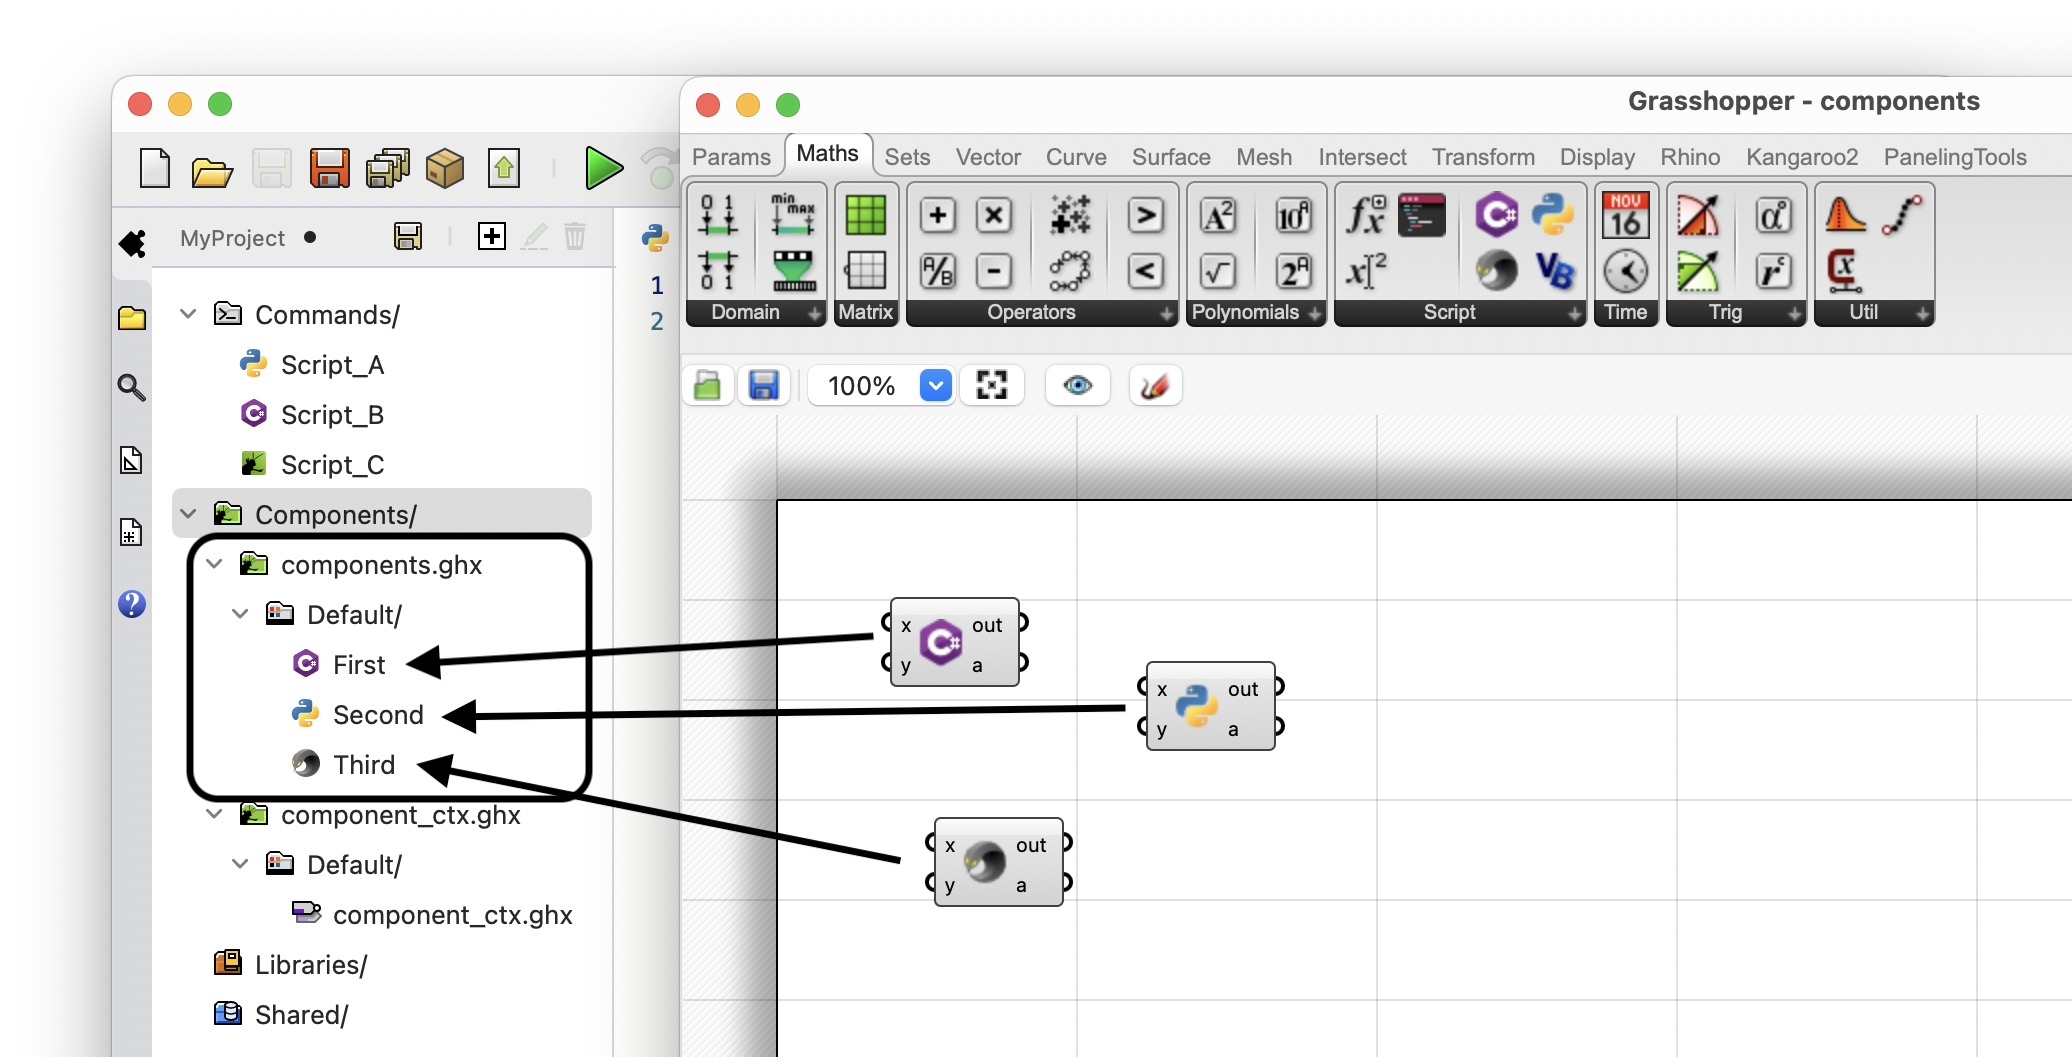
Script: If Grasshopper definition does not contain any contextual inputs or outputs, a component is created for each Script that exist in the definition. The new component matches nickname, inputs, and outputs of the Script and runs the same code.
Example:
In this example, the definition contains 3 Script components, nicknamed First, Second, and Third. Each script components becomes a component in published Grasshopper plugin matching the nickname, inputs, and outputs. See Project Components on how to edit components, add icons, and set their exposure.
This is how the components look like when published (default icon). Note that although they are generated from scripts of different languages, the published components are language agnostic and the three components look the same:

Required Inputs
Input parameters of published components follow the Required, Access, and Type Hint settings of their corresponding input on the original script component:

Output Previews
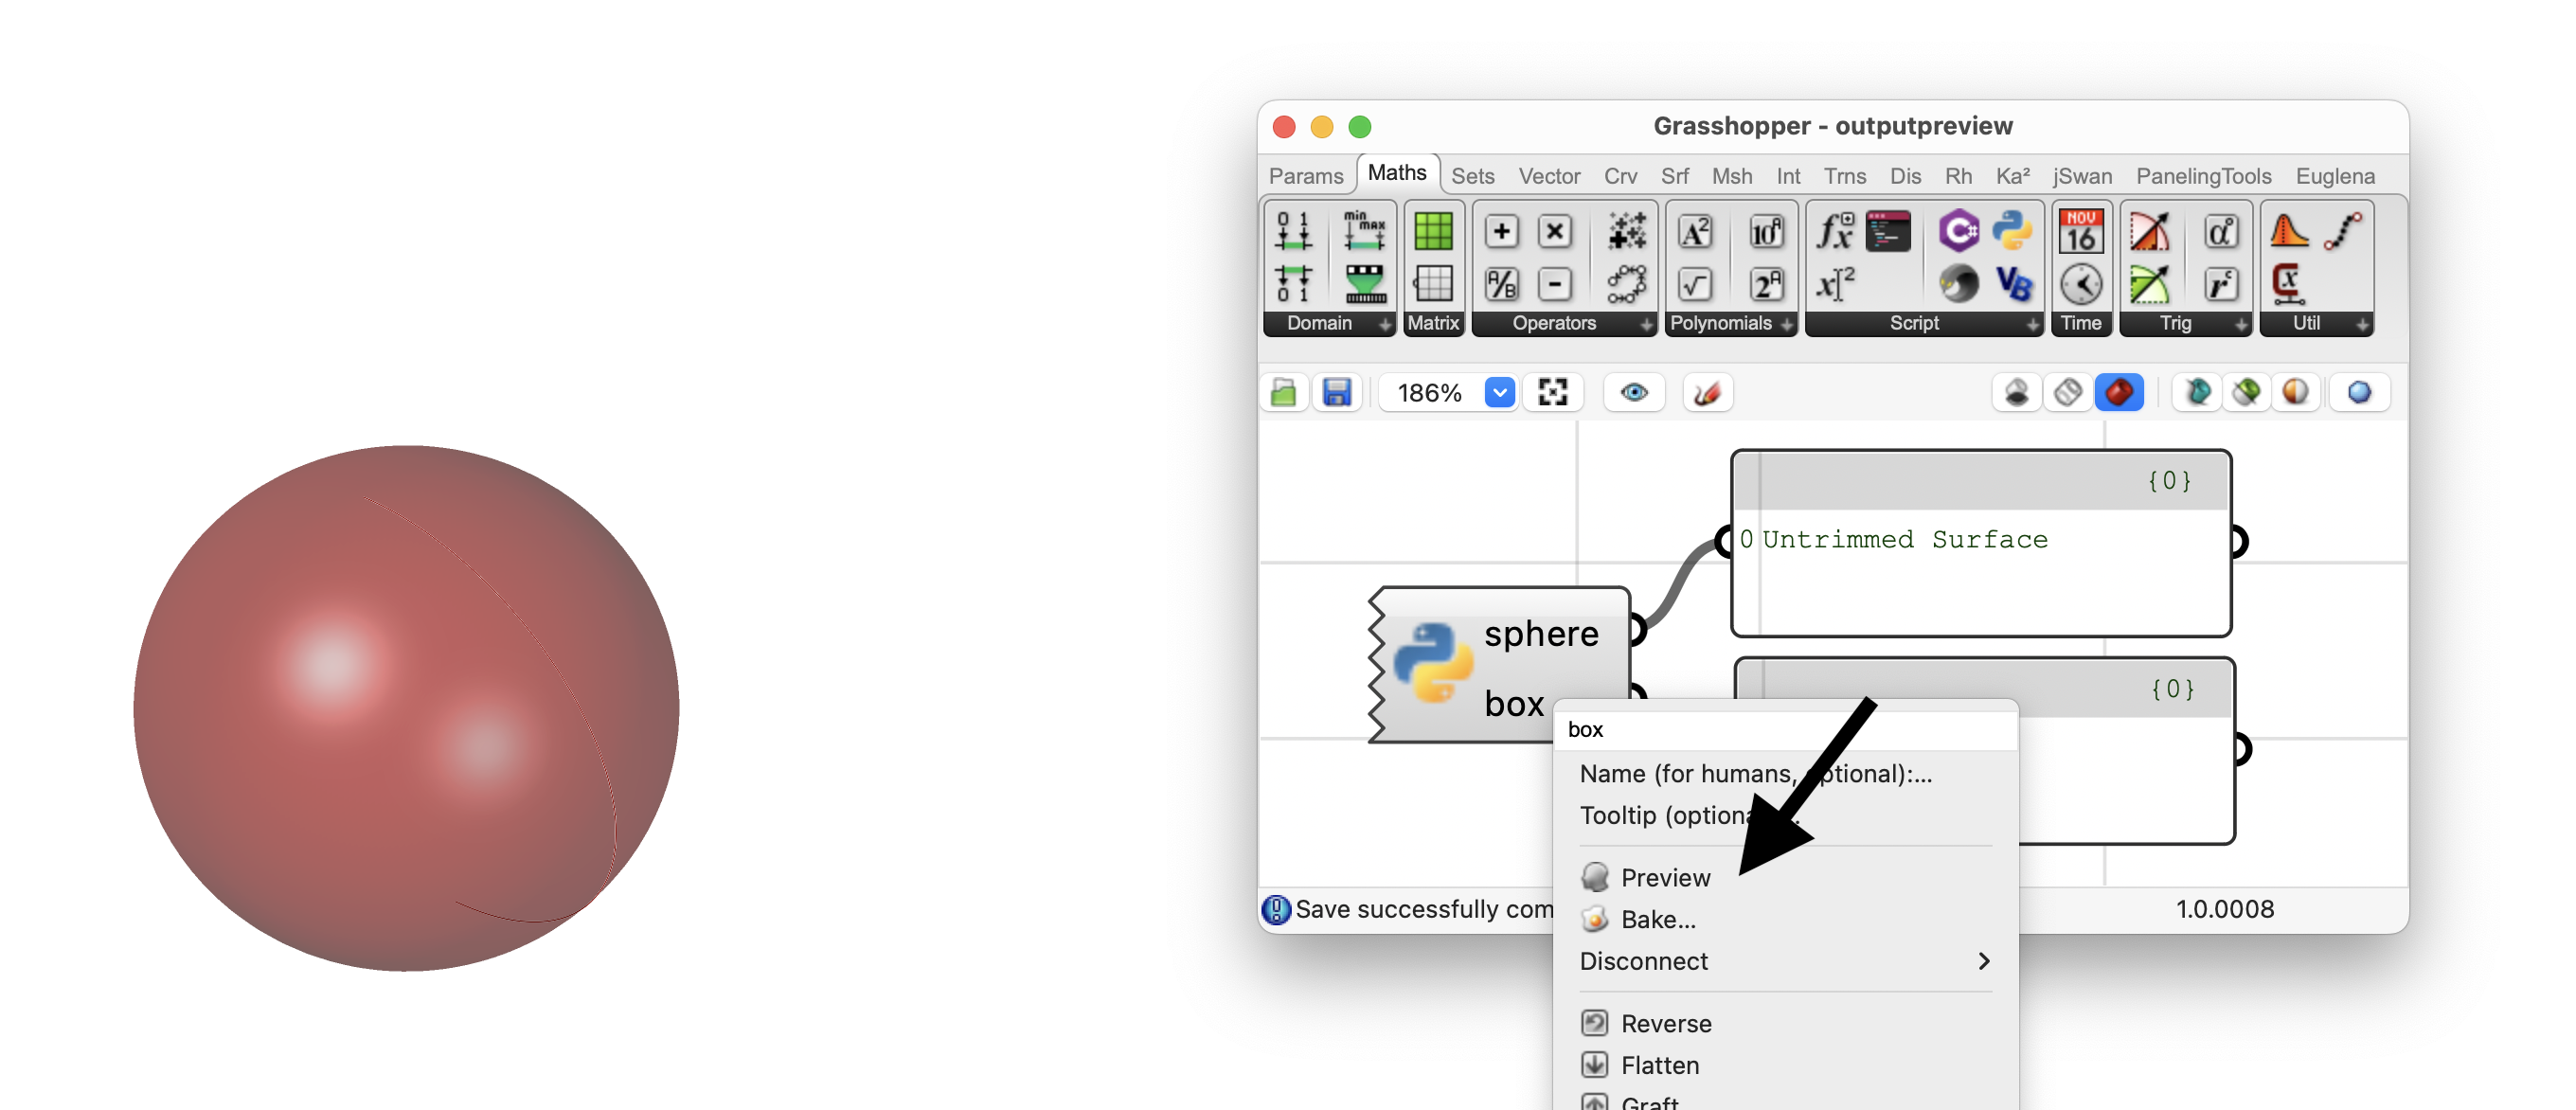
Outputs parameters of published components follow the Preview settings of their corresponding output on the original script component:
Components Types: Contextual
Contextual: If Grasshopper definition does contain contextual inputs or outputs, a single component is created for the complete definition. The new component matches the contextual inputs and outputs of the definition and runs the full definition on each iteration.
Example:
In this example, the definition contains contextual inputs and outputs. The complete definition becomes a component in published Grasshopper plugin, and its name matches the definition name by default. Component inputs and outputs will match contextual inputs and outputs of the definition. Note that any other Script component in this definition is not converted. See Project Components on how to edit components, add icons, and set their exposure.
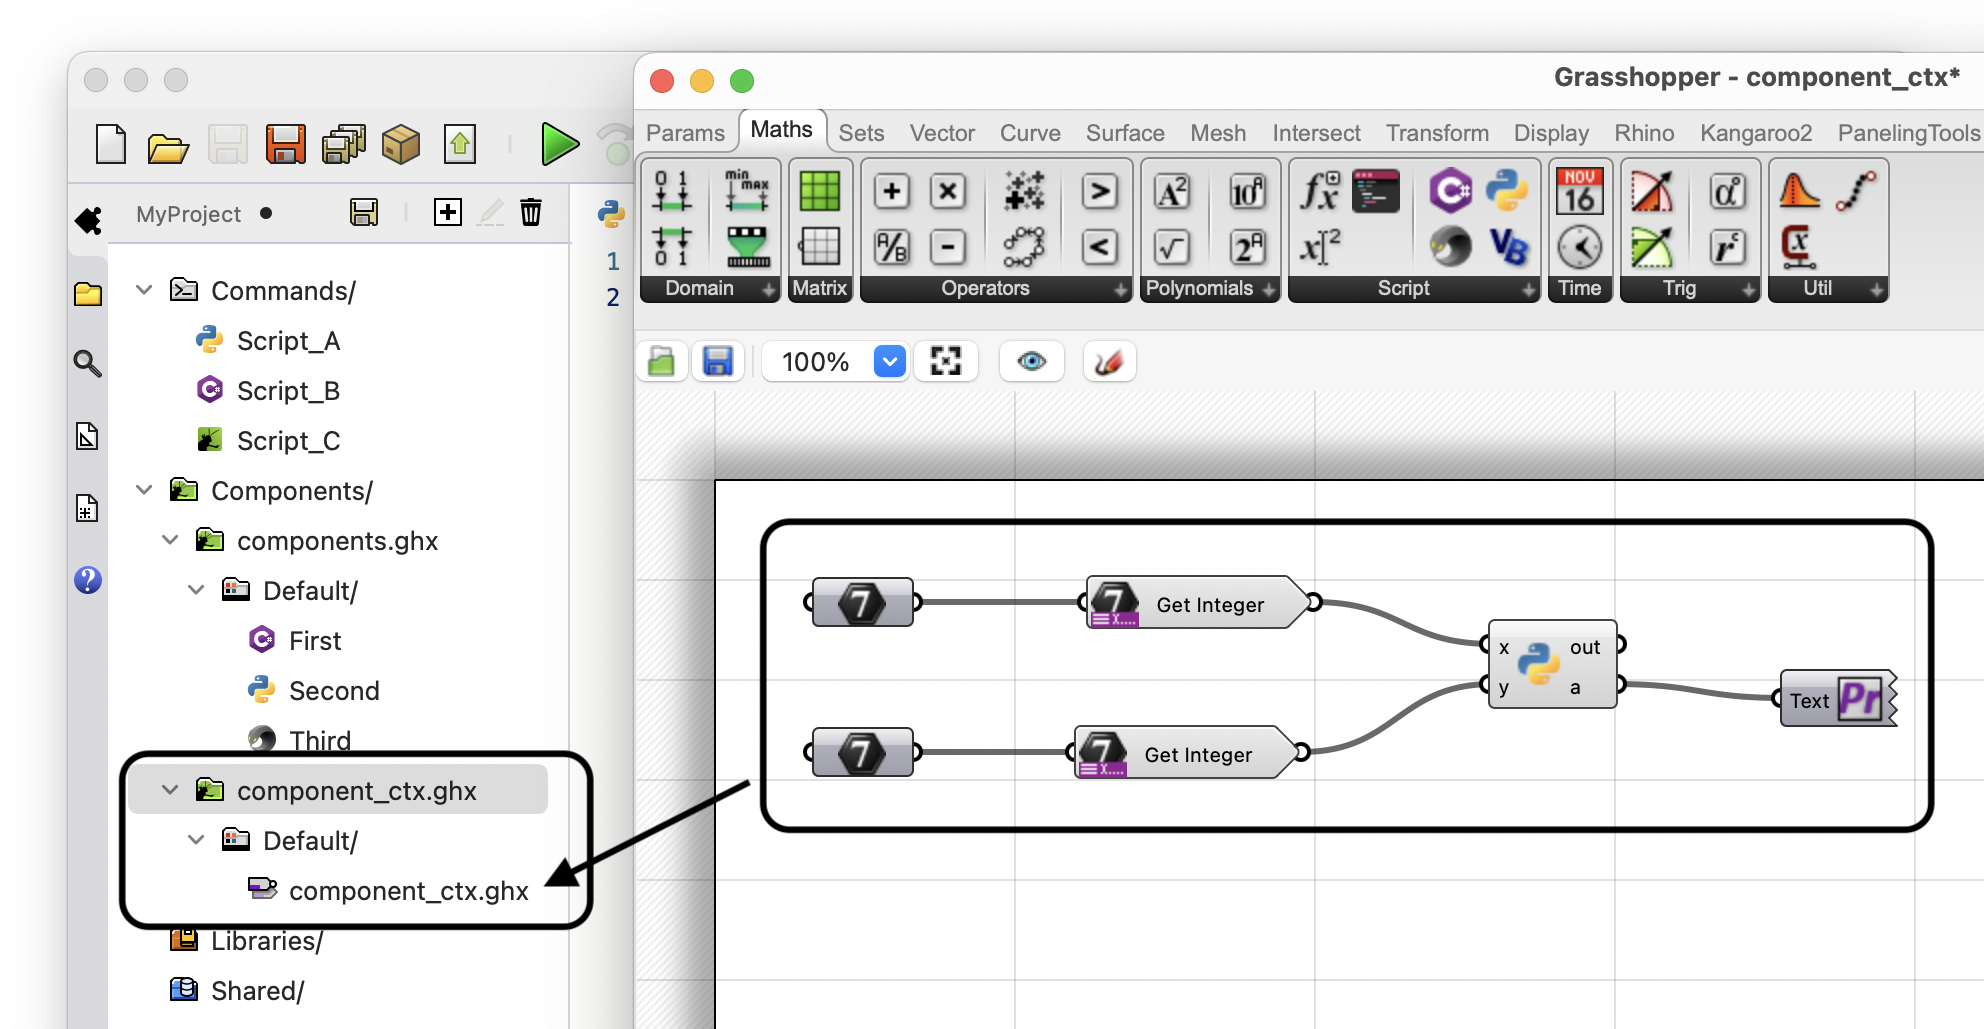
This is how the component looks like when published (default icon):

Inputs and Outputs
Contextual components embed and run full Grasshopper definitions as a single component. Inputs and outputs of the component are based on the Contextual inputs and outputs placed on the source Grasshopper definition. Take this file as an example:

This Grasshopper definition is converted to a component like below. Note that a specific GH Parameter corresponding with the type of Get Integer contextual component is used as inputs to the component:

Prompt value is used as the name of the input parameter:
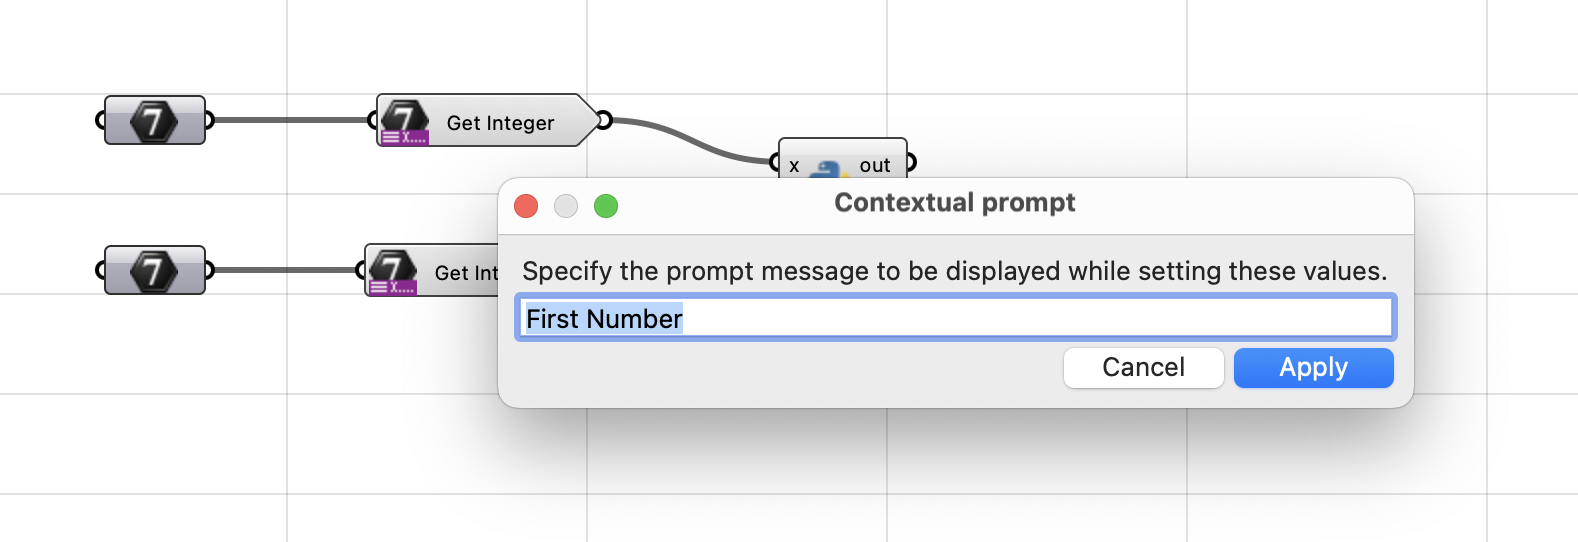
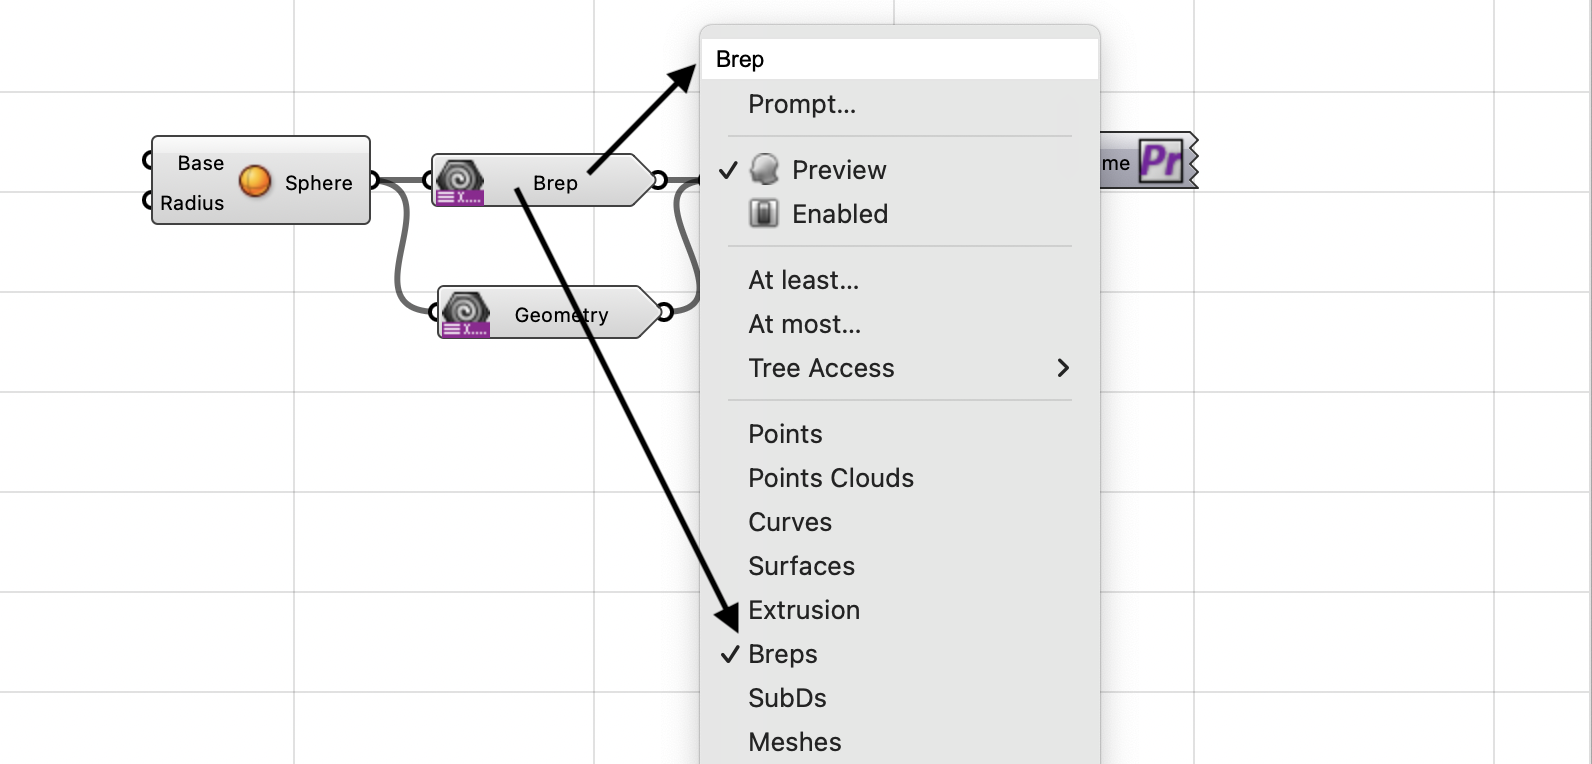
There are a few contextual components that can filter their input data. Get Geometry is an example of such contextual component. The more specific the filter, the more specific the final parameter will be. If filter is specific to one type, a parameter of that specific type is created on published component:

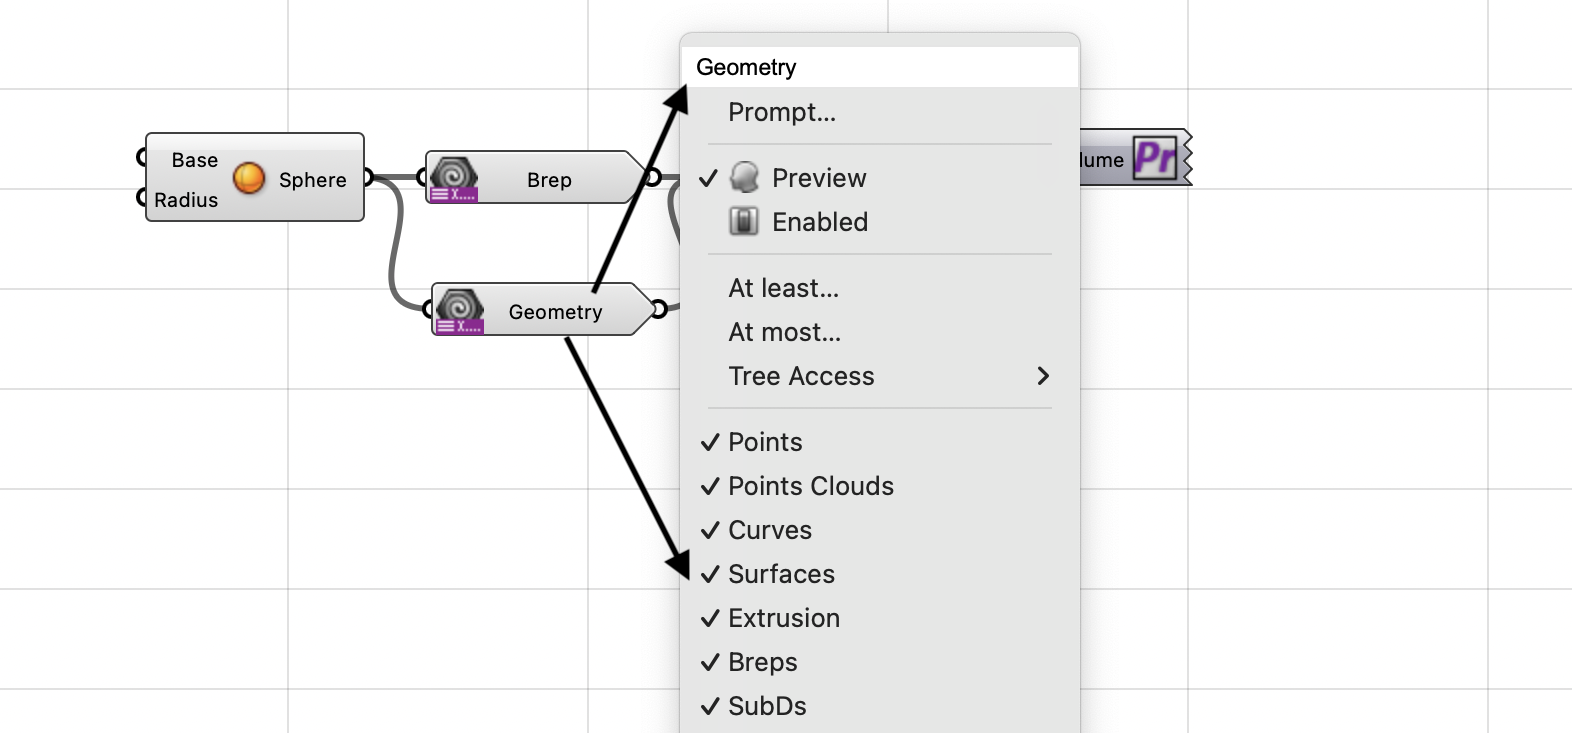
If filter not specific, a flexible geometry parameter is created on published component:

Contextual output components are converted to:
-
Generic Goo parameter for Context Bake

-
Text parameter for Context Print

Grasshopper Previews
Grasshopper calls the components and parameters on the canvas to draw previews and follows the drawing settings and mode that is stored in the document. You can change the mode and settings for each document from the Grasshopper UI. Component previews are also configurable, and there is a Custom Preview component available as well. This means that you can customize how your Grasshopper definition previews the geometry it is working with.
Normally a published component that embeds a script (e.g. Python) draws previews on its outputs as well as any drawings performed by Preview Overrides of its script.
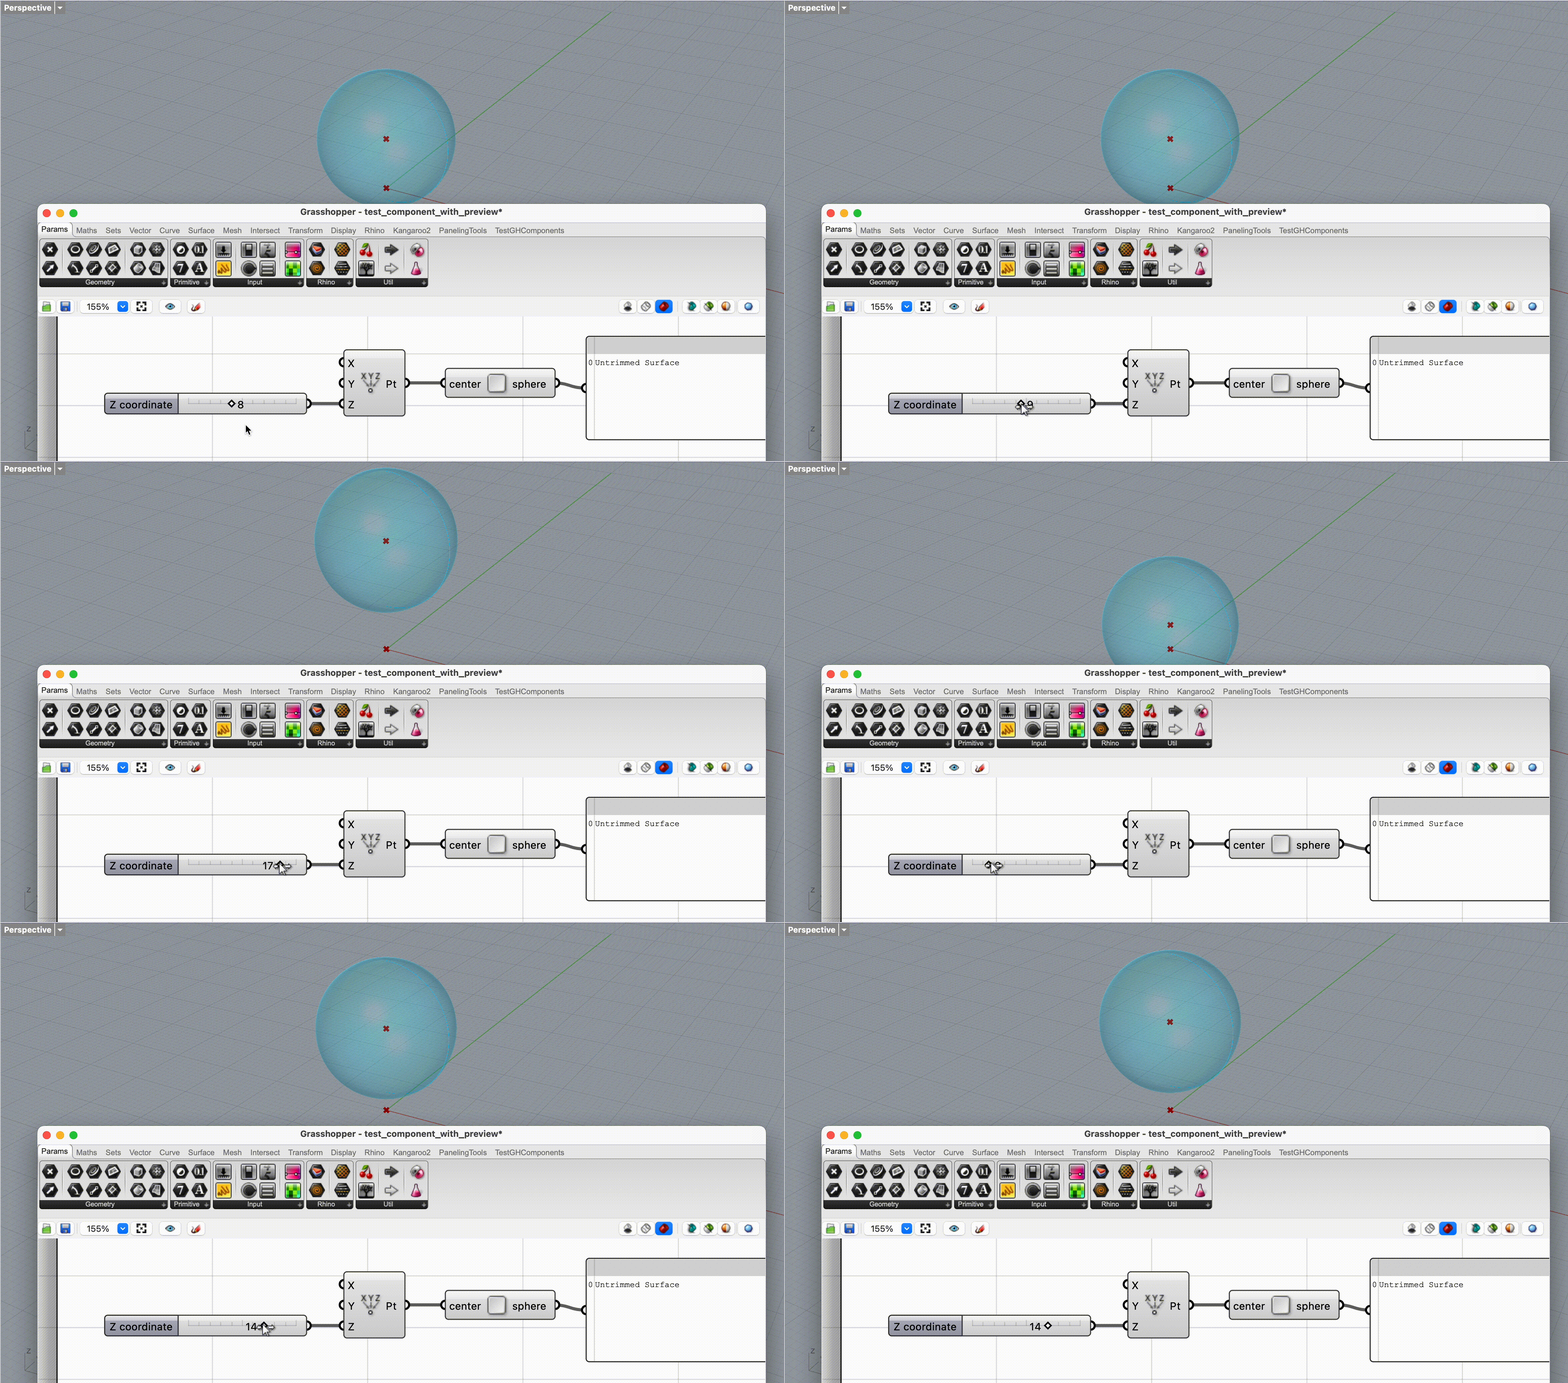
In case of published component with embedded Grasshopper definitions, the component itself does not draw any previews and asks the embedded definition to draw its own previews (Rhino >= 8.13). This means that whatever custom preview you have specified in the embedded definition, the same preview is drawn on the canvas.
Note: To preserve consistency with other Grasshopper components, Contextual Components will not draw previews of embedded definition if the Preview option is off on the component or it is disabled. Preview mode is also synchronized to the embedded definition, meaning that if you set preview mode to Wireframe Preview in Grasshopper UI, the embedded definition will also draws in wireframe mode.
This is an example of a Grasshopper definition that creates a sphere at given point. It draws its own preview of the sphere using Custom Preview component:
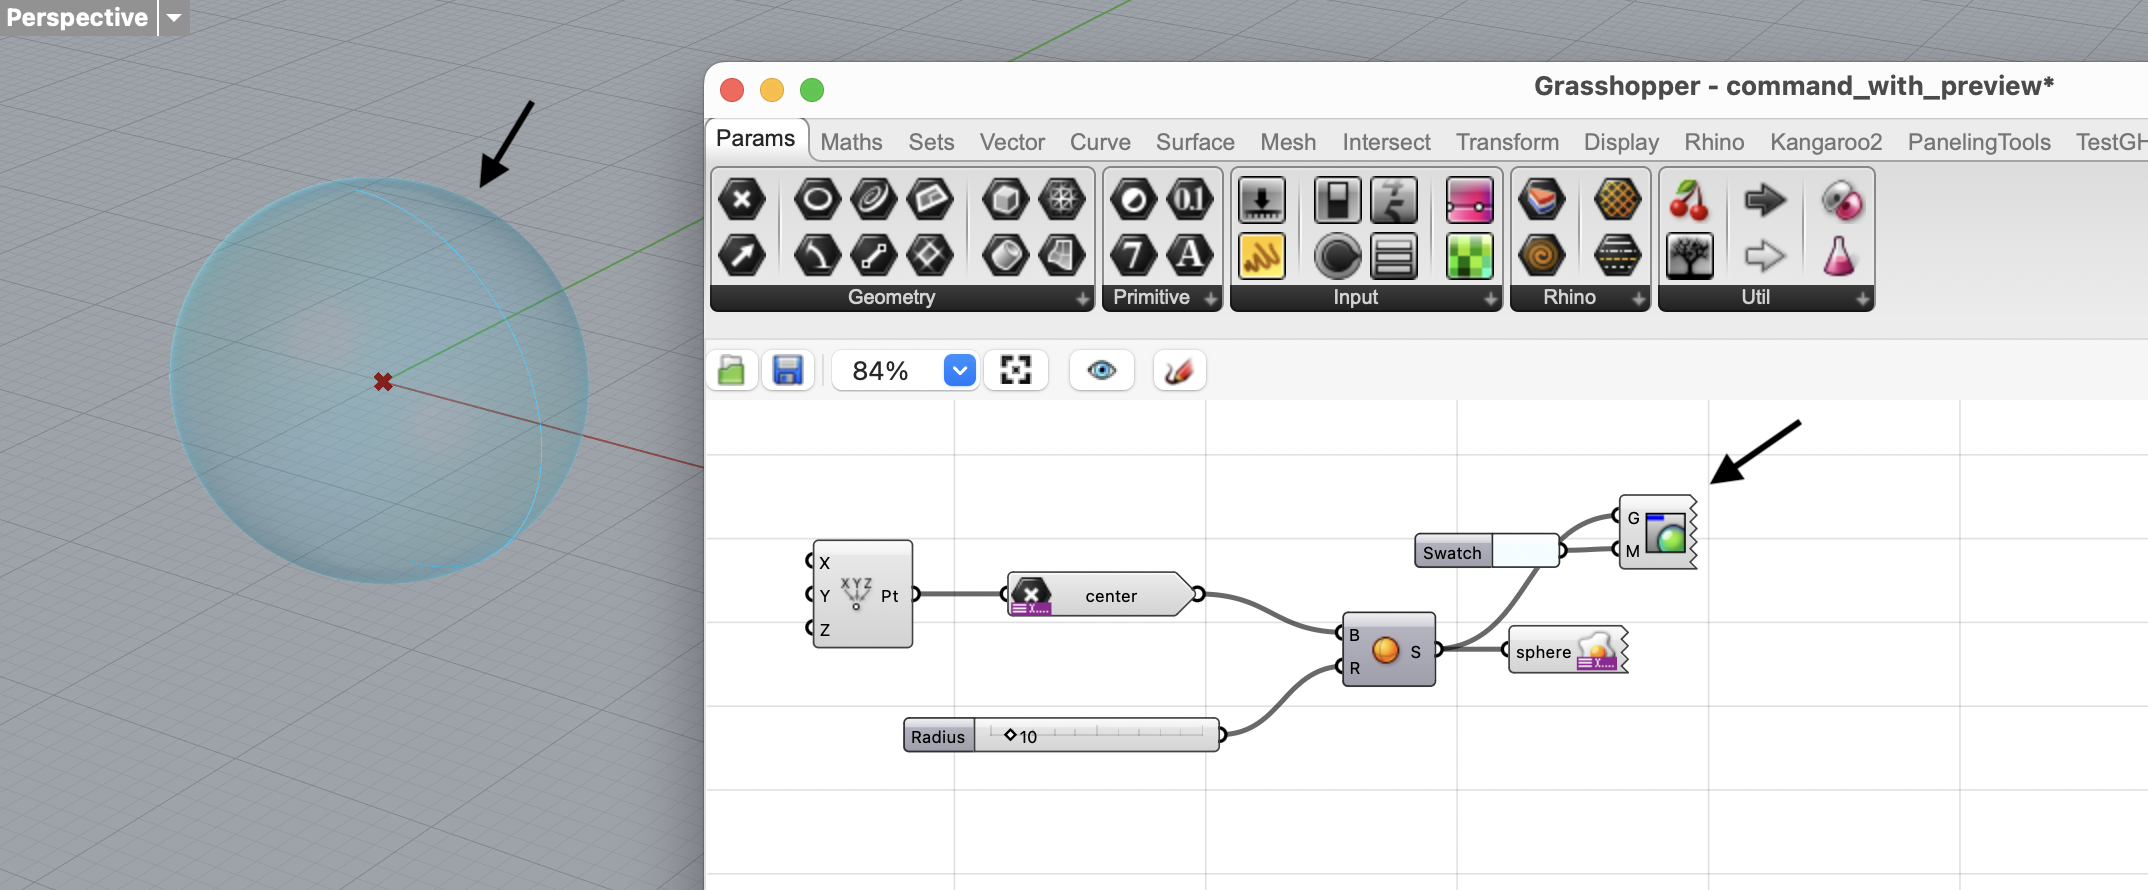
When publishing this Grasshopper definition as a Contextual Component, the same preview is drawn with the input provided to the component:
Project Info
To edit project information, either use the Publish Project dialog, or run the Edit Project Info command from editor command prompt. Both dialogs show identical project information fields:
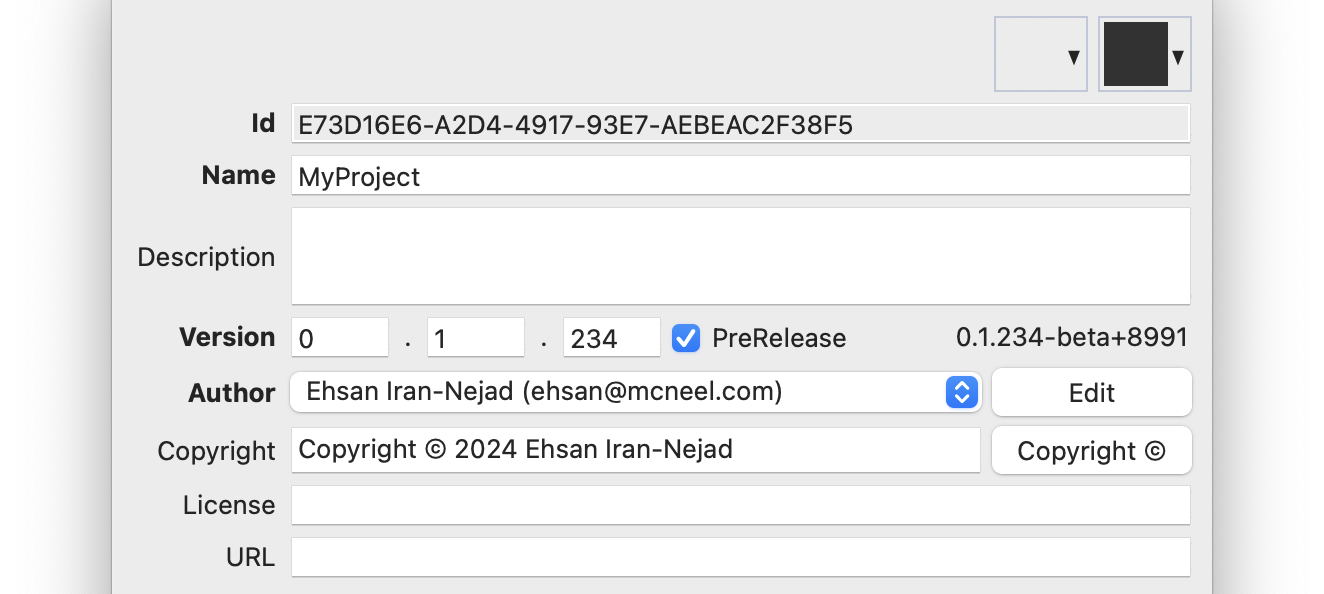
Project Id
Project UUID is assigned when the project is created and remains read-only afterwards. This id, uniquely identifies your plugin among all other past and future Rhino and Grasshopper plugins.
This id is embedded in the final plugin assemblies as:
[assembly: Guid("e73d16e6-a2d4-4917-93e7-aebeac2f38f5")]
It is also assigned to the Grasshopper AssemblyInfo:
public sealed class AssemblyInfo : GH_AssemblyInfo
{
    public override Guid Id { get; } = new Guid("e73d16e6-a2d4-4917-93e7-aebeac2f38f5");
}
Project Name and Icon
Name is the official name of your project. This name will be used when generating plugin assemblies and other associated files (<name> is the project name in this example):
    ├── <name>.rhp
    ├── <name>.rui
    ├── <name>.Components.gha
    ├── <name>-0.1.16222.8992-rh8-any.yak
    └── src
        ├── <name>
        │   ├── AssemblyInfo.cs
        │   ├── ProjectCommand_*.cs
        │   ├── ProjectInterop.cs
        │   ├── ProjectPlugin.cs
        │   └── <name>.csproj
        ├── <name>.Components
        │   ├── AssemblyInfo.cs
        │   ├── ProjectComponent_*.cs
        │   ├── ProjectComponent_Base.cs
        │   ├── ProjectInterop.cs
        │   ├── ProjectPlugin_Grasshopper.cs
        │   └── <name>.Components.csproj
        └── <name>.sln
You can add/remove SVG icons (both light and dark) for the plugin. This icon is used in plugin manager and toolbars for both Rhino and Grasshopper:
![]()
Project name and icon are used for the toolbar:
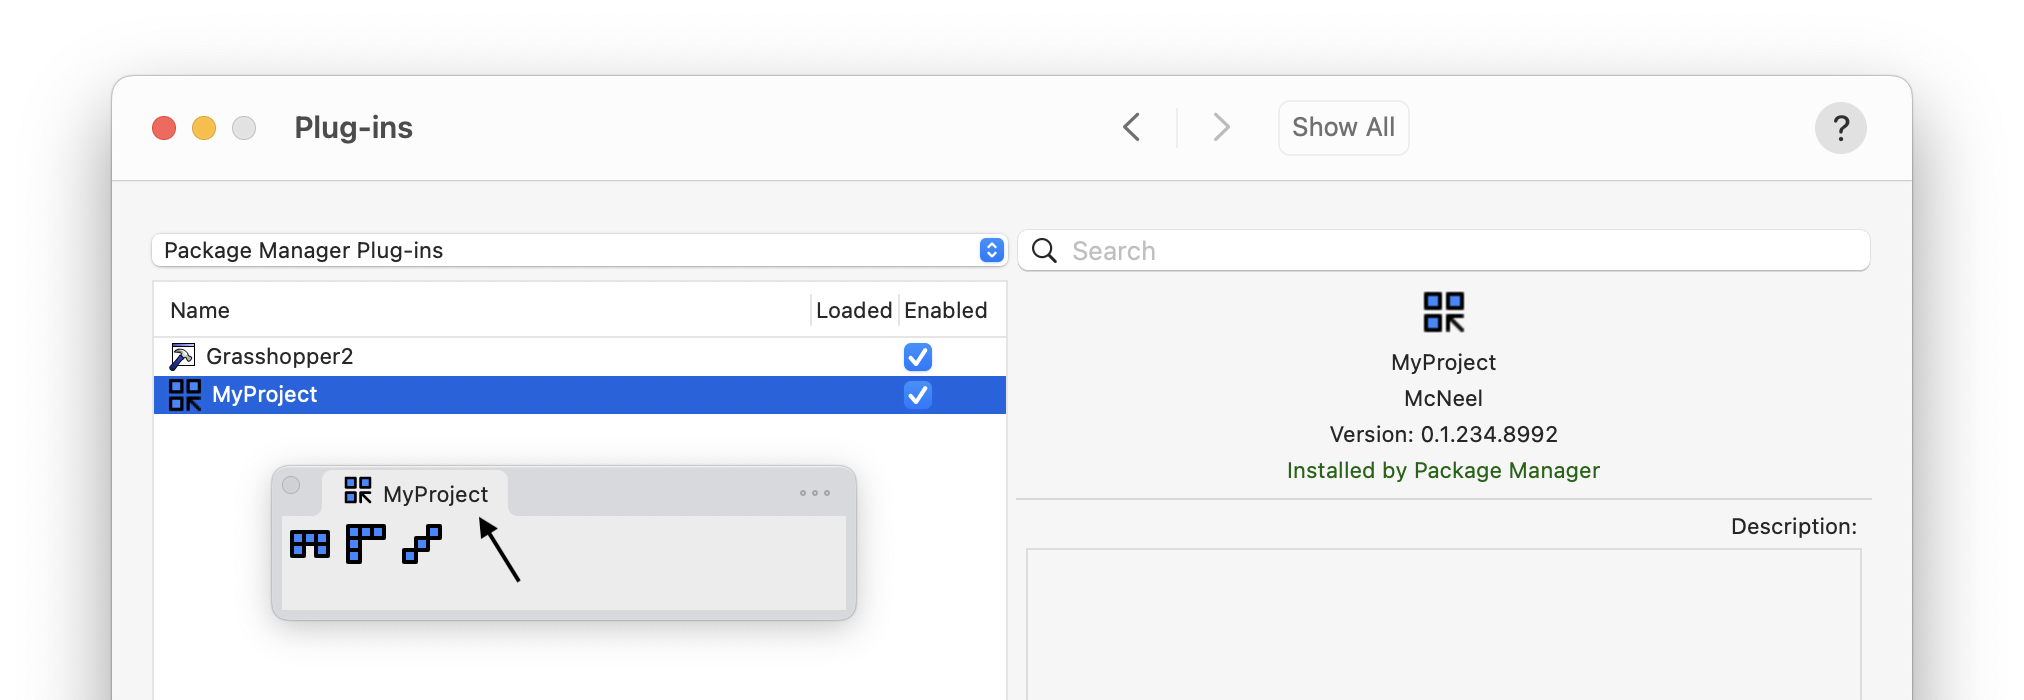
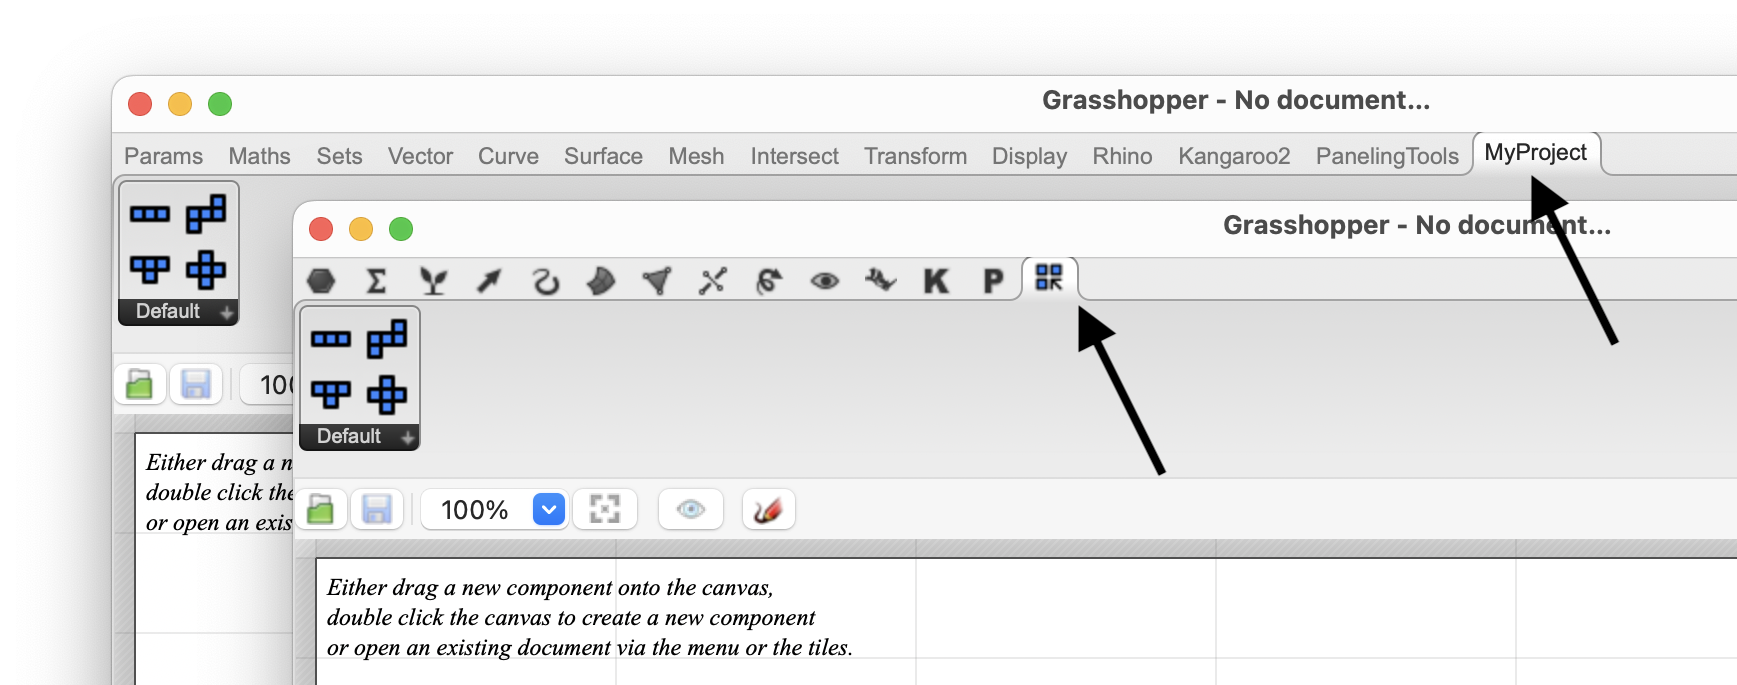
Project name is also used as the main category name in Grasshopper UI. Project icon is shown if Grasshopper is set to show the icons in category tabs (or first letter of project name if no icon is set):
Project Version
This is the project version and follows Semantic Versioning style. When creating a new project it is set to v0.1 by default.

Note that the final version used in building assemblies is 0.1.8991+28927. Script editor automatically generates patch and build numbers to completion the version and make it specific:
- Patch number is number of days since start of century (01/01/2000)
- Build is the number of seconds since midnight divided by 2.
You can assign your own custom patch number by entering a value in the Patch field.

You can also mark the version as PreRelease by checking the box. The patch suffix -beta will be added to the full version. Note that due to lack of support for custom patch extensions in AssemblyVersion attributes, -beta extension is excluded. However the generated Yak package will include the tag and is marked as pre-release.


Here is an example of how the full version number is included in the plugins:
[assembly: AssemblyVersion("0.1.234.8991")]
[assembly: AssemblyFileVersion("0.1.234.8991")]
[assembly: AssemblyInformationalVersion("0.1.234.8991")]
Project Authors
Assigning an Author is required for a build. Project Edit or Publish dialogs show a dropdown, listing all the available authors. Selected author information will be saved within the project file.

Choose Edit button on the right side of author dropdown to edit the list of available authors:
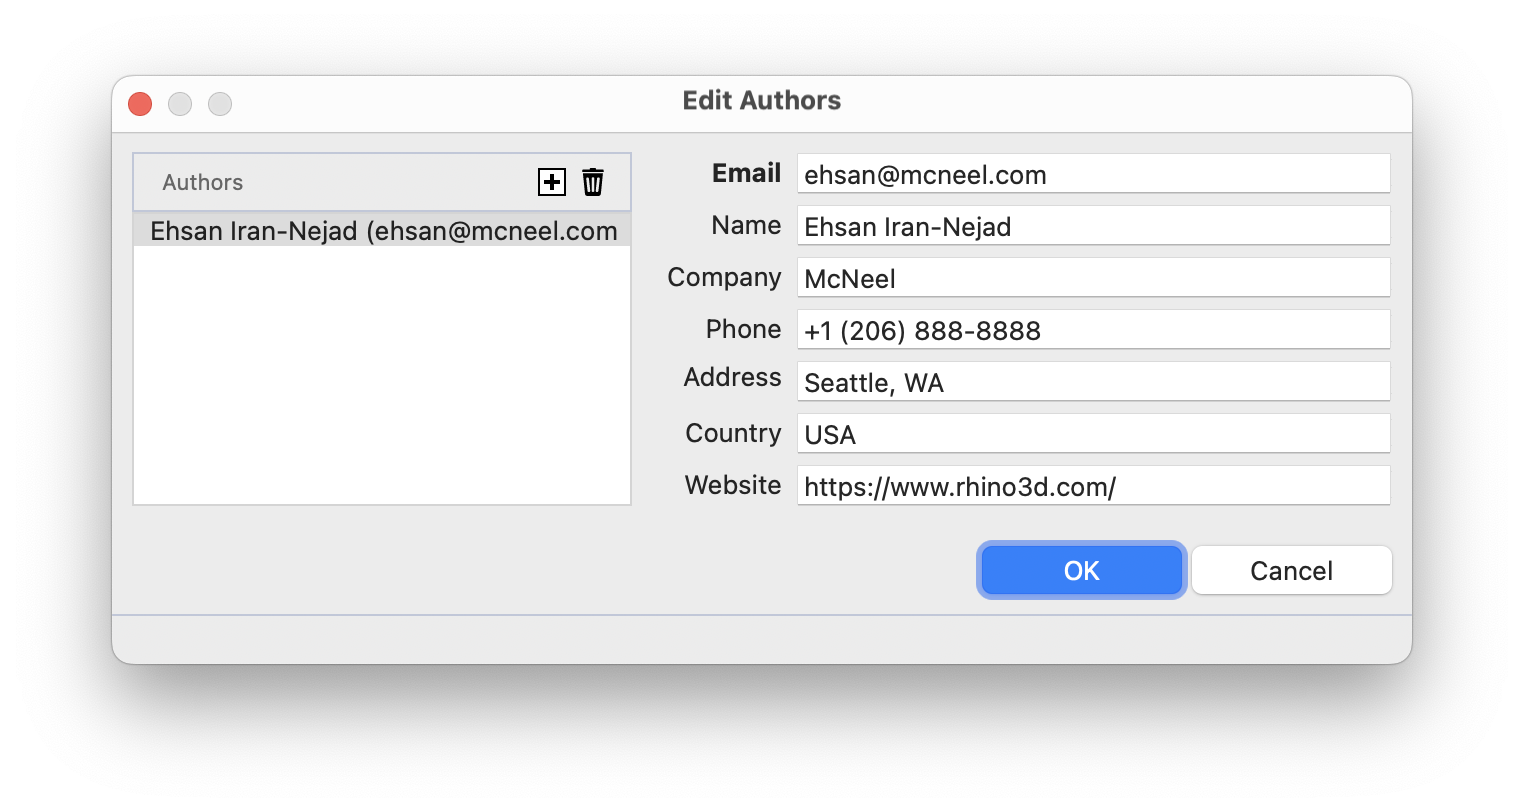
Author information is also included in the published plugins using the PlugInDescription attribute in RhinoCommon. Note that the full name of author is not listed and is usually included as part of Copyright message:
[assembly: PlugInDescription(DescriptionType.Email, "ehsan@mcneel.com")]
[assembly: PlugInDescription(DescriptionType.Phone, "+1 (206)-888 8888")]
[assembly: PlugInDescription(DescriptionType.Organization, "McNeel")]
[assembly: PlugInDescription(DescriptionType.Address, "Seattle, WA")]
[assembly: PlugInDescription(DescriptionType.Country, "USA")]
[assembly: PlugInDescription(DescriptionType.WebSite, "https://www.rhino3d.com/")]
Project Copyright, License, and URL
Edit the copyright field and add your custom copyright message, or click on the Copyright button to add a default message based on the selected Author:

The copyright message is embedded in the final plugin assemblies as:
[assembly: AssemblyCopyright("Copyright © 2024 Ehsan Iran-Nejad")]
Commands
Name and Icon
Once a command is added to the project, you can select and click the Edit icon on the Project Tray toolbar, to edit the command properties. The Edit Command dialog provides fields to modify the command Name, and to add/remove SVG icons (both light and dark) for the command. This icon will be used in the generated toolbar layout file (*.rui):
![]()
Command icons are used for the project toolbar:

Type (Style)
Choose the type of Rhino command from the Type dropdown menu. Hidden and Transparent correspond with the Rhino.Commands.Style.Hidden and Rhino.Commands.Style.Transparent enum values in RhinoCommon:

Excluding Commands
Sometimes it is desired to keep a command in the project but exclude that from published plugins. You can check the Exclude box to exclude the command:

Note that Project Tray shows a dimmed icon for excluded commands:

Components
Name and Icon
Once a component is added to the project, you can select and click the Edit icon on the Project Tray toolbar, to edit the component properties. The Edit Component dialog provides fields to modify the component Name, NickName, Description, and to add/remove SVG icons (both light and dark) for the component:
![]()
Panel Name (Sub-Category)
Sub-Category is then name of Grasshopper panel that contains the published component. You can edit and customize the panel name or choose from a list of previously set panel names in the project:


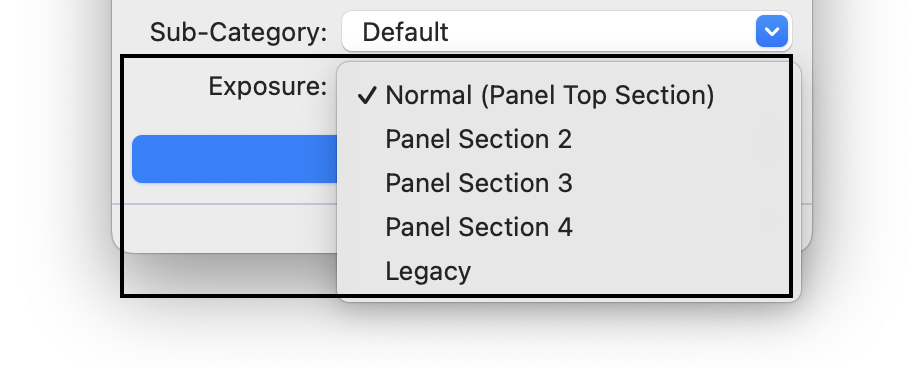
Exposure
Exposure dropdown sets the location of component on the subcategory panel. It is simplified from Grasshopper.Kernel.GH_Exposure and includes 4 main areas (primary, secondary, tertiary, and quarternary) of the subcategory panel. See Component Versioning for information on how to update your component versions.
Excluding Components
Sometimes it is desired to keep a component in the project but exclude that from published plugins. You can check the Exclude box to exclude the component:

Note that Project Tray shows a dimmed icon for excluded components:

Component Versioning
Script editor creates a new component in the Grasshopper plugin for each script component extracted from Grasshopper definition.
The Instance Id of the source script component, will be used as Component Id of the published component. This means that if you duplicate the same script component on your Grasshopper canvas, you will end up with multiple unique components in the published plugin:

This is a feature and not a bug.
Legacy and New
If you need to make a “breaking” change to a published component (e.g. changing inputs or outputs), it is a good practice to mark the previously published component as Legacy and create a new component.
Simply duplicate the previous script component on the source Grasshopper definition, and make your changes to this new instance. Saved the definition and the Project Tray will update to show then new component. Select and edit the first component and choose Legacy exposure (Corresponds with Grasshopper.Kernel.GH_Exposure.hidden):

Note that Project Tray shows a dimmed icon with (Legacy) postfix for legacy components:

Legacy components are still included in the published plugin but are hidden and marked as Old. You would need to prefix search with # to see these hidden components. This allows your plugin to be backwards compatible and all previous Grasshopper definitions using the old component still work. The source Grasshopper definition (identical.gh in the screenshot above) also ends up including the source for each of the published component versions:

Shared Libraries
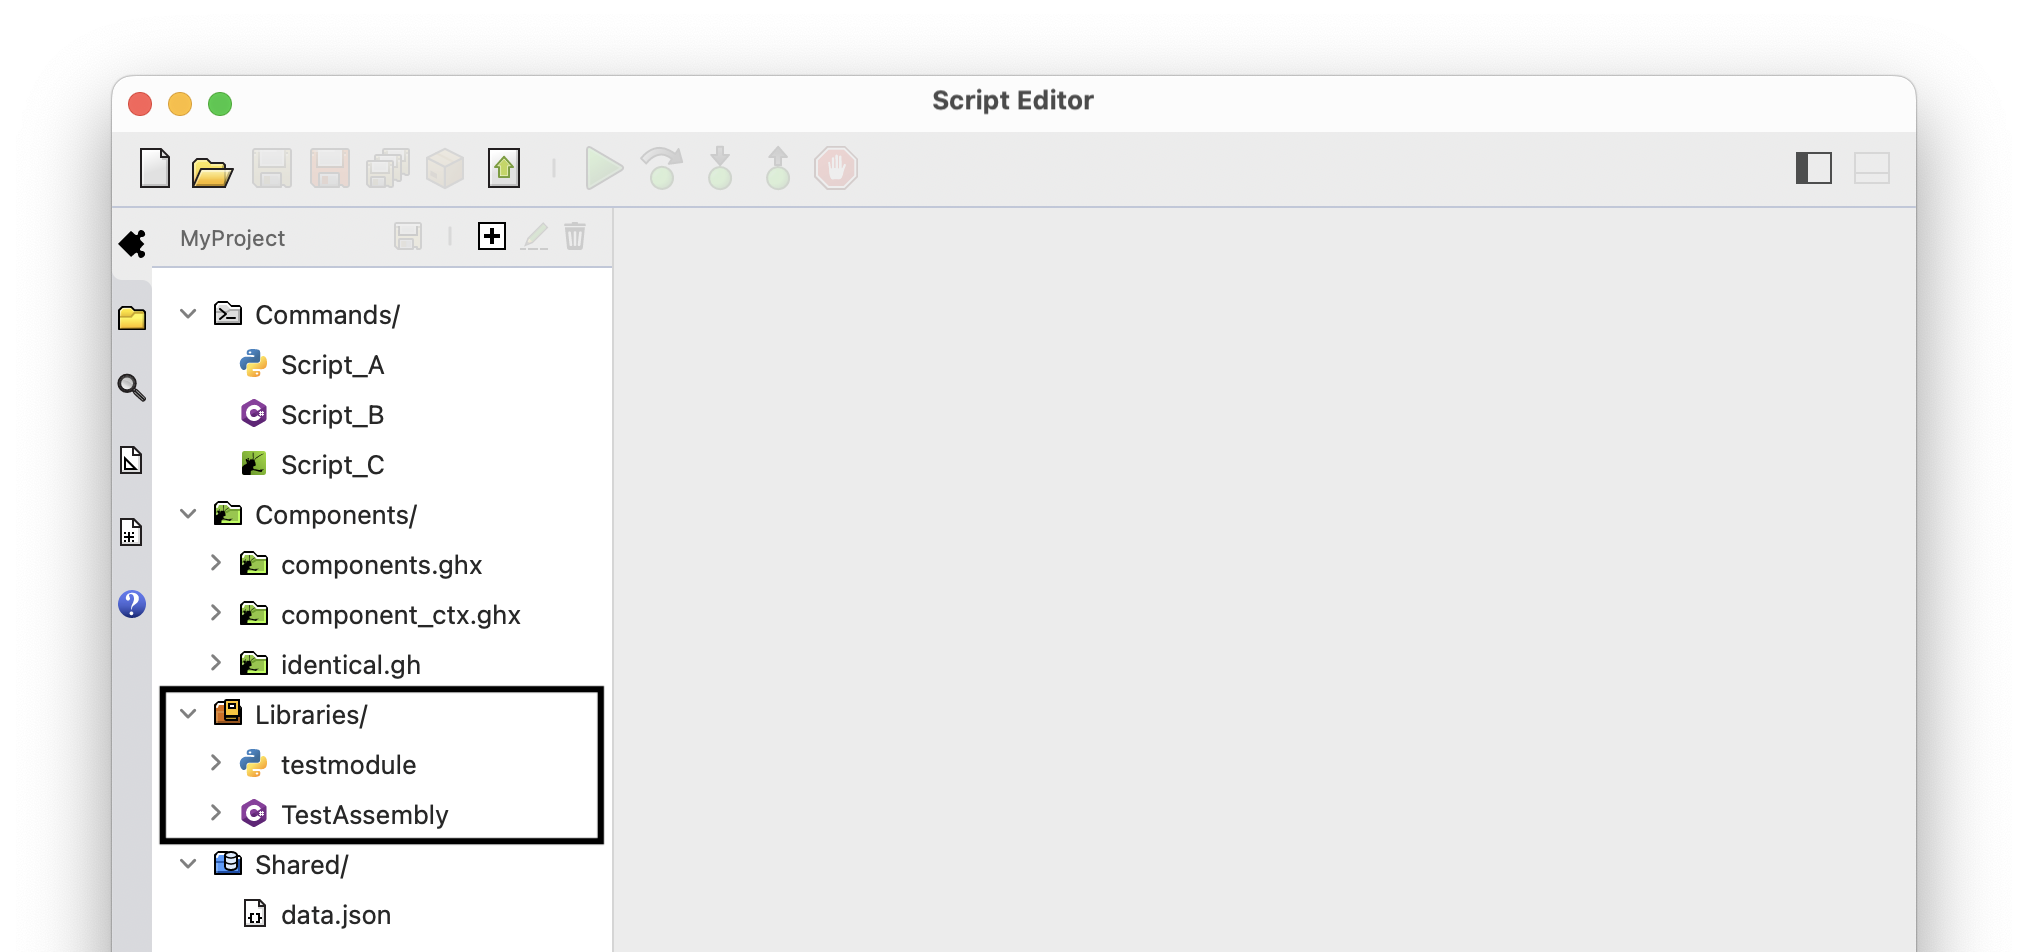
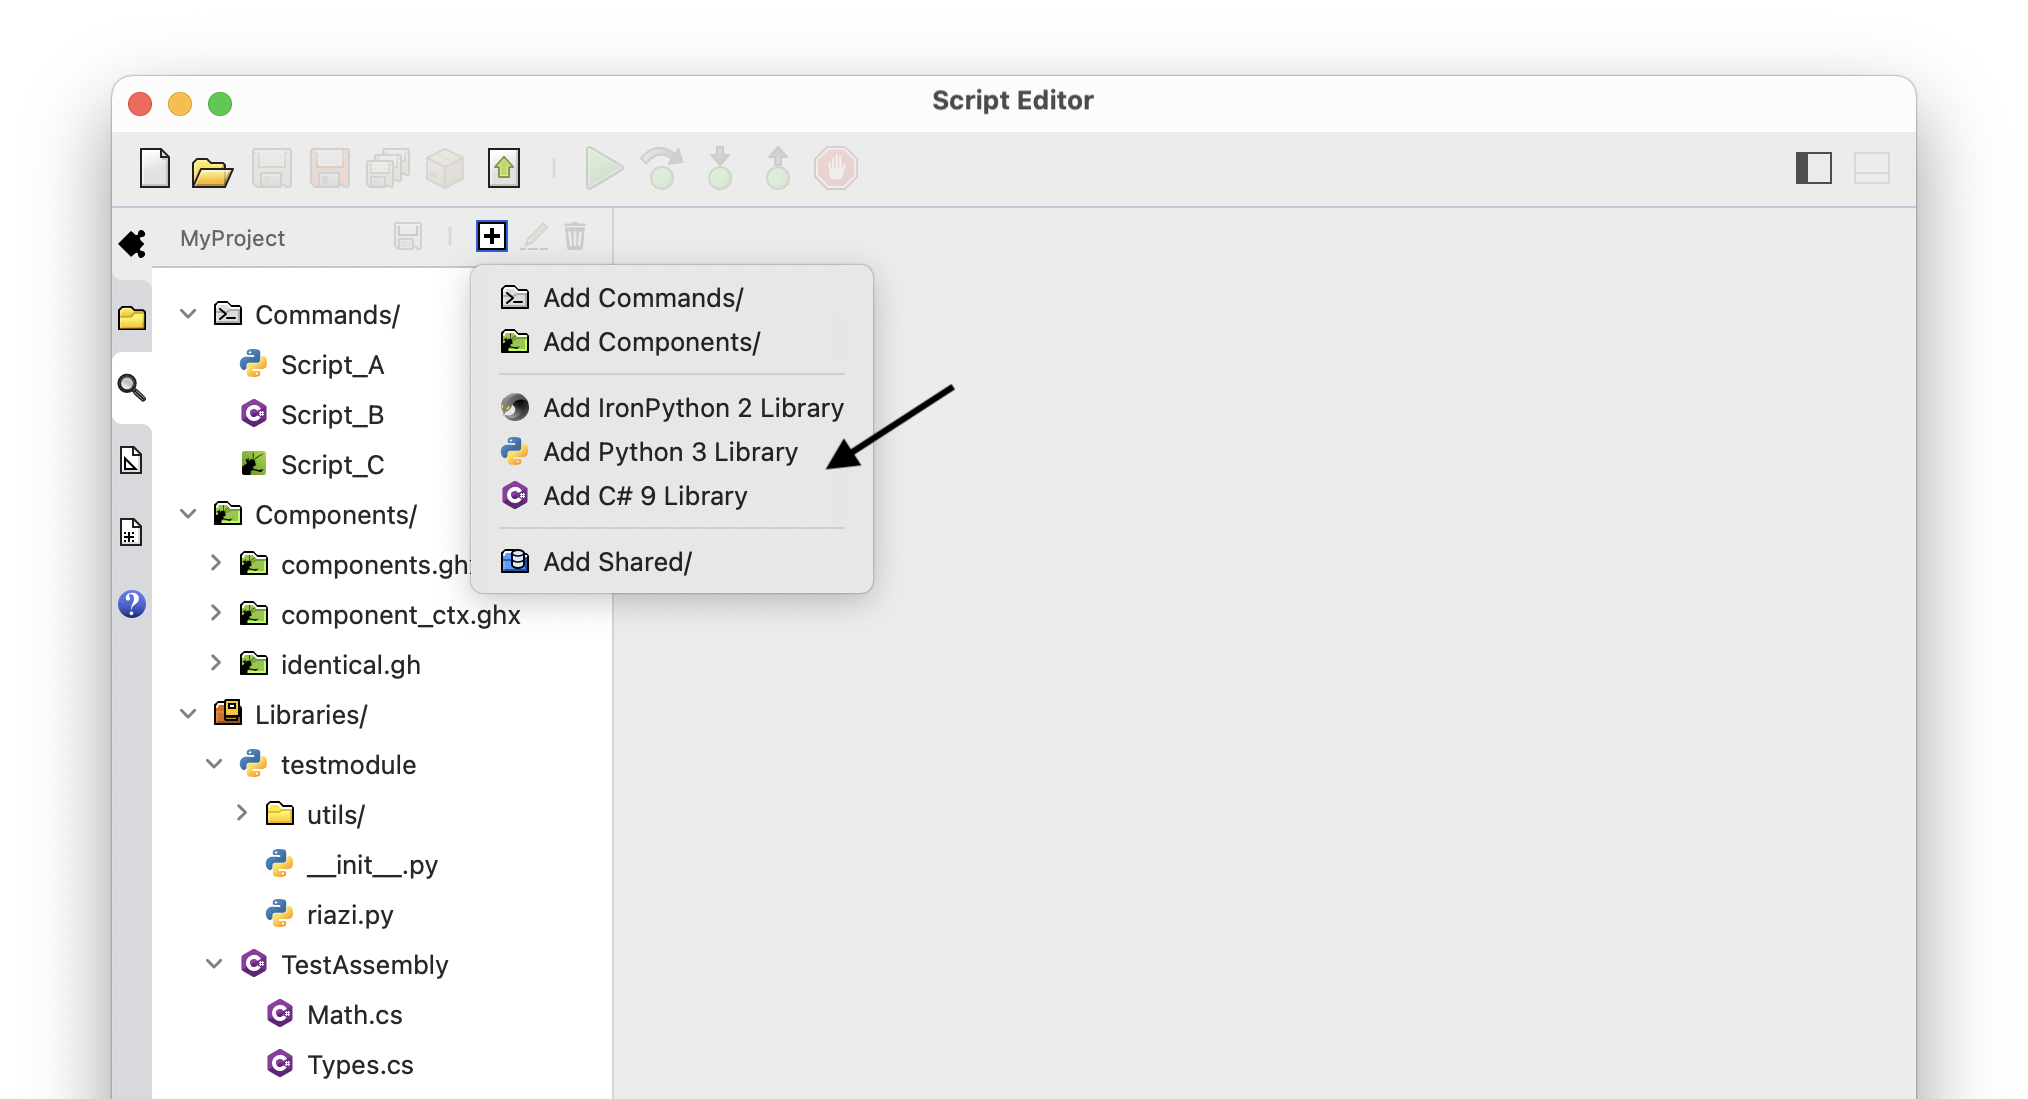
To share code between command and components, create a code library and add that to your project. These libraries will be embedded in the published plugins and deployed on the target machine. Here is an example of a project with a Python 3 and C# library added:
What is a Library
Code libraries are a group of source files organized in a folder. They are language-specific and follow the library or module creation patterns of that language. For example, to create a Python 3 library, you would need to organize your python sources like below and include __init__.py files. Otherwise Python will not be able to import these libraries correctly:
testmodule/
├── __init__.py
├── riazi.py
└── utils
    ├── __init__.py
    └── utils.py
For C#, a series of .cs files organized in a folder will do the job:
TestAssembly/
├── Math.cs
└── Types.cs
Language libraries are cached when the project is being edited or is published.
See Language Libraries for more information.
Add Language Libraries
You can include code libraries in your project under Libraries/ path. Choose Add * Library from + menu in Project Tray toolbar or right-click on Libraries/ and add a shared file:

Reference Libraries
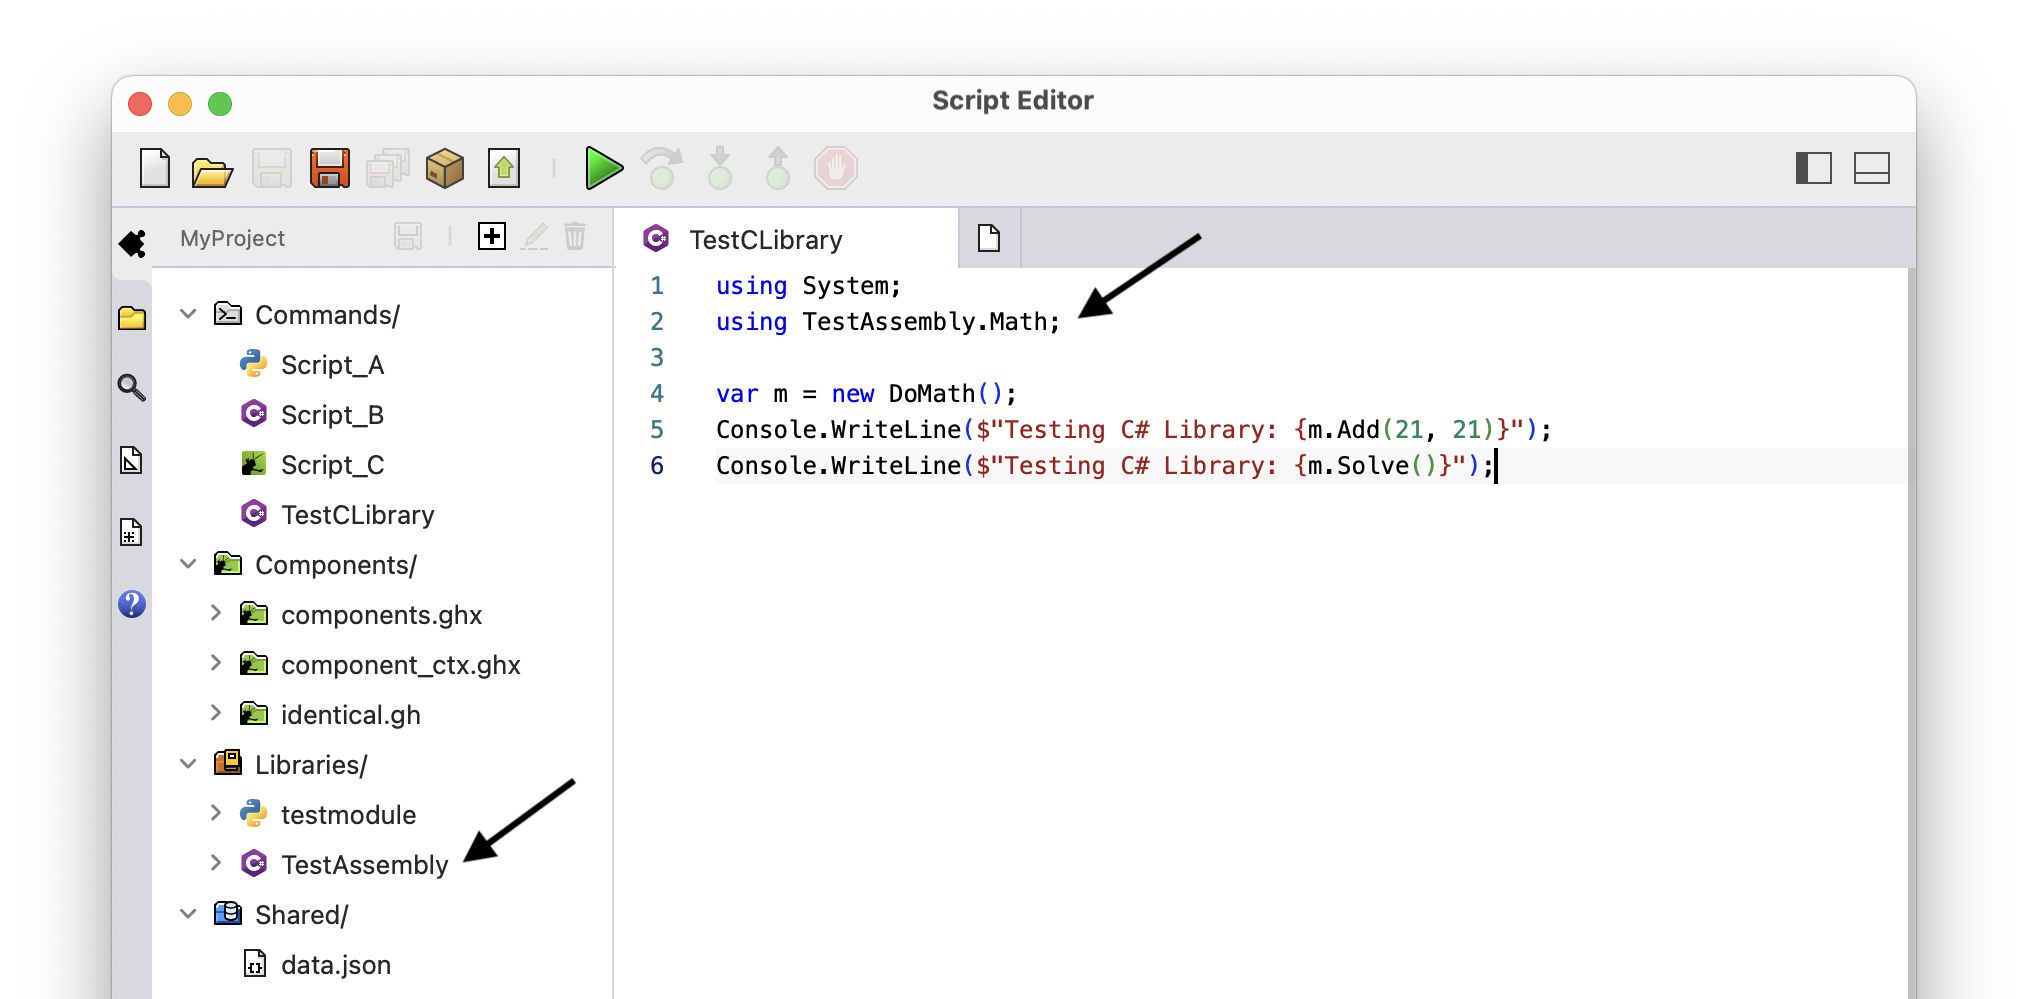
Once libraries are added, you can reference them in your scripts:
Shared Resources
Add Shared Resources
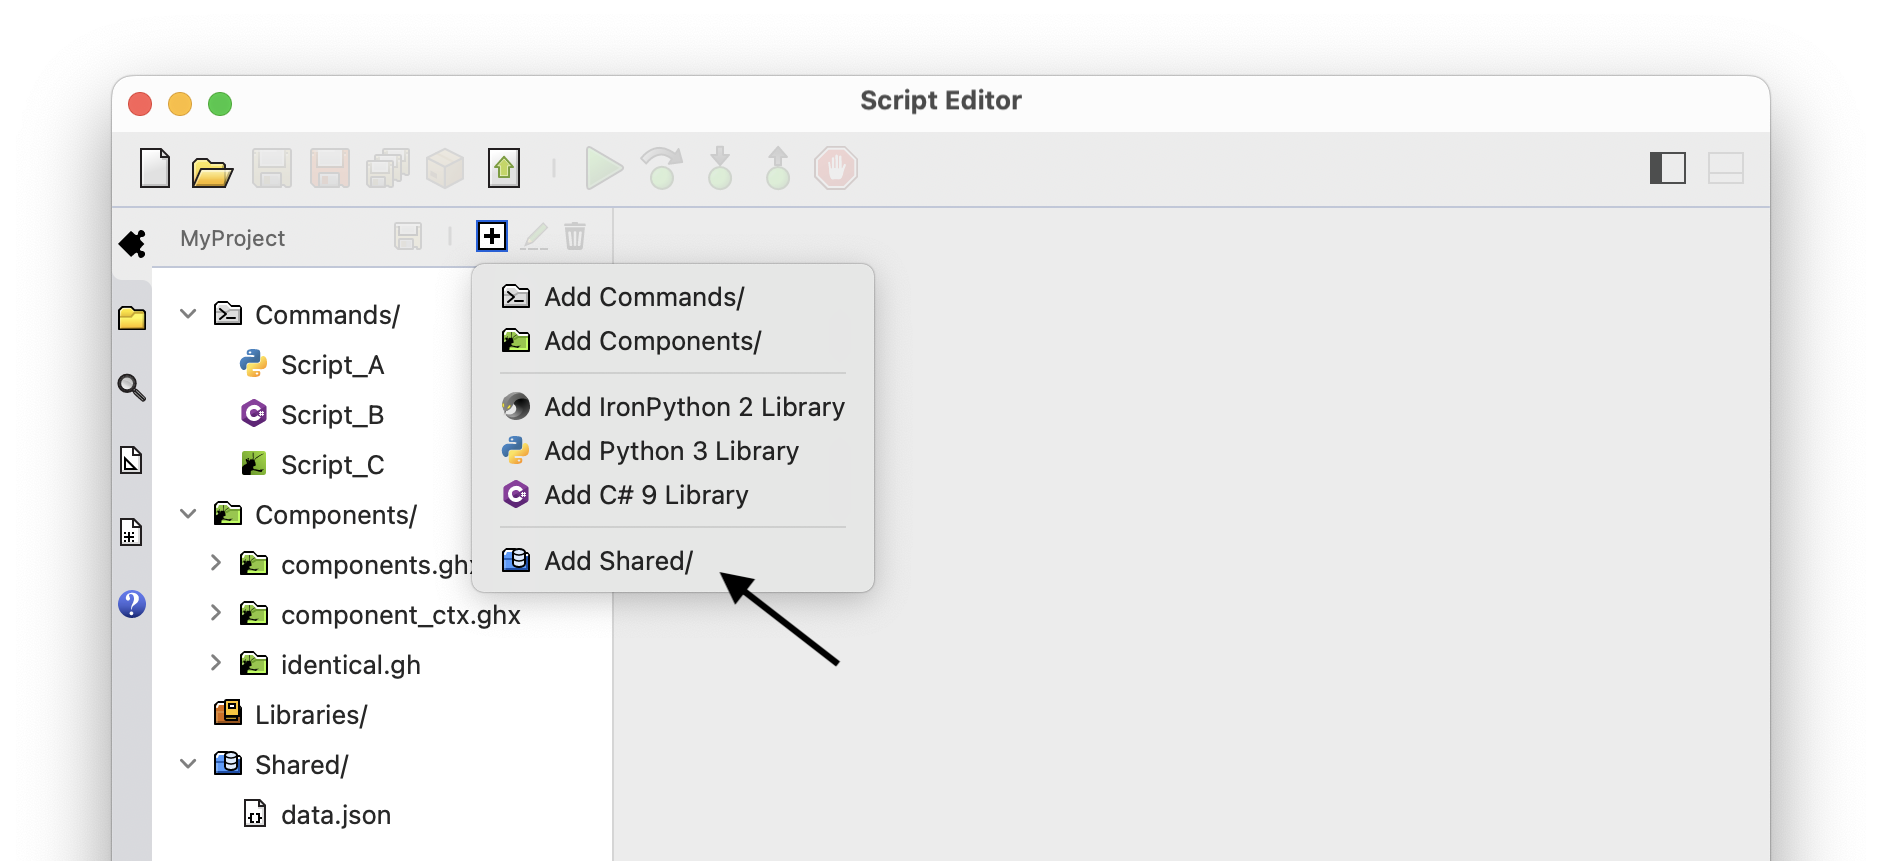
You can include data files of any type and extension in your project under Shared/ path. Choose Add Shared/ from + menu in Project Tray toolbar or right-click on Shared/ and add a shared file:

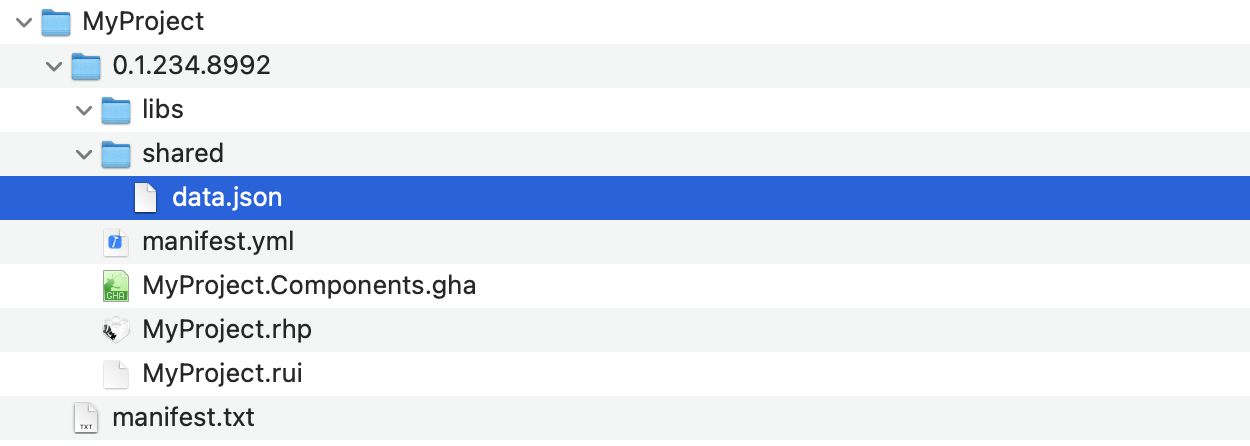
These files will be included in the final Yak package under shared/ path and are deployed on target machine. Here is an example of including data.json in the project. The file is included in the Yak package as shared/data.json and deployed when Yak package is installed:
myproject-0.1.234.8992-rh8-any.yak
├── MyProject.rhp
├── MyProject.rui
├── MyProject.Components.gha
├── manifest.yml
└── shared/
    └── data.json
Find Shared Resource
To query and get access to the deployed data files, use Rhino.PlugIns.PlugIn.PathFromId to get the installed path of you plugin. Use this path to build a path to the deployed data files. Note that data files and deployed under shared/ path alongside the plugin assembly file:
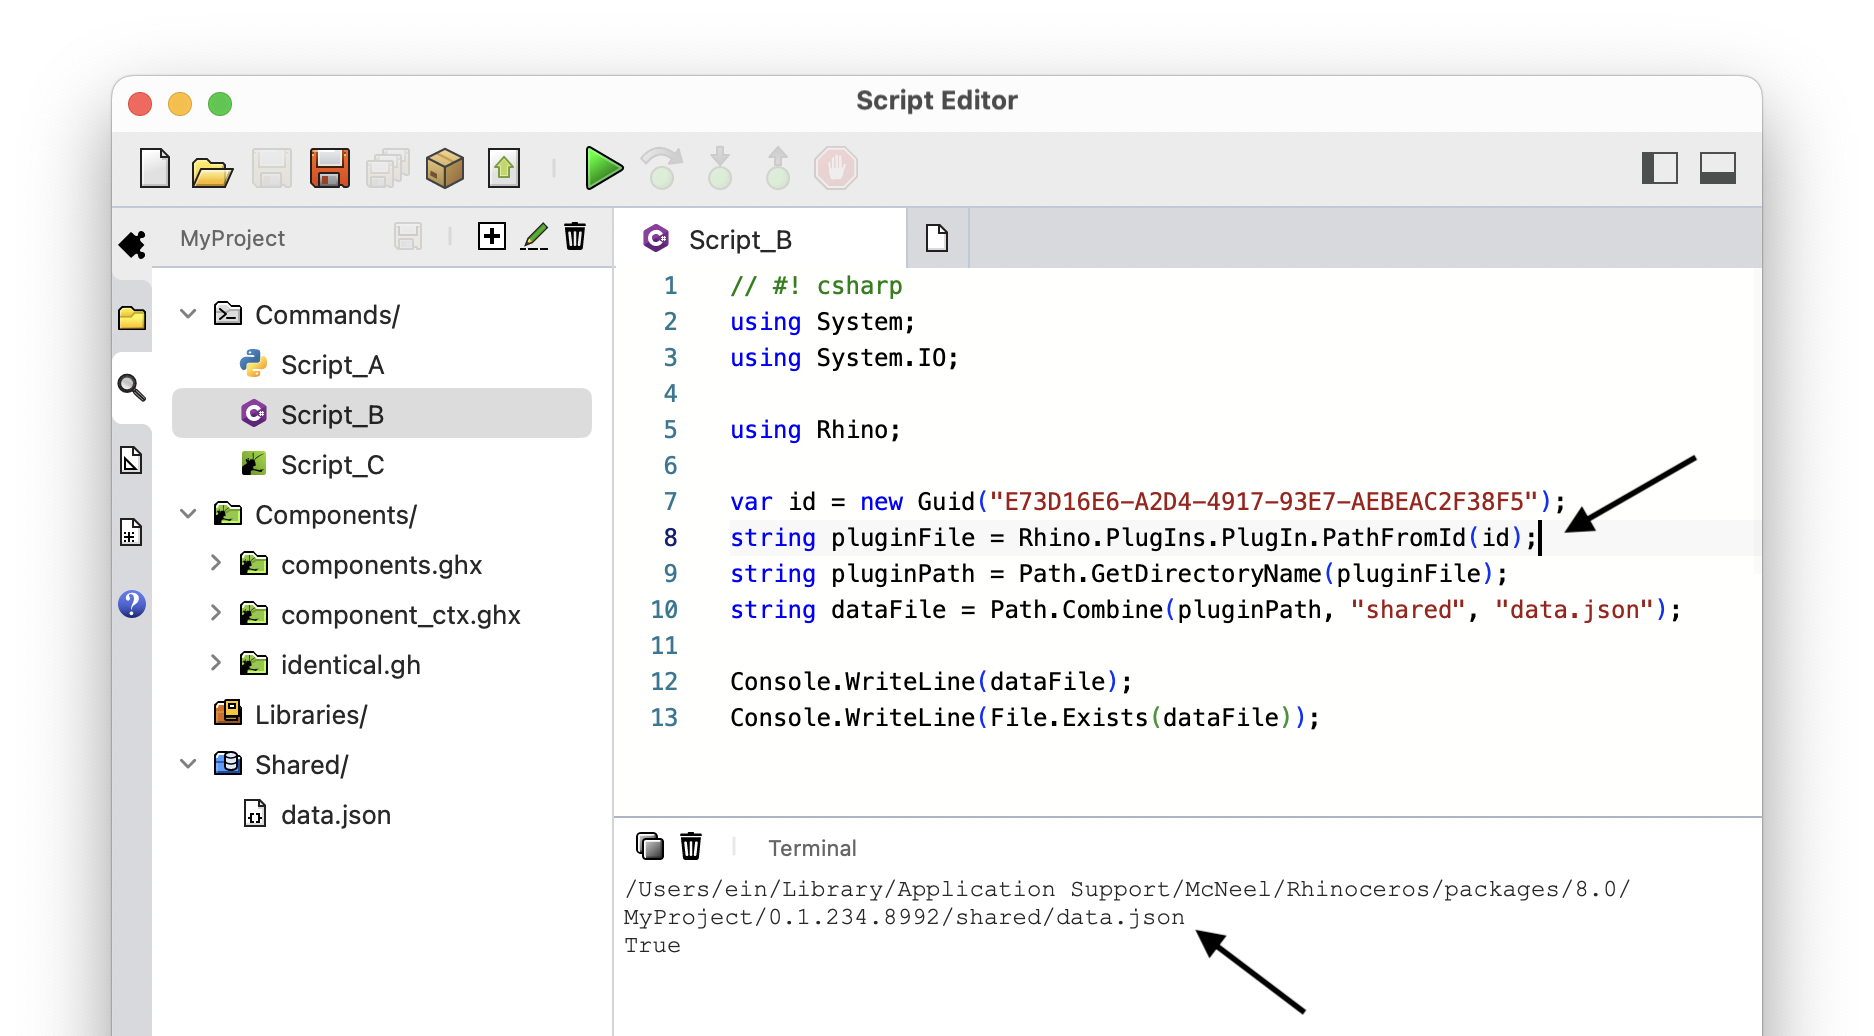
You can also use Rhino.PlugIns.PlugIn.PathFromName and pass your plugin name however the plugin id is better since it should never change and is more unique than the name.
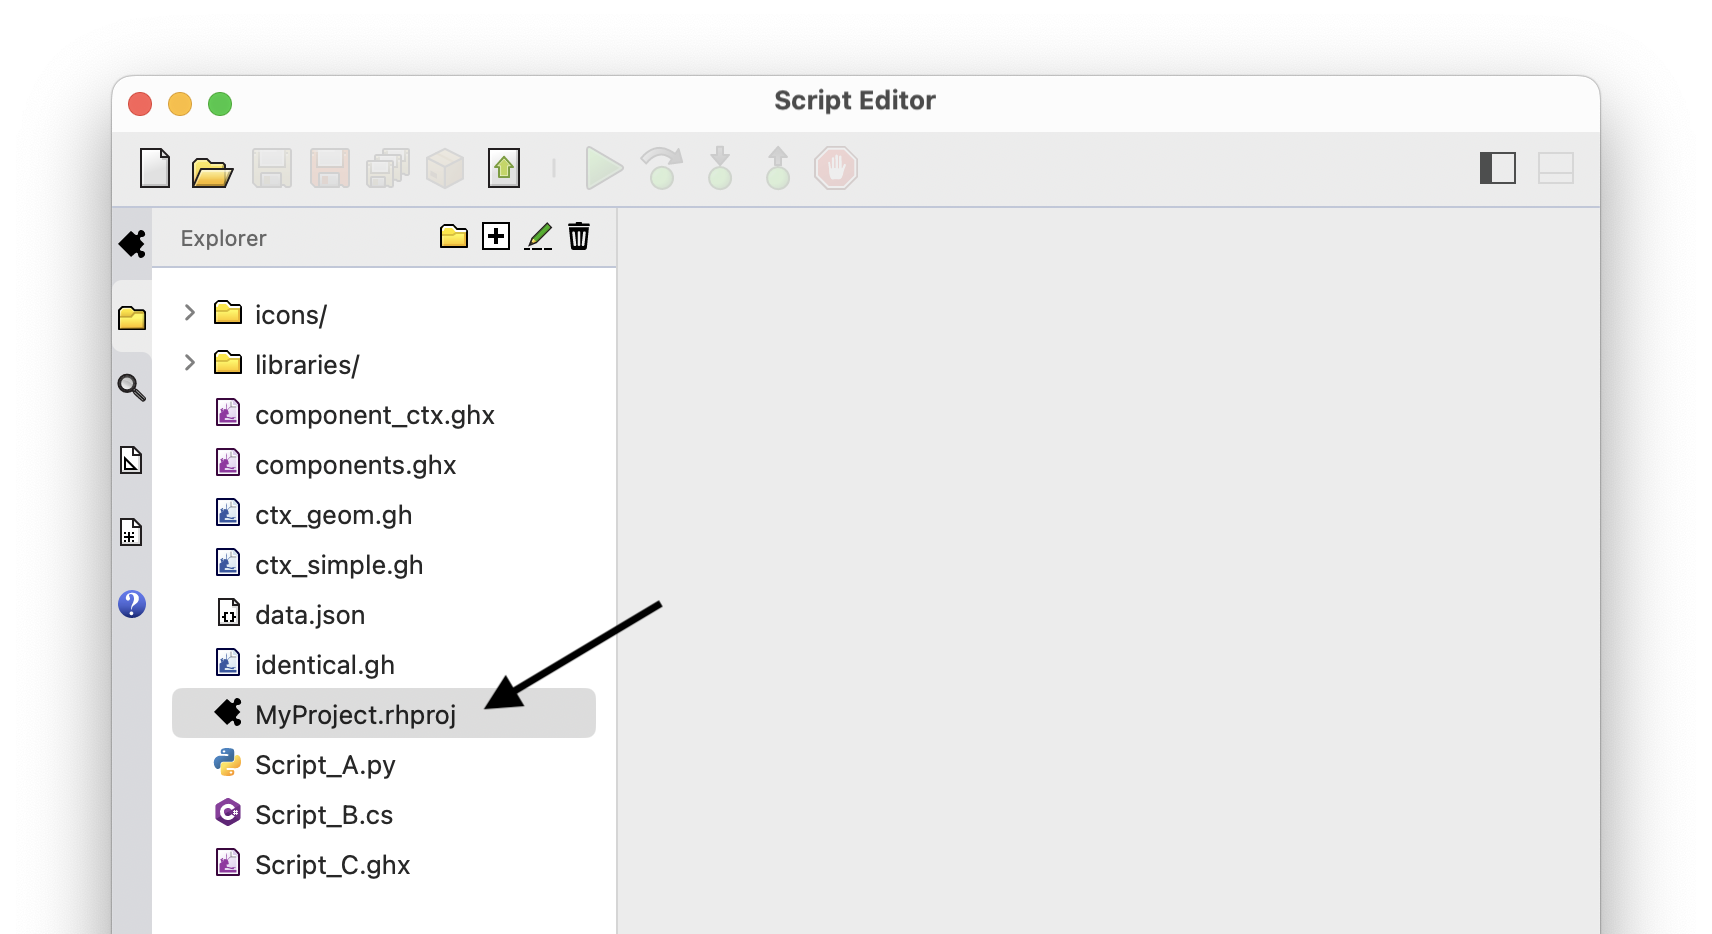
Projects in Explorer
The file explorer on the left side of Script Editor shows project source files. You can open a project by double-clicking the entry in the explorer (Rhino >=8.12):
