
It is presumed you already have the necessary tools installed and are ready to go. If you are not there yet, see Installing Tools (Windows).
Barebones plugin
We will use the Rhino 3D Plugin (C++) project template to create a new general purpose plugin. The project template generates the code for a functioning plugin. Follow these steps to build the plugin.
Plugin Template
-
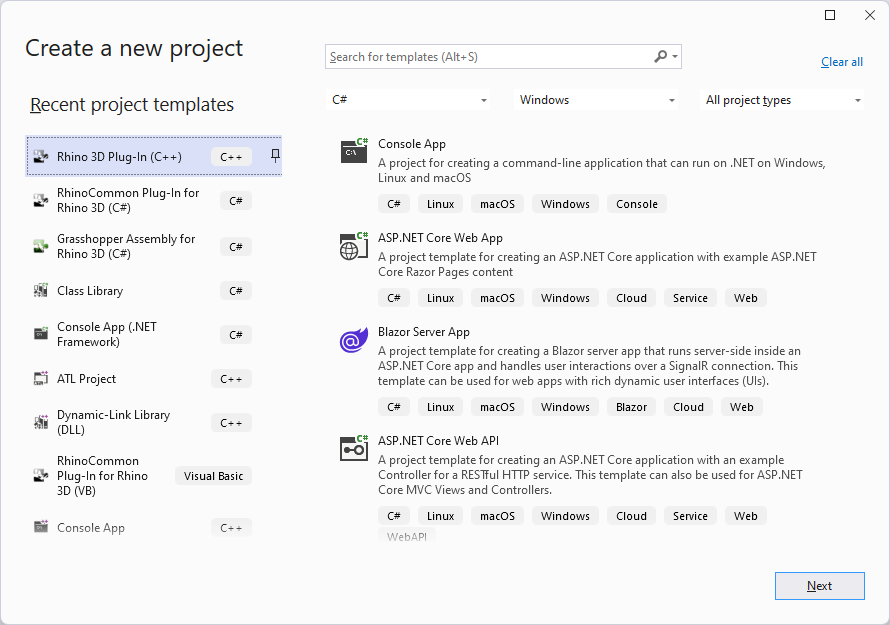
Launch Visual Studio and navigate to File > New > Project….
-
From the Create a new project dialog, select the Rhino 3D Plugin (C++) template from the list of installed templates and click Next.
-
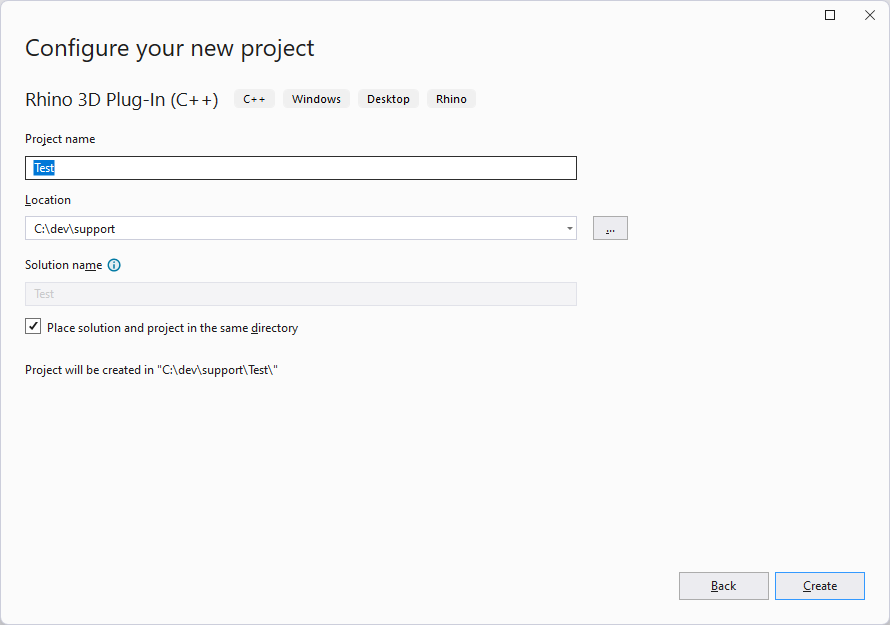
Type the project name as shown below. You can enter a different name if you want. The template uses the project name when it creates files and classes. If you enter a different name, your files and classes will have a name different from that of the files and classes mentioned in this tutorial. Don’t forget to choose a location to store the project. When finished, click Create.
-
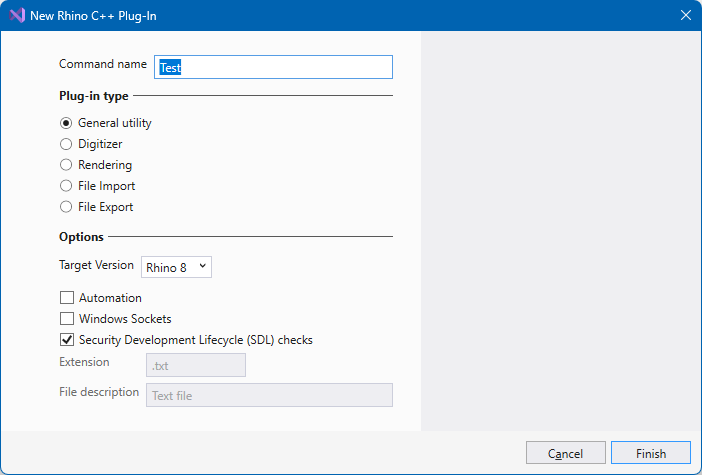
Upon clicking Create, the New Rhino C++ Plugin dialog will appear. By default, the template will create a General Utility plugin.
-
The New Rhino C++ Plugin dialog allows you to modify a number of settings used by the template when generating the plugin source code:
- Command name: Modify this field if you want to change the name of the plugin’s initial command.
- Plugin type: Select the type of plugin that you want the template to create.
- Target Version: Select the target Rhino version.
- Automation: Select this option to allow your program to manipulate objects implemented in another program. Selecting this option also exposes your program to other Automation client plugins.
- Windows sockets: Select this option to indicate that your program supports Windows sockets. Windows sockets allow you to write programs that communicate over TCP/IP networks.
- Security Development Lifecycle (SDL) checks: Select this option to add recommended Security Development Lifecycle (SDL) checks to the project. These checks include extra security-relevant warnings as errors, and additional secure code-generation features. For more information, see Enable Additional Security Checks.
-
For this tutorial, just accept the default settings. Click the Finish button, and the template begins to generate your plugin project’s folders, files, and classes. When the template is finished, look through the plugin project using Visual Studio’s Solution Explorer…
Plugin Anatomy
The following files are of interest:
| File | Description |
|---|---|
| Test.vcxproj | Project file that allows Visual C++ to build your plugin. |
| stdafx.h | Main project header. |
| stdafx.cpp | Used to generate the precompiled header. |
| TestApp.h | Application class header that contains the CTestApp class declaration. |
| TestApp.cpp | Application class implementation that contains the CTestApp member functions. |
| TestPlugIn.h | Plugin class header that contains the CTestPlugIn class declaration. |
| TestPlugIn.cpp | Plugin class implementation that contains the CTestPlugIn member functions. |
| cmdTest.cpp | Initial Rhino command. |
| Resource.h | #define constant definitions for resources. |
| Test.rc | Resource script. |
| Test.rc2 | Resource script. |
| Test.def | Module definition. |
| Test.ico | Plugin icon. |
| targetver.h | Defines the supported Windows platform. |
Project Settings
With Visual Studio, you can view a project’s setting by clicking Project > [ProjectName] Properties….
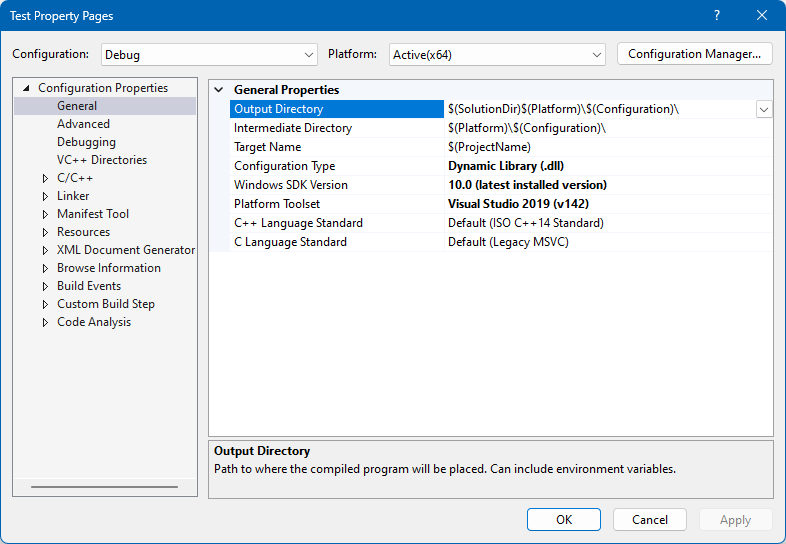
Reviewing the above settings, you can see that there is no 32-bit platform. This is because Rhino is only available as a 64-bit application.
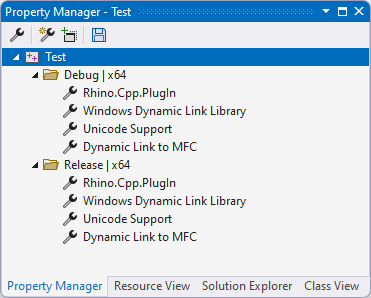
Property Sheets
Visual Studio projects have hundreds of compiler switches and options to choose from. Using custom Project Property Sheets is a convenient way to synchronize or share these common settings among other projects.
The Plugin Template, used to generate the plugin project, adds Rhino plugin specific property sheets to the project. To view these property sheets, click View > Property Manager.
Boilerplate Build
The Rhino Plugin Template, in addition to generating code, creates a custom project file for your plugin. This file, Test.vcxproj, specifies all of the file dependencies together with the compile and link option flags.
Before we can build our project, we need to fill in the Rhino plugin developer declarations. These declarations will let the user of our plugin know who produced the plugin and where they can support information if needed.
-
Open TestPlugIn.cpp and modify the following lines of code, providing your company name and other support information:
RHINO_PLUG_IN_DEVELOPER_ORGANIZATION(L"My Company Name"); RHINO_PLUG_IN_DEVELOPER_ADDRESS(L"123 Developer Street\r\nCity State 12345-6789"); RHINO_PLUG_IN_DEVELOPER_COUNTRY(L"My Country"); RHINO_PLUG_IN_DEVELOPER_PHONE(L"123.456.7890"); RHINO_PLUG_IN_DEVELOPER_FAX(L"123.456.7891"); RHINO_PLUG_IN_DEVELOPER_EMAIL(L"support@mycompany.com"); RHINO_PLUG_IN_DEVELOPER_WEBSITE(L"http://www.mycompany.com"); RHINO_PLUG_IN_UPDATE_URL(L"http://www.mycompany.com/support"); -
When finished, delete the following line of source code as the
#errordirective will prevent the project from building:#error Developer declarations block is incomplete! -
NOTE: If you do not delete this line, the plugin will build. You are now ready to build the project by picking Build Test from the Build menu. If the build was successful, a plugin file named Test.rhp is created in the project’s Debug folder.
Testing
-
From Visual Studio, navigate to Debug > Start Debugging. This will load Rhino. The version of Rhino that is launched depends on the configuration that you build. The template adds the following configurations to your project:
- Debug: The Debug project is a Release project that disables optimizations and generates debugging information using the compiler’s Program Database (
/Zi) option and the linker’s Generate Debug Information (/DEBUG) option. These option settings let you use the debugger while you are developing your custom plugin. The Debug configuration also links with release runtime libraries. Plugins built with the Debug configuration will only load in the release version of Rhino that was installed with Rhino. - Release: The Release configuration of your program contains no symbolic debug information and is fully optimized. Debug information can be generated in PDB Files (C++) depending on the compiler options used. Creating PDB files can be very useful if you later need to debug your release version. The Release configuration also links with release runtime libraries. Plugins built with the Release configuration will only load in the release version of Rhino that was installed with Rhino.
- Debug: The Debug project is a Release project that disables optimizations and generates debugging information using the compiler’s Program Database (
-
For this guide, build the Debug configuration.
-
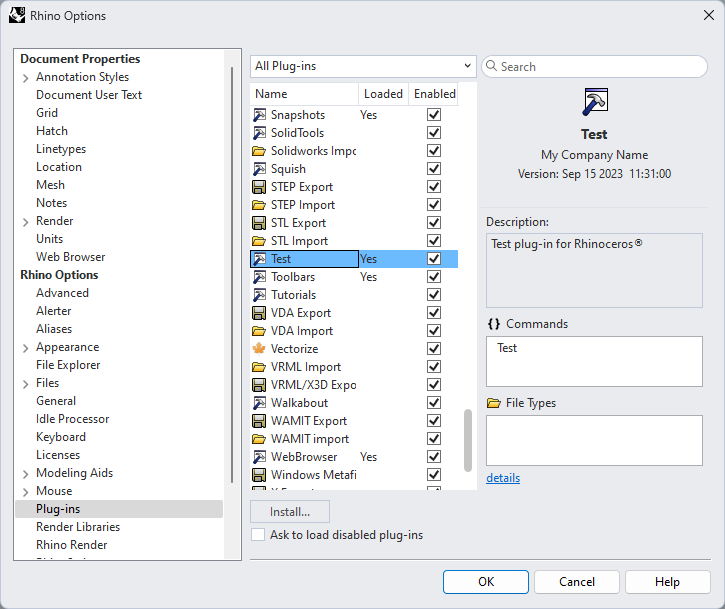
From within Rhino, navigate to Tools > Options. Navigate to the Plugins page under Rhino Options and install your plugin.
-
Once your plugin is loaded, close the options dialog and run your Test command.
-
You have finished creating your first plugin!
Adding Additional Commands
Rhino plugins can contain any number of commands. Commands are created by deriving a new class from CRhinoCommand. See rhinoSdkCommand.h for details on the CRhinoCommand class.
Example
The following example code demonstrates a simple command class that essentially does nothing:
// Do NOT put the definition of class CCommandTest in a header
// file. There is only ONE instance of a CCommandTest class
// and that instance is the static theTestCommand that appears
// immediately below the class definition.

class CCommandTest : public CRhinoCommand
{
public:
  // The one and only instance of CCommandTest is created below.
  // No copy constructor or operator= is required.
  // Values of member variables persist for the duration of the application.

  // CCommandTest::CCommandTest()
  // is called exactly once when static theTestCommand is created.
  CCommandTest() = default;

  // CCommandTest::~CCommandTest()
  // is called exactly once when static theTestCommand is destroyed.
  // The destructor should not make any calls to the Rhino SDK.
  // If your command has persistent settings, then override
  // CRhinoCommand::SaveProfile and CRhinoCommand::LoadProfile.
  ~CCommandTest() = default;

  // Returns a unique UUID for this command.
  // If you try to use an id that is already being used, then
  // your command will not work. Use GUIDGEN.EXE to make unique UUID.
  UUID CommandUUID() override
  {
    // {F502C783-C0CE-4118-8869-EFB0CB34CCCB}
    static const GUID TestCommand_UUID =
    { 0xF502C783, 0xC0CE, 0x4118, { 0x88, 0x69, 0xEF, 0xB0, 0xCB, 0x34, 0xCC, 0xCB } };
    return TestCommand_UUID;
  }

  // Returns the English command name.
  // If you want to provide a localized command name, then override

  // CRhinoCommand::LocalCommandName.
  const wchar_t* EnglishCommandName() override { return L"Test"; }

  // Rhino calls RunCommand to run the command.
  CRhinoCommand::result RunCommand(const CRhinoCommandContext& context) override;
};

// The one and only CCommandTest object
// Do NOT create any other instance of a CCommandTest class.
static class CCommandTest theTestCommand;

CRhinoCommand::result CCommandTest::RunCommand(const CRhinoCommandContext& context)
{
  // CCommandTest::RunCommand() is called when the user
  // runs the "Test".

  // TODO: Add command code here.

  // Rhino command that display a dialog box interface should also support
  // a command-line, or scriptable interface.

  ON_wString str;
  str.Format(L"The \"%s\" command is under construction.\n", EnglishCommandName());
  if (context.IsInteractive())
    RhinoMessageBox(str, TestPlugIn().PlugInName(), MB_OK);
  else
    RhinoApp().Print(str);

  // TODO: Return one of the following values:
  //   CRhinoCommand::success:  The command worked.
  //   CRhinoCommand::failure:  The command failed because of invalid input, inability
  //                            to compute the desired result, or some other reason
  //   CRhinoCommand::cancel:   The user interactively canceled the command
  //                            (by pressing ESCAPE, clicking a CANCEL button, etc.)
  //                            in a Get operation, dialog, time consuming computation, etc.

  return CRhinoCommand::success;
}
Notes
A couple things to consider:
- Command classes must return a unique UUID. If you try to use a UUID that is already in use, then your command will not work. Use the GUIDGEN.EXE that comes with Visual Studio to create unique UUIDs.
- Command classes must return a unique command name. If you try to use a command name that is already in use, then your command will not work.
- Only ONE instance of a command class can be created. This is why you should put the definition of your command classes in .cpp files.
