
Overview
If you’re a render engine developer and you’re thinking of writing an integration plug-in for Rhino, then you definitely should keep reading on.
For this series I’ll be looking into how one would go about integrating a render engine using RhinoCommon.
The subject will be broken up into several guides:
- Setting up the plug-in (this guide)
- Modal Rendering
- ChangeQueue
- Interactive render - viewport integration
- Preview render (forthcoming)
For each guide we’ll take a look at relevant parts of the integration plug-in for the Cycles render engine while doing several simple example plug-ins at the same time. The code for the example plug-ins will be stripped of (most) of the comments that are added by the template, so we can focus on the parts that matter. Source code for the sample project, dubbed MockingBird, is available on GitHub.
Creating Render Plug-in project
Install the RhinoCommon template package
To make developing a new plug-in for Rhinoceros 3D easy McNeel has published a template packages. Search for the string rhino and install the relevant package.
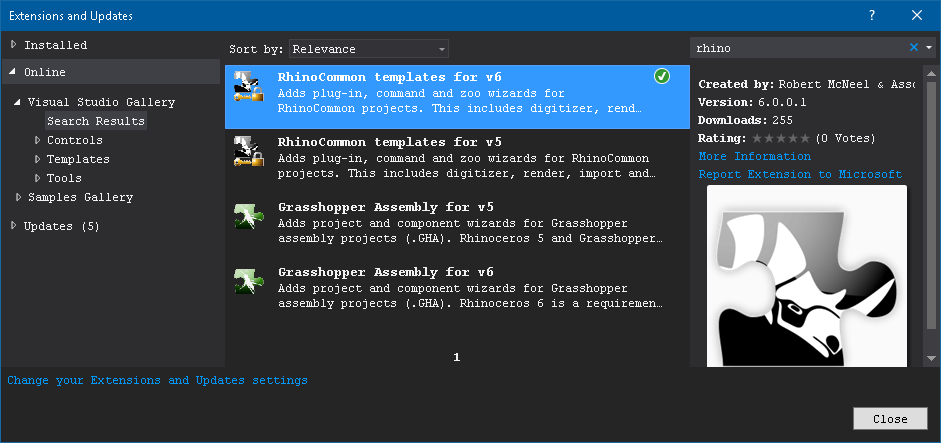
Once the template package is installed we’re ready to write amazing plug-ins for Rhino.
Create a new RhinoCommon v6 project

Lets create a new plug-in now that the wizard is installed. Simply create a new project in Visual Studio, and from the Visual C# section under Templates select Rhinoceros. Pick RhinoCommon Plug-In for Rhinoceros and give a name.
After you click on OK you’ll be presented with a wizard dialog where settings can be changed. For our case we select Render plug-in. If the wizard fails to recognize a Rhino installation path one can set the necessary paths before accepting the settings. Click on the Finish button when happy with the settings.
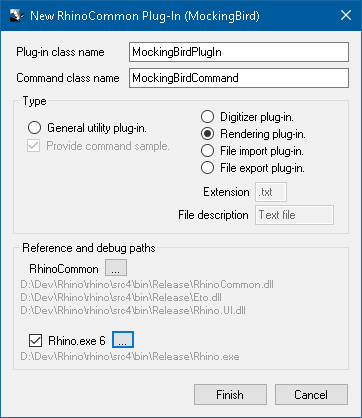
The plug-in wizard will generate a set of files for the developer.
Adjust assembly configuration
Before diving into the deep it probably is a good idea to change the assembly information and plug-in description strings. I’d suggest at least some minimal contact information and a short description of what the plug-in is supposed to do.
[assembly: PlugInDescription(DescriptionType.Address, "Turku")]
[assembly: PlugInDescription(DescriptionType.Country, "Finland")]
[assembly: PlugInDescription(DescriptionType.Email, "jesterking@letwory.net")]
[assembly: PlugInDescription(DescriptionType.Phone, "-")]
[assembly: PlugInDescription(DescriptionType.Fax, "-")]
[assembly: PlugInDescription(DescriptionType.Organization, "Letwory Interactive")]
[assembly: PlugInDescription(DescriptionType.UpdateUrl, "-")]
[assembly: PlugInDescription(DescriptionType.WebSite, "http:/www.letworyinteractive.com")]

[assembly: AssemblyTitle("MockingBird")] // Plug-In title is extracted from this
[assembly: AssemblyDescription("A sample render plug-in for Rhinoceros 6")]
[assembly: AssemblyConfiguration("")]
[assembly: AssemblyCompany("Letwory Interactive")]
[assembly: AssemblyProduct("MockingBird")]
[assembly: AssemblyCopyright("Copyright ©  2016")]
[assembly: AssemblyTrademark("")]
[assembly: AssemblyCulture("")]

// The following GUID is for the ID of the typelib if this project is exposed to COM
// This will also be the Guid of the Rhino plug-in
[assembly: Guid("ccb6ab63-fdef-44ac-9c1f-7eca810d5b75")]
The main part of the plug-in
We’ll ignore the the command class that the wizard also has added. For the purpose of this example plug-in it is not needed, so it could just be removed as well. This leaves the major entry point for the plug-in as our starting point.
using System;
using Rhino;

namespace MockingBird
{
	public class MockingBirdPlugIn : Rhino.PlugIns.RenderPlugIn
	{
		public MockingBirdPlugIn()
		{
			Instance = this;
		}

		public static MockingBirdPlugIn Instance
		{
			get; private set;
		}

		protected override Rhino.Commands.Result Render(RhinoDoc doc, Rhino.Commands.RunMode mode, bool fastPreview)
		{
			throw new NotImplementedException("Render is not implemented in the MockingBird.MockingBirdPlugIn class.");
		}

		protected override Rhino.Commands.Result RenderWindow(RhinoDoc doc, Rhino.Commands.RunMode mode, bool fastPreview, Rhino.Display.RhinoView view, System.Drawing.Rectangle rect, bool inWindow)
		{
			throw new NotImplementedException("RenderWindow is not implemented by the MockingBird.MockingBirdPlugIn class.");
		}
	}
}
Currently the wizard gives a public constructor that always assigns itself to the static Instance property. I think it is better to assign only when Instance is not set.
There are two mandatory functions to override. They have been added with default implementations that throw a NotImplementedException when called. For this example plug-in we are not going to bother with RenderWindow, so we’ll just return with a success code. For now we’ll do the same for Render(), but we’ll using that to hook up our render engine.
using System;
using Rhino;

namespace MockingBird
{
	public class MockingBirdPlugIn : Rhino.PlugIns.RenderPlugIn
	{
		public MockingBirdPlugIn()
		{
			if(Instance==null) Instance = this;
		}

		public static MockingBirdPlugIn Instance
		{
			get; private set;
		}

		protected override Rhino.Commands.Result Render(RhinoDoc doc, Rhino.Commands.RunMode mode, bool fastPreview)
		{
			return Result.Success;
		}

		protected override Rhino.Commands.Result RenderWindow(RhinoDoc doc, Rhino.Commands.RunMode mode, bool fastPreview, Rhino.Display.RhinoView view, System.Drawing.Rectangle rect, bool inWindow)
		{
			return Result.Success;
		}
	}
}
With these changes in the very first version of the plug-in can be compiled. This will create a .rhp file in the build folder.
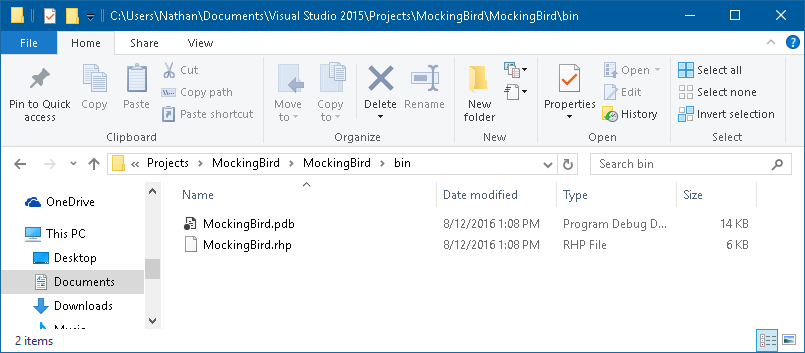
Start a Debug session with Visual Studio, and drag-and-drop the .rhp file on the Rhino instance that opens. The Rhino command-line should tell that the plug-in has been loaded. The Current Renderer menu should show the newly-loaded plug-in as an entry as well.

Congratulations! The render engine can be selected, but it won’t do anything useful yet :) Now what?
Next Steps
With these steps completed the basics of the plug-in are done. It is time to have a proper look at integrating the render engine.
Related Topics
- Render Engine Integration - Modal
- Render Engine Integration - ChangeQueue
- Render Engine Integration - Interactive Viewport
- Preview render (forthcoming)
