
In this guide, we will detail how you can leverage Rhino Compute™ from your .NET development environment in Windows to perform geometric operations in your application.
To be able to make HTTP requests, it is necessary to have Rhino.Compute running on a server, either locally or remotely. If you don’t have it set up yet, please visit one of the following guides:
Prerequisites
Before continuing, please ensure you have the right tools. This guide presumes you have an:
- Windows Operating System. Rhino.Compute only runs in Windows 7 or later.
- Development Environment. You will need one of the IDEs from Microsoft Visual Studio
- Visual Studio 2022. The most comprehensive IDE for .NET developers on Windows.
- Visual Studio Code. A standalone cross-platform IDE. It is free and open source.
Setting up a Compute Project in Visual Studio
Once you have your Rhino.Compute server up and running (either local or remote), there are a few tools which are essential to communicate with it. Here are the detailed descriptions of these tools:
- Rhino3dm - The Dotnet wrapper for OpenNurbs which contains the functions to read and write Rhino Geometry Objects. As it is available as a NuGet package, you can download directly using the NuGet Package Manager.
- NewtonSoft.JSON - The very popular JSON library. This package is called directly by RhinoCompute.cs as the information is defined in JSON format embedded in the body of a REST POST. As rhino3dm, it is also available as a NuGet Package.
- RhinoCompute.cs - This is a work in progress package which is meant to add classes available in RhinoCommon, but not available through Rhino3dm. RhinoCompute makes calls into Rhino for these functions.
Here are step by step instructions to setting up a basic project to use Rhino.Compute:
File New
- If you have not done so already, launch Visual Studio. For the purposes of this guide, we are using Visual Studio 2022 Community Edition and C#.
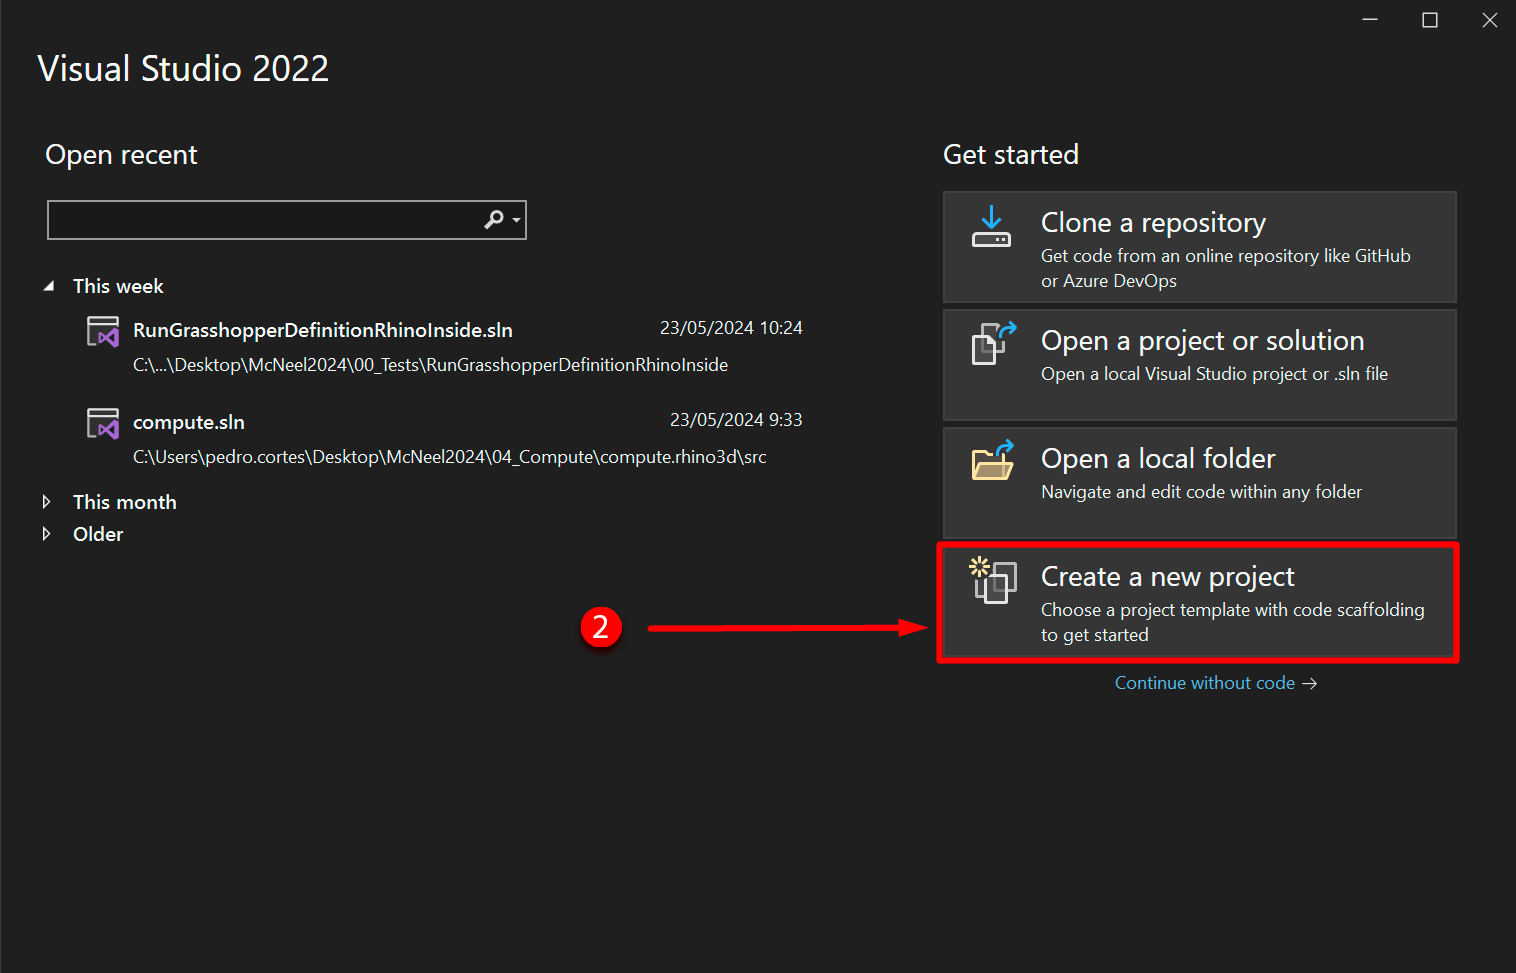
- On the right-hand menu, click on Create a new project…
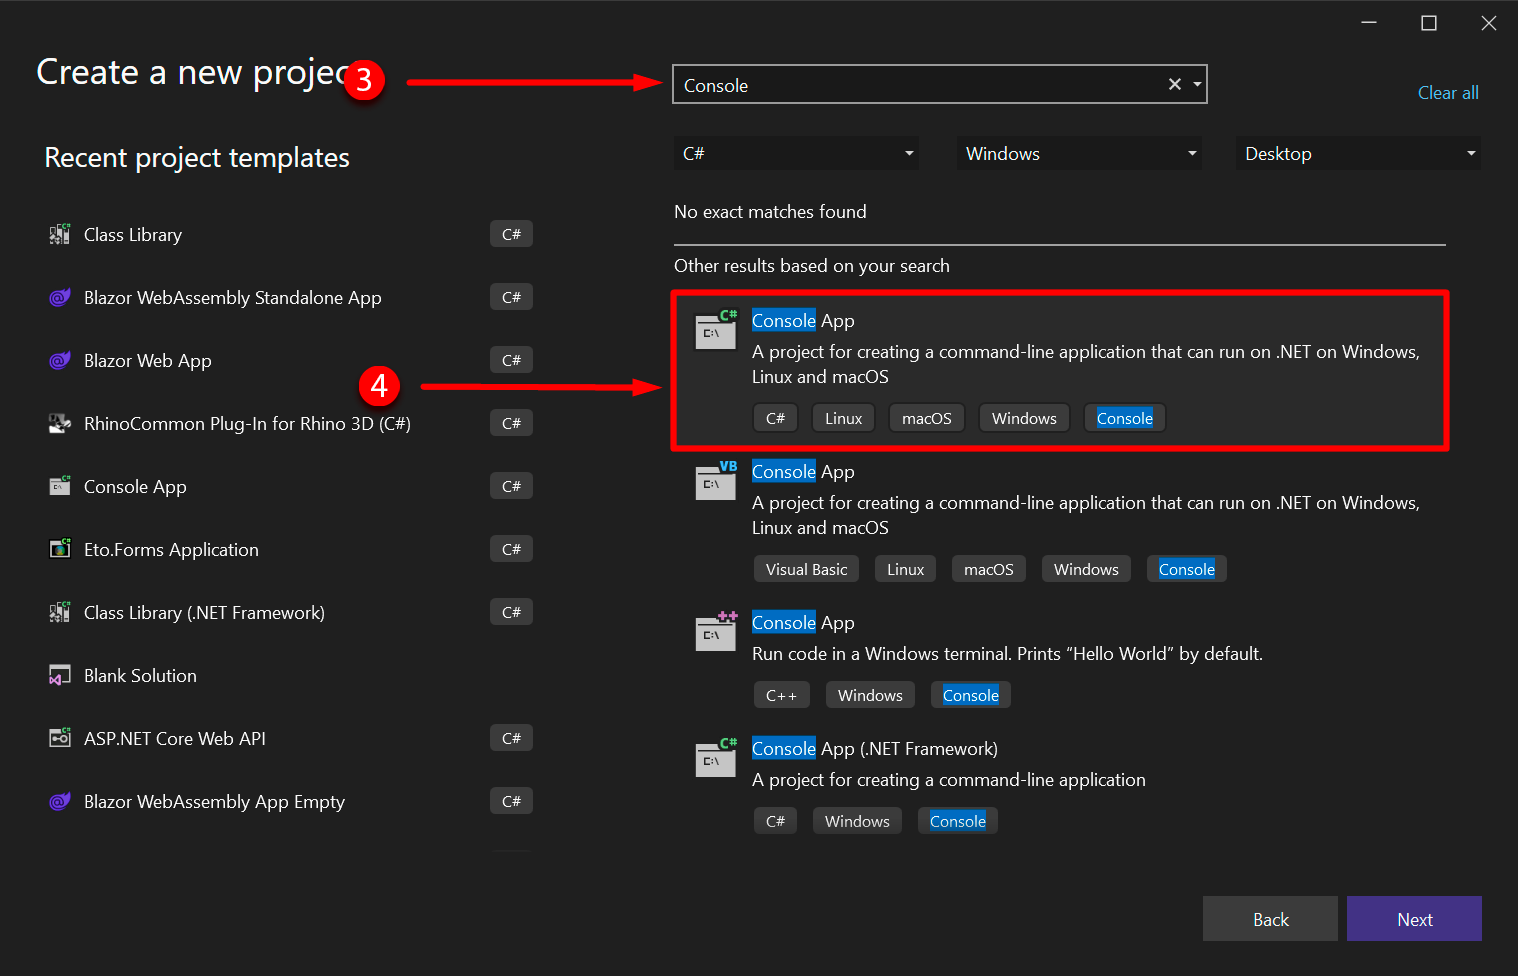
- The New Project wizard should appear. In the right column you will find a list with all the possible project templates you can choose from. To filter among them enter the word console.
- Select the C# version of the Console App template and click on Next.
- For the purposes of this guide, we will name our demo plugin TestCompute. Enter your desired name in the space reserved for it under the Project name field.
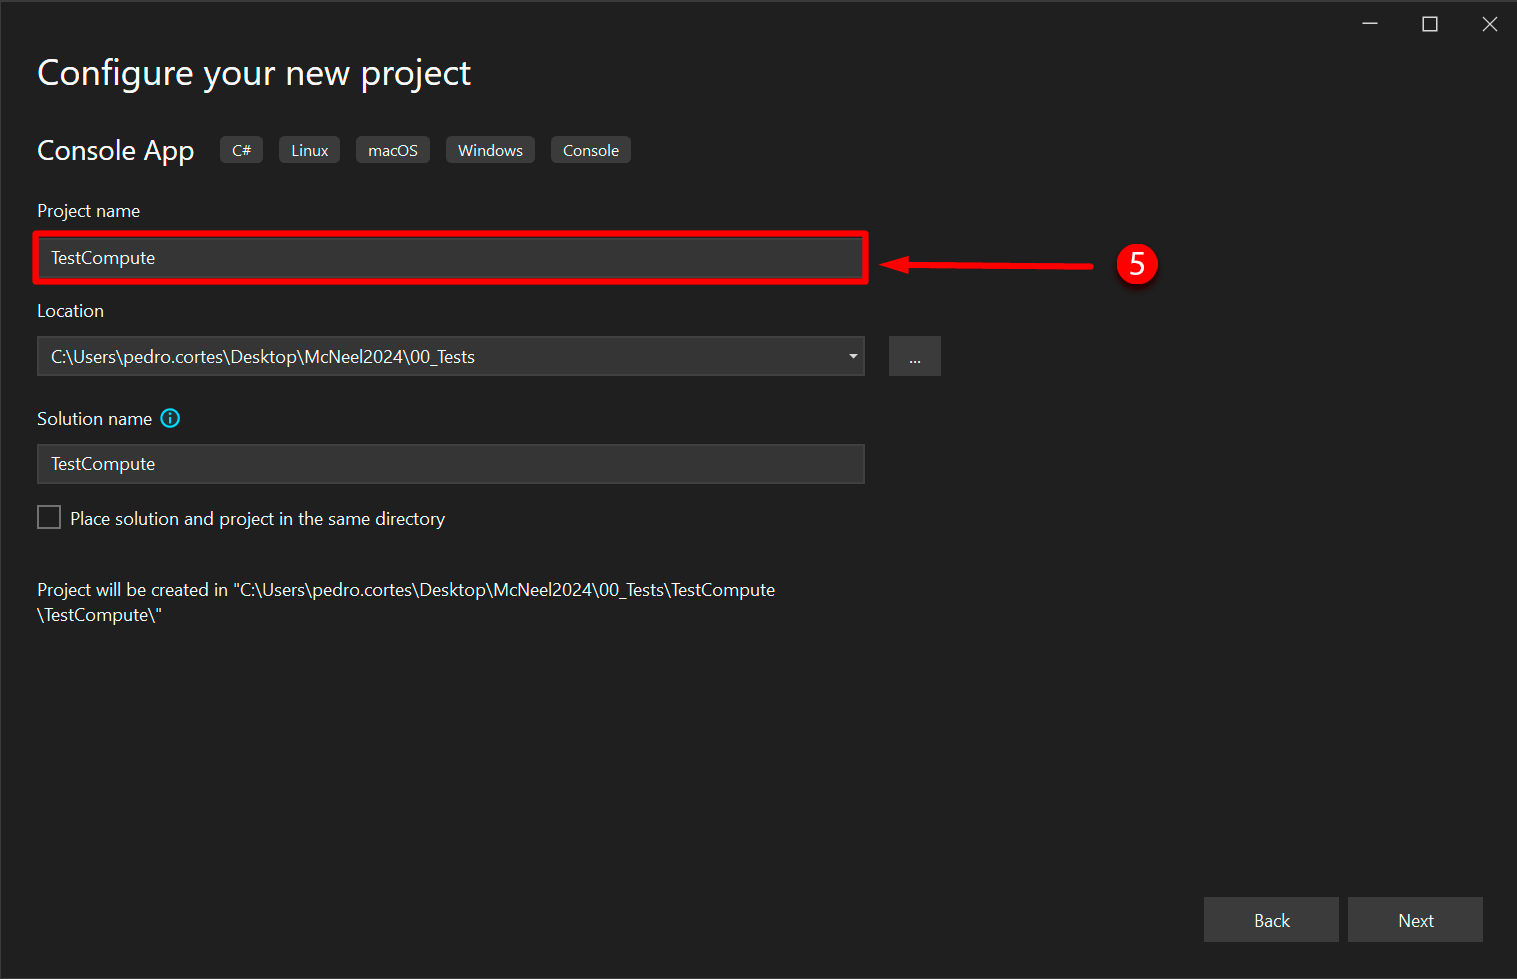
- Below the name, you can select a Location for this project on you device. This is optional depending on how you want to structure your project.

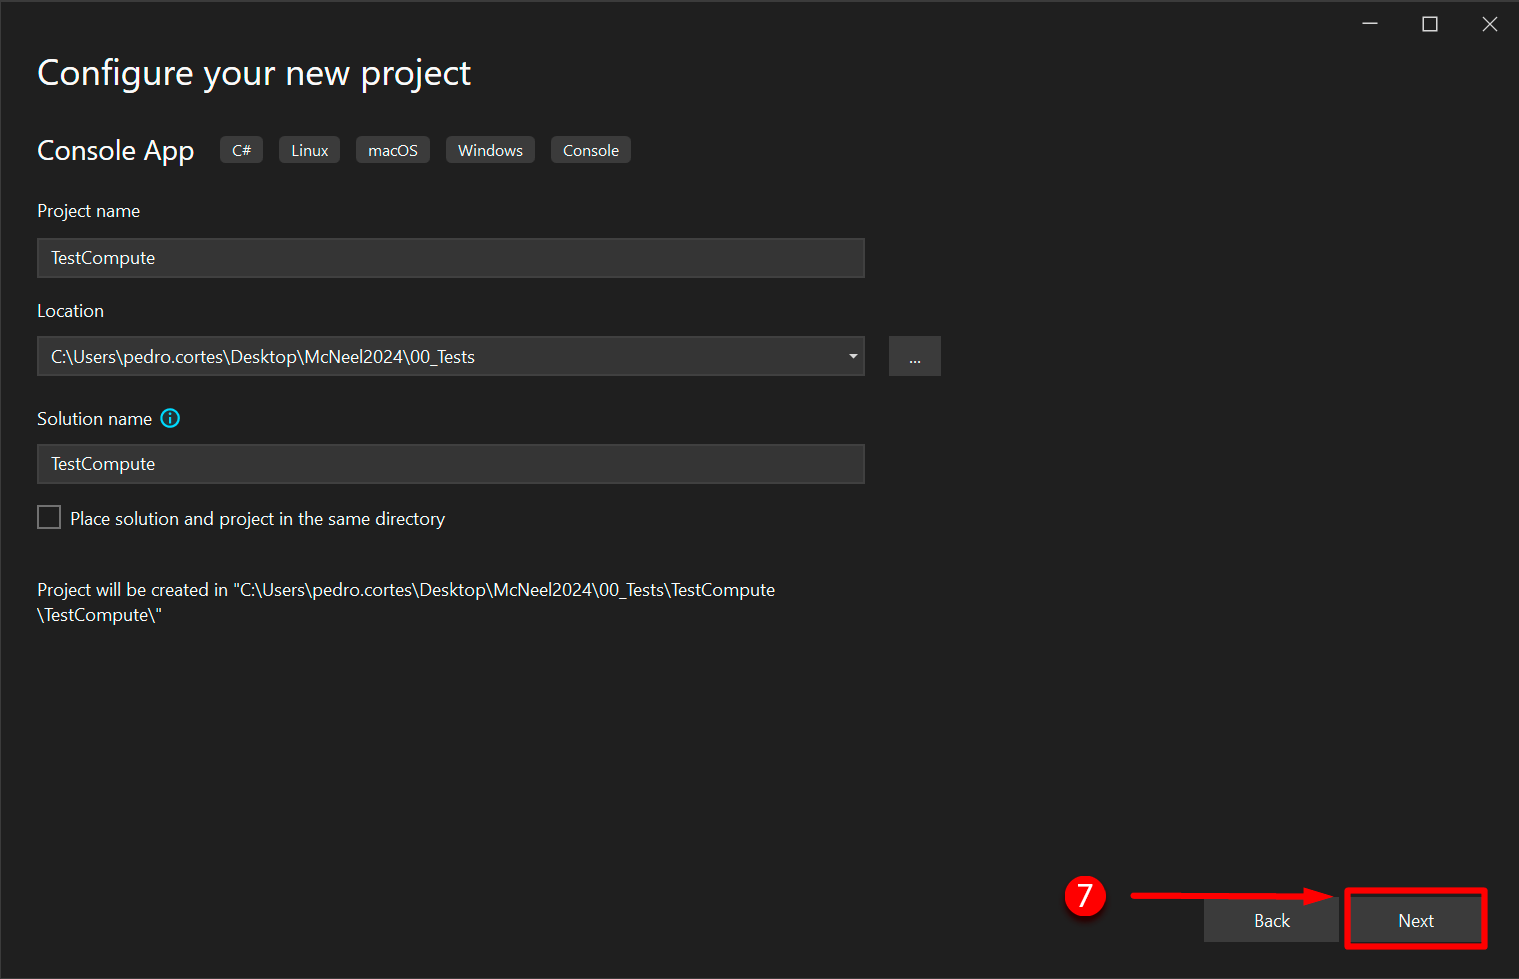
- Click the Next button. Note: You can place the solution and the project in the same directory to simplify the root path.
- Select the target framework for your project according to your specifications. In this guide we will choose .NET 8.0 (Long Term Support).

- Once you click on Create a new solution called TestCompute should open…

Steps to install the NuGet packages
- Right-click your project name in Solution Explorer and select Manage NuGet Packages ….
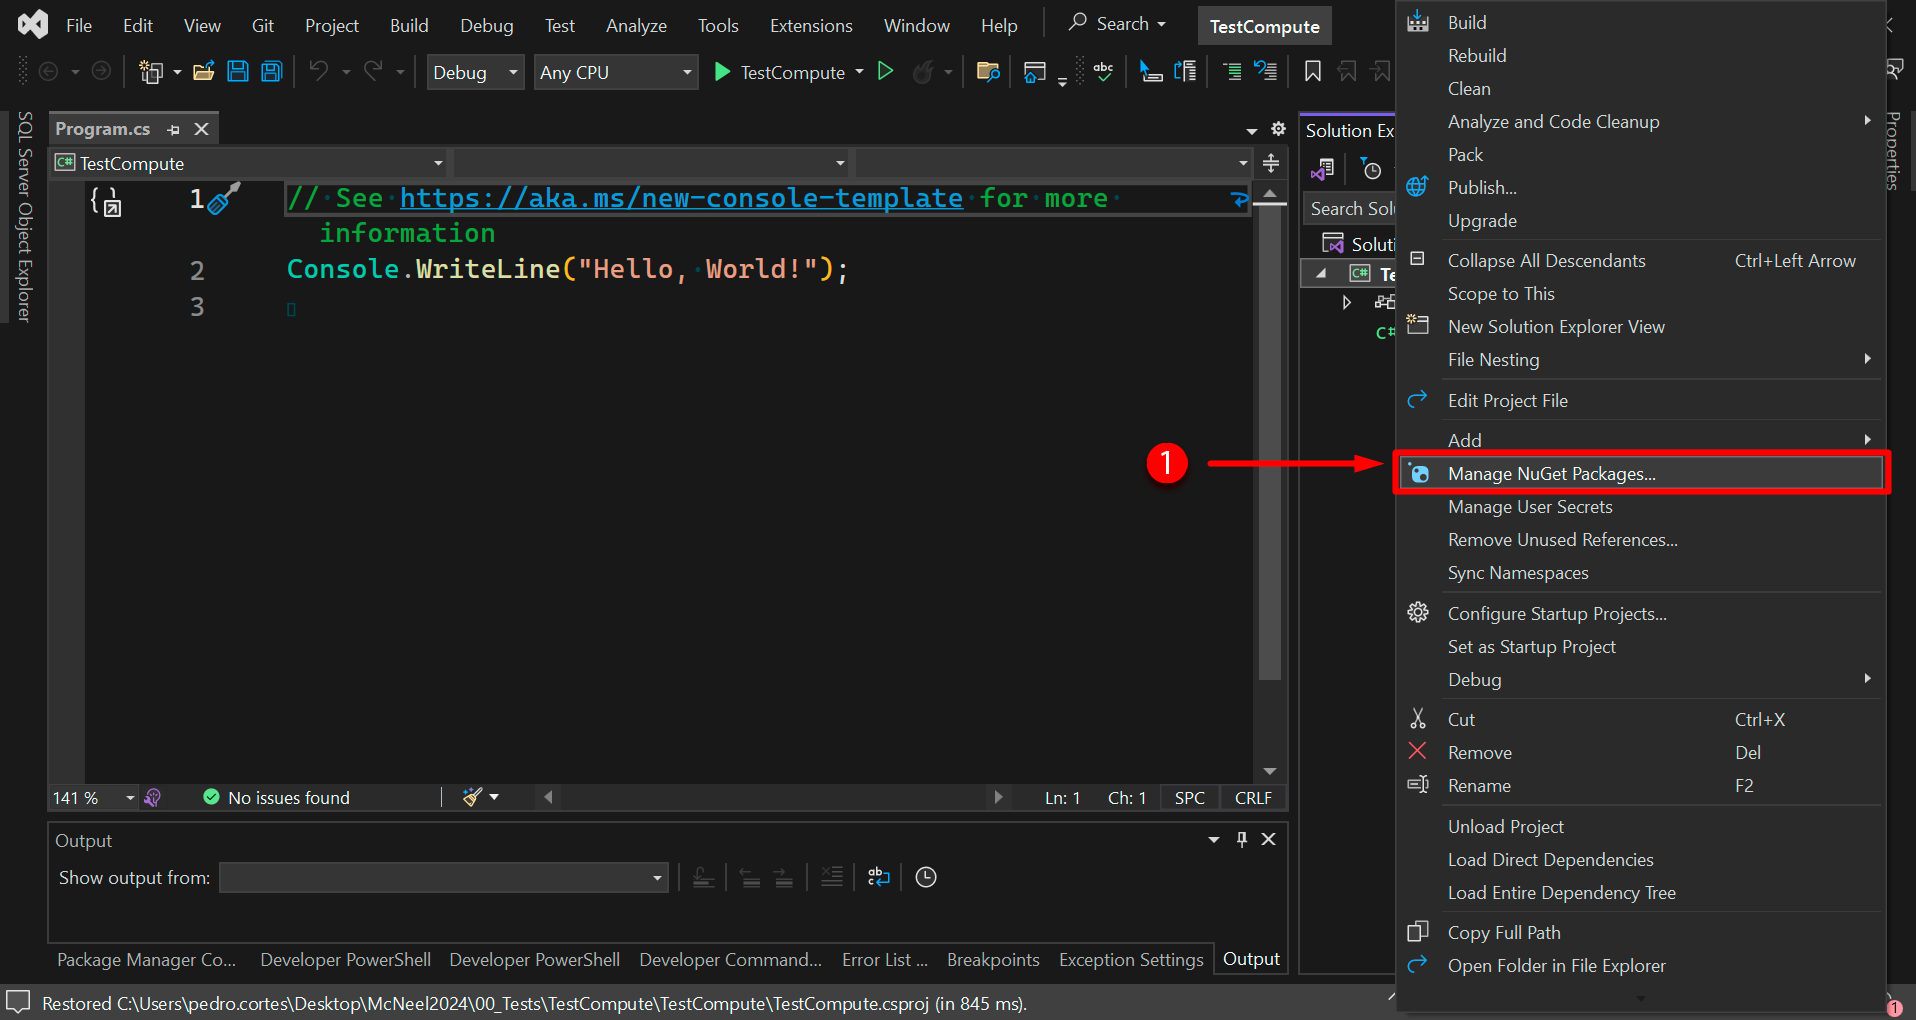
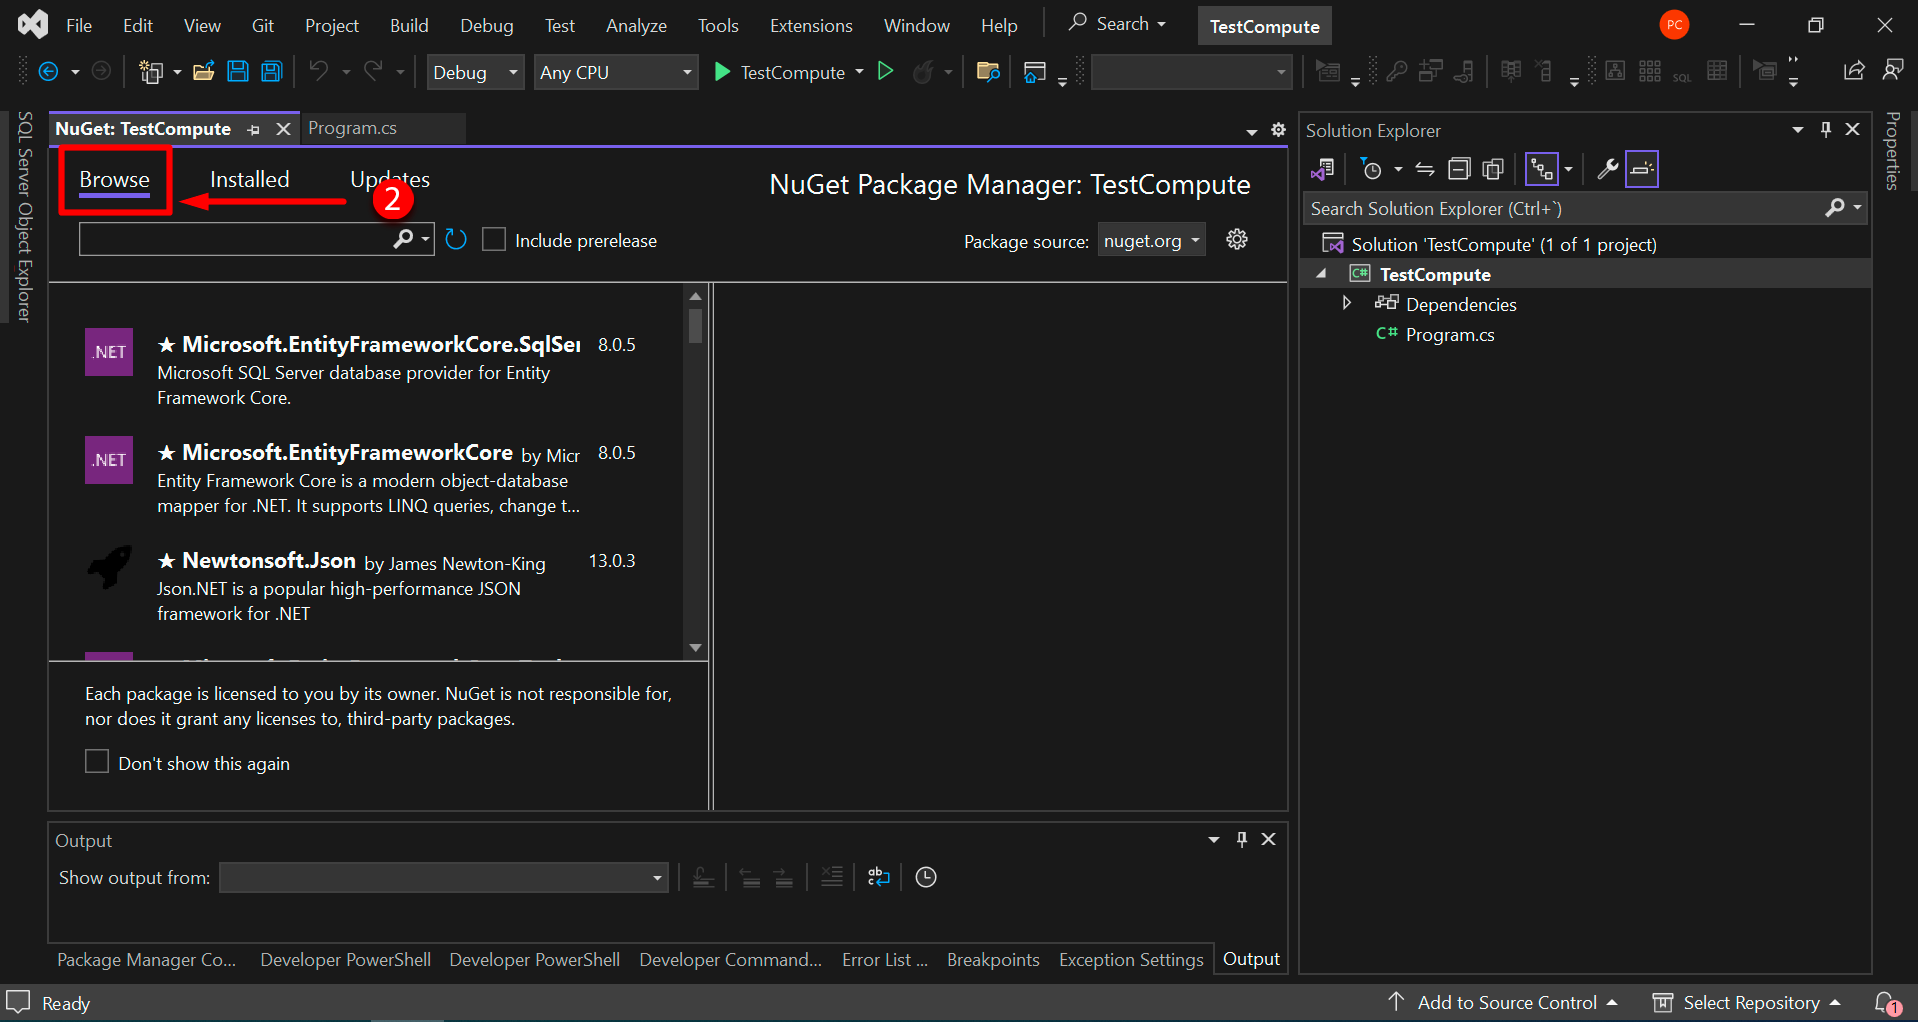
- On the left side of the dialog click on Browse.
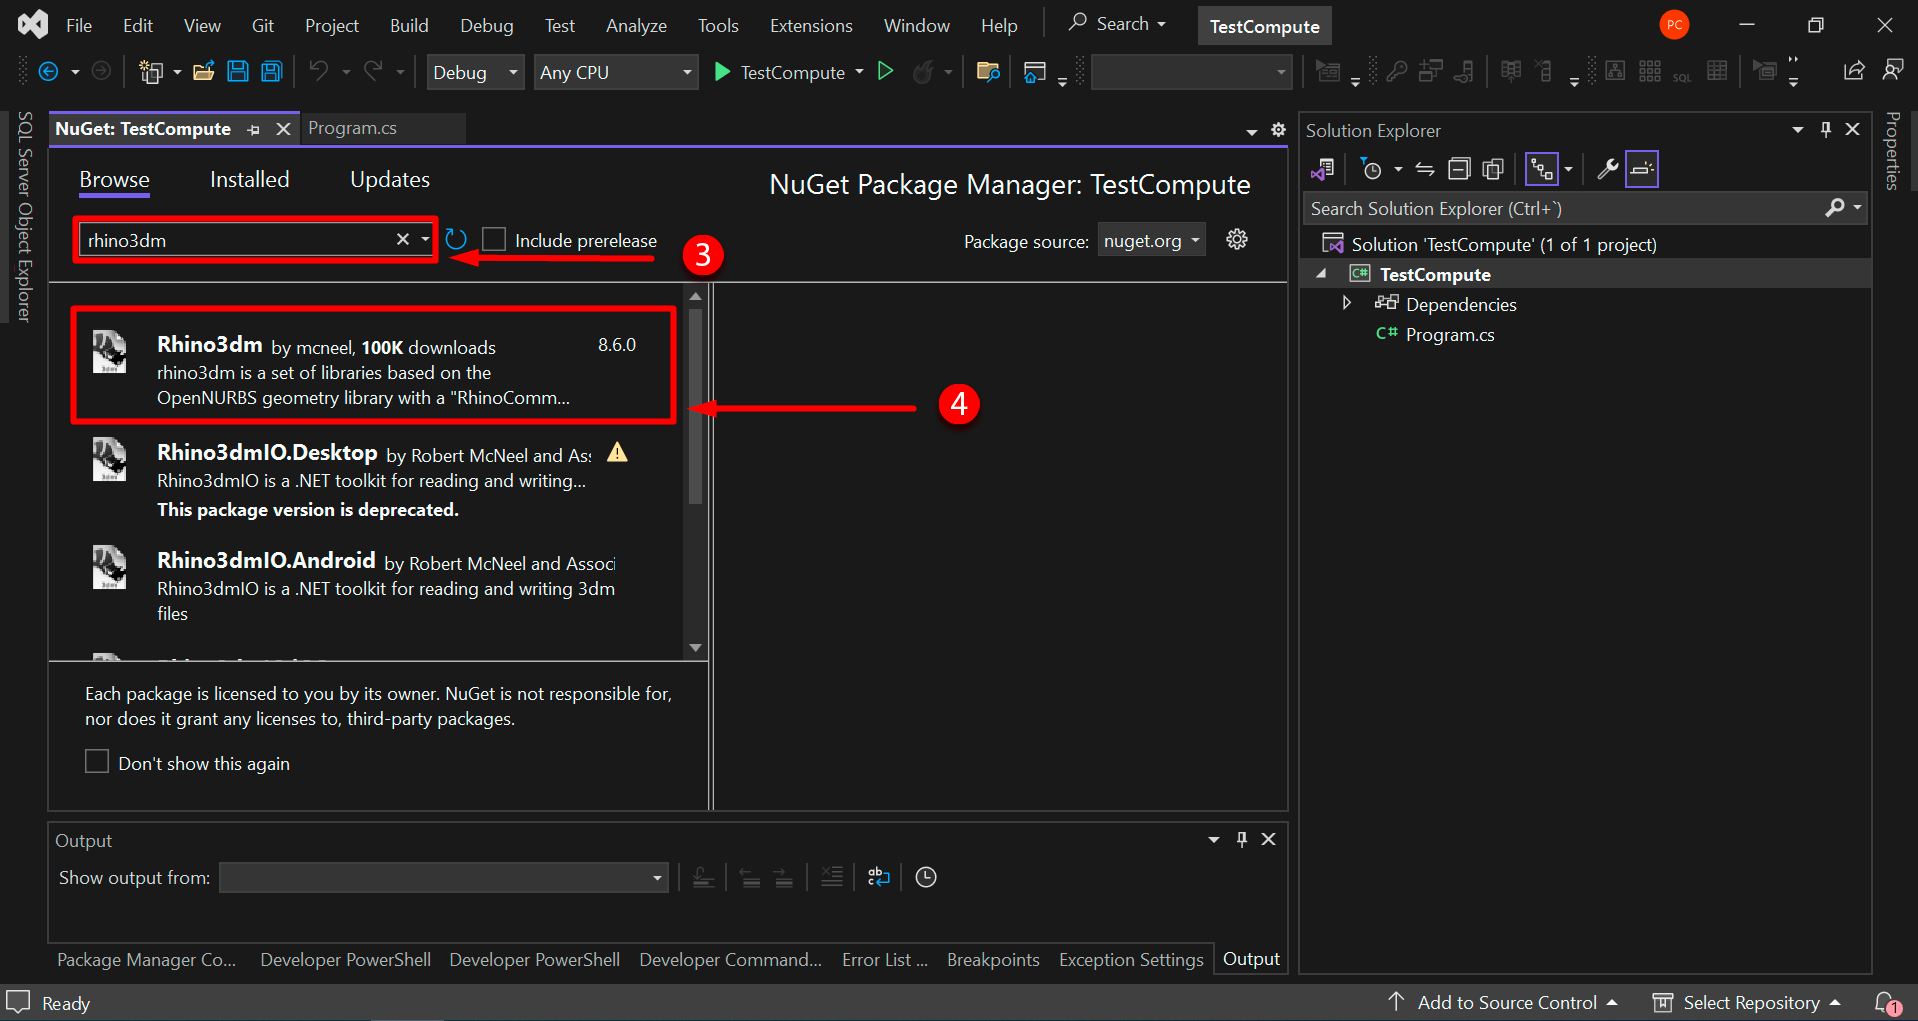
- In the search box enter rhino3dm and wait fo the results to appear.
- Click on the first one. You will find other packages starting by Rhino3dmIO, but all of them have been discontinued.
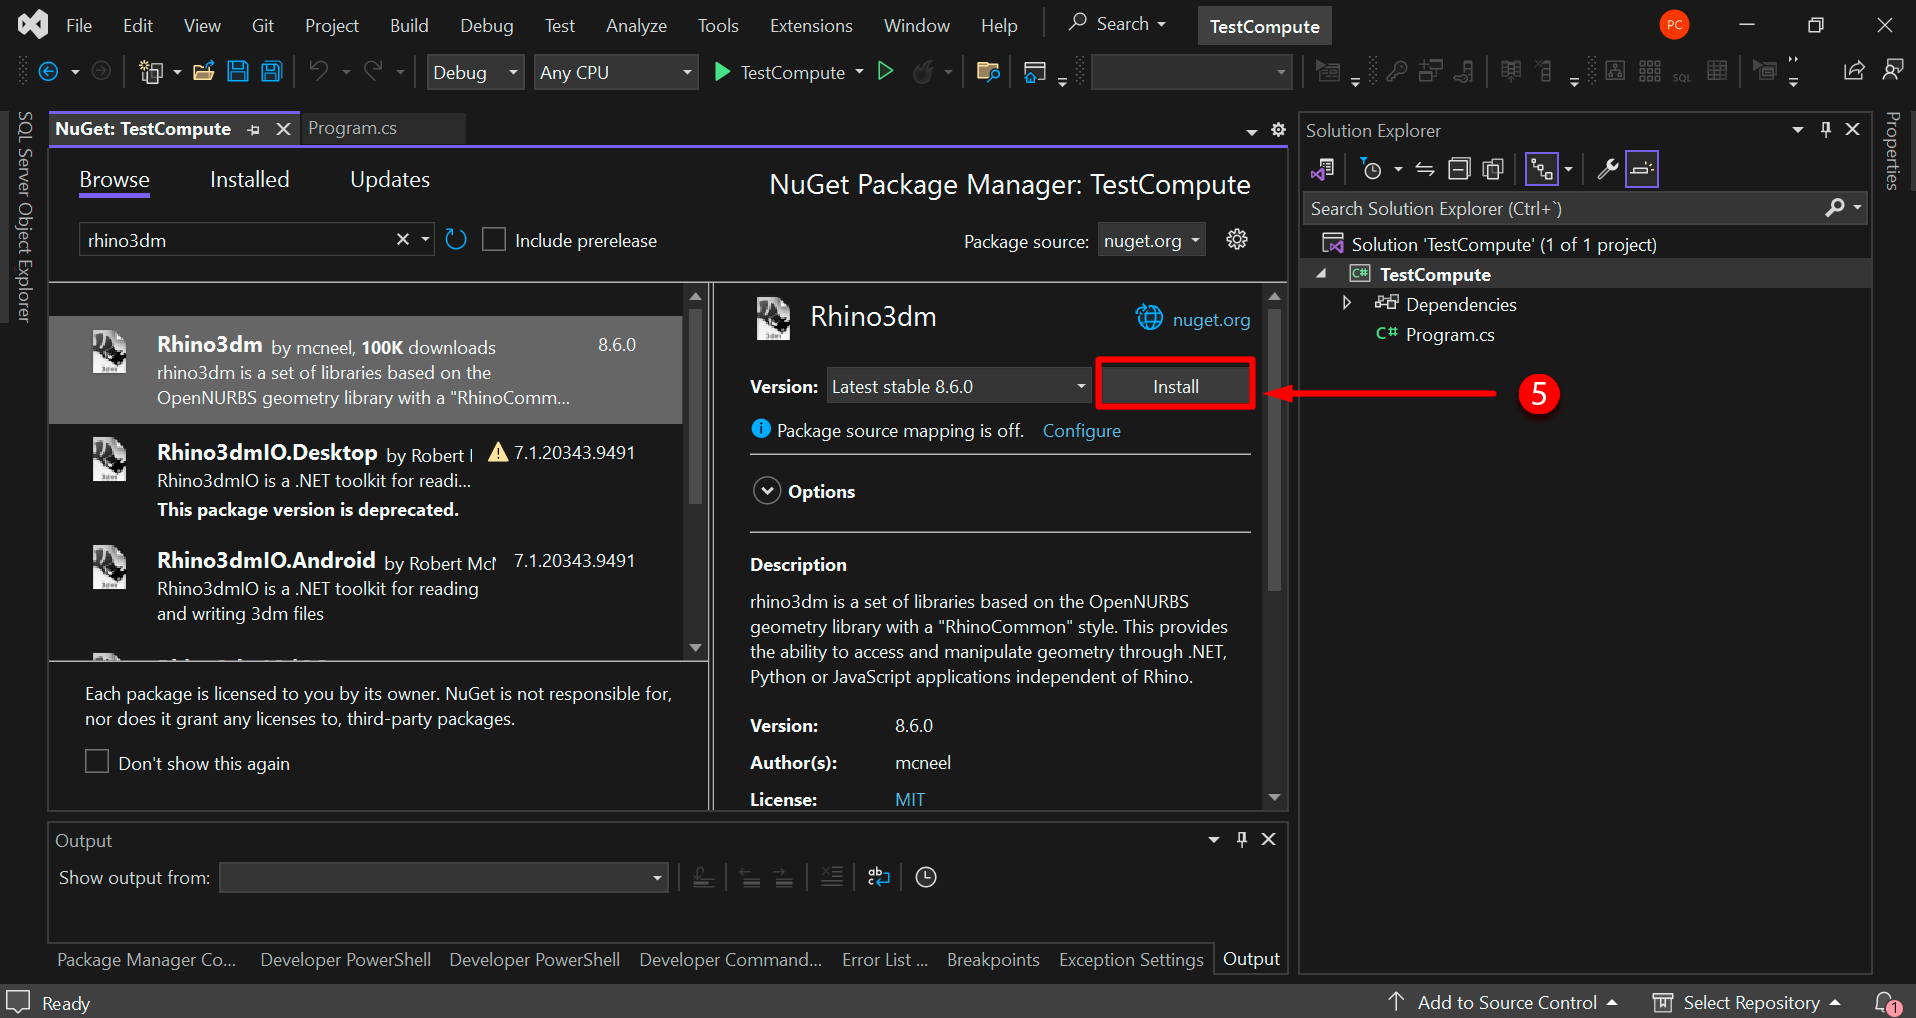
- Click on the Install button.
- Continue by searching for Newtonsoft.JSON. Click on a NewtonSoft.JSON option and click on the Install button.
- Close the Manage NuGet Packages dialog. The Nuget packages are installed and ready to use.
Changes that were made:
- The Rhino3dm and NewtonSoft.JSON NuGet packages were installed in your project.
- Your project now references the Rhino3dm and Newtonsoft.JSON assemblies.
Include RhinoCompute.cs in the project
RhinoCompute.cs is a package which adds the methods to call into the Rhino.Compute server. It is organized similarly to RhinoCommon calls.
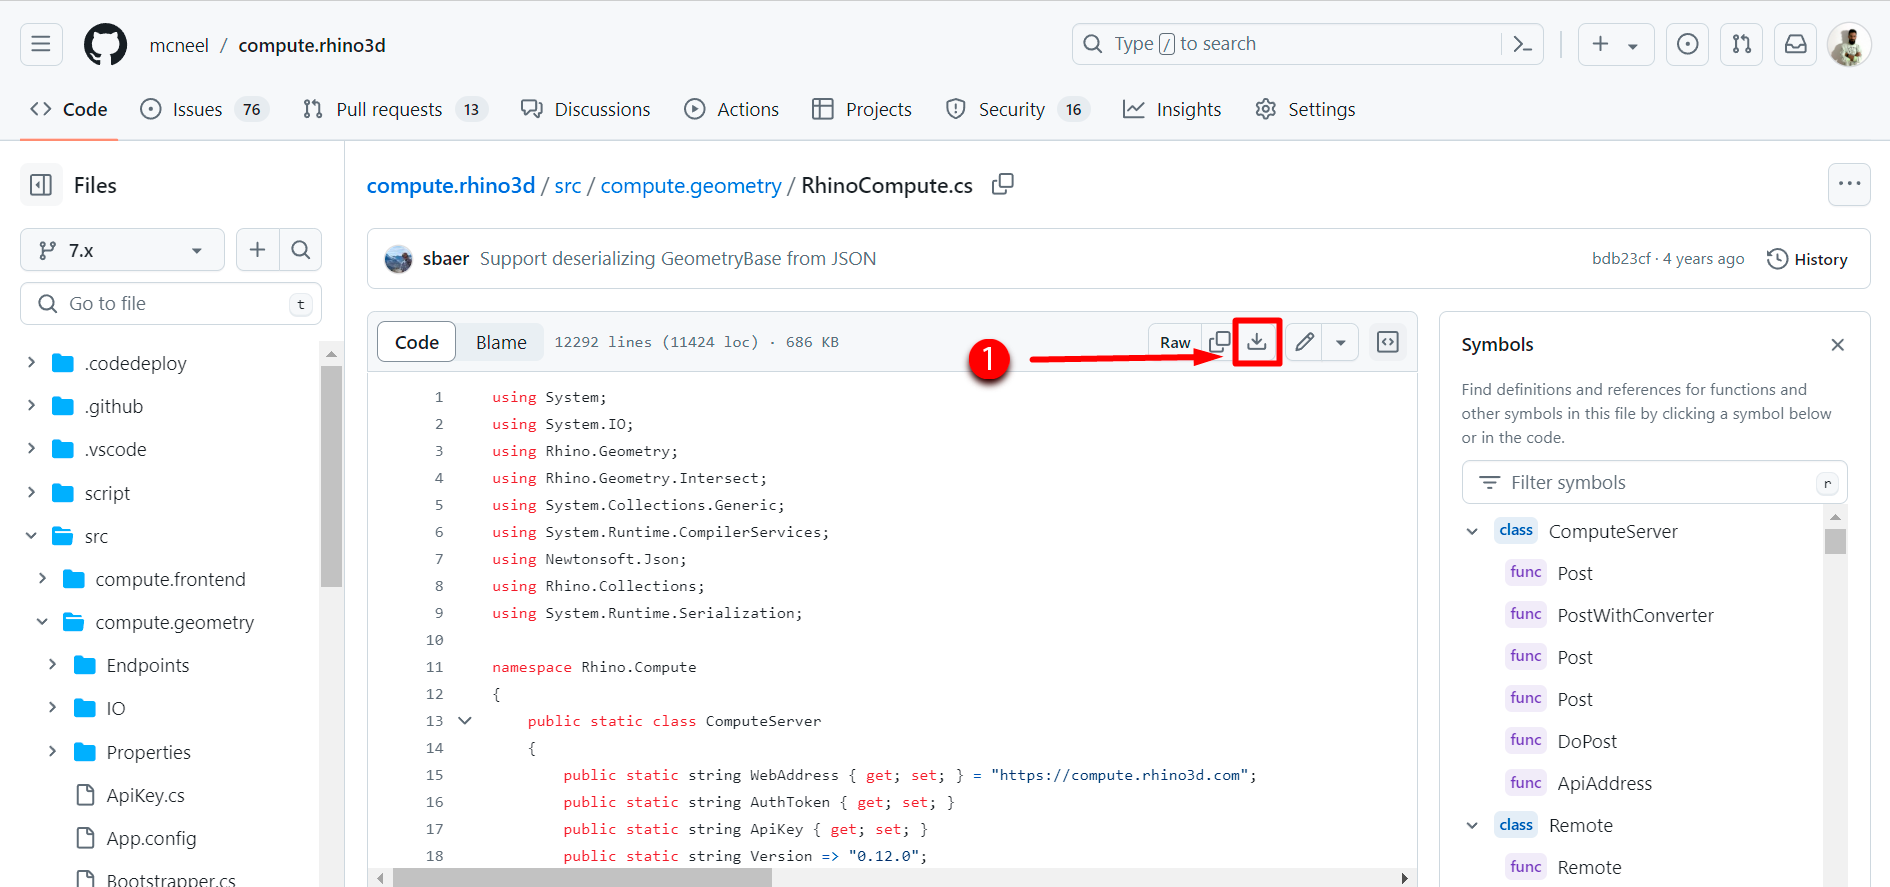
- Download the RhinoCompute.cs source file from the compute.rhino3d github repo. Click on the Download raw file icon and store it wherever you prefer on your device.
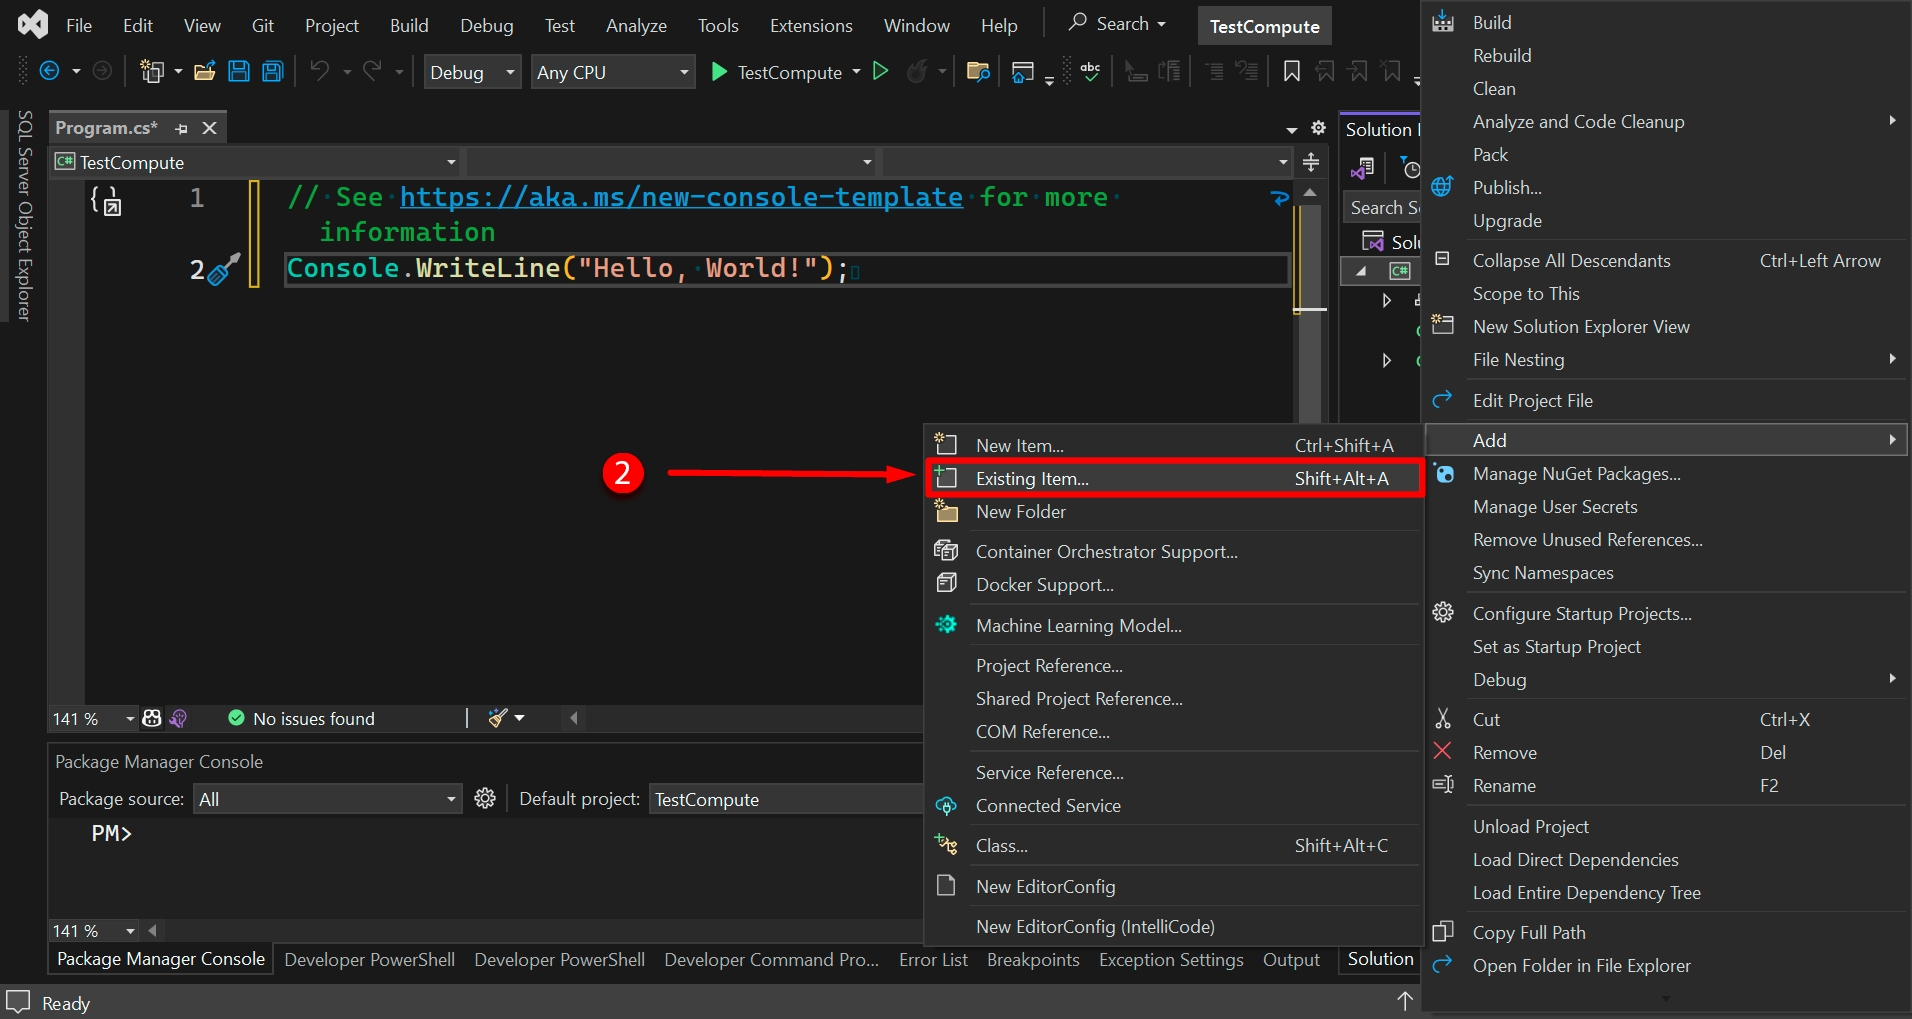
- In Visual Studio, using the Project pulldown, select Add Existing Item…
- Select the file you have just downloaded and add it to the project.
Changes that were made:
- The RhinoCompute.cs source file is now installed and its functions are available in your project.
The first use of Rhino.Compute
As a place to start, let’s create a simple console app that shows the standard workflow for calling methods using Rhino.Compute. The guide below shows a simple example of using Rhino3dm locally to read, write and create Rhino geometry. Then we will use Rhino.Compute to handle a function that does not exist in Rhino3dm.
using System.Collections.Generic;
using System.Linq;
using System.Text;
using System.Threading.Tasks;
using Rhino.Compute;

namespace TestCompute
{
    class Program
    {
        static void Main(string[] args)
        {
            // Uses standard Rhino3dm methods locally to create a sphere.
            var sphere = new Rhino.Geometry.Sphere(Rhino.Geometry.Point3d.Origin, 12);
            var sphereAsBrep = sphere.ToBrep();

            // the following function calls rhino.compute to get access to something not
            // available in Rhino3dm. In this case send a Brep to Compute and get a Mesh back.
            var meshes = MeshCompute.CreateFromBrep(sphereAsBrep);

            // Use regular Rhino3dm local calls to count the vertices in the mesh.
            Console.WriteLine($"Got {meshes.Length} meshes");
            for (int i = 0; i < meshes.Length; i++)
            {
                Console.WriteLine($"  {i + 1} mesh has {meshes[i].Vertices.Count} vertices");
            }

            Console.WriteLine("press any key to exit");
            Console.ReadKey();
        }
    }
}
The example above first creates a sphere using Rhino3dm. Then, we make a call to Rhino.Compute to create a mesh from that Brep object. Rhino.Compute then returns the mesh. Finally, we use Rhino3dm to walk through the mesh and count the number of vertices.
| Line | Description |
|---|---|
| 5 | Include the Rhino.Compute Assembly from the RhinoCompute.cs Package. |
| 19 | Here the OpenNurbs Brep sphere is sent to Compute to convert to a mesh. The Mesh is returned as a OpenNurbs Mesh. |
Seeing the results of Compute
Now let’s look at another example. Many times the intersection of objects may need to be calculated. Intersections are not in OpenNurbs, but they are part of Rhino.Compute. Here is a tutorial to create two circles, find their intersection, then convert the circles to an SVG image to display.
using System.Collections.Generic;
using System.Text;
using Rhino.Geometry;

namespace CircleIntersection
{
    class Program
    {
        static void Main(string[] args)
        {
            // create a couple Circles using a local copy of Rhino3dmIo
            var c1 = new Circle(new Point3d(0, 0, 0), 100);
            var c2 = new Circle(new Point3d(30, 30, 0), 70);

            // call compute to perform a curve boolean operation
            var intersectionCurves = Rhino.Compute.CurveCompute.CreateBooleanIntersection(c1.ToNurbsCurve(), c2.ToNurbsCurve());
            Mesh[] intersectionMeshes = null;
            if (intersectionCurves != null)
            {
                // use local Rhino3dmIo to create a Brep from the curves
                var brep = Brep.CreateTrimmedPlane(c1.Plane, intersectionCurves);

                // call compute to mesh the Brep
                intersectionMeshes = Rhino.Compute.MeshCompute.CreateFromBrep(brep, MeshingParameters.FastRenderMesh);
            }

            // just some helper routines to create an SVG file of the results so we can see what was generated
            string path = "circle_intersection.svg";
            WriteSvgFile(path, c1, c2, intersectionMeshes);
            System.Diagnostics.Process.Start(path);
        }


        /// <summary>
        /// Very basic SVG file creation routine to make an SVG that displays two circles and a mesh.
        /// Kept simple just for this sample; there are much better SVG toolkits available that could
        /// be used for general purpose routines.
        /// </summary>
        /// <param name="path"></param>
        /// <param name="circle1"></param>
        /// <param name="circle2"></param>
        /// <param name="intersectionMeshes"></param>
        static void WriteSvgFile(string path, Circle circle1, Circle circle2, Mesh[] intersectionMeshes)
        {
            var doc = new System.Xml.XmlDocument();
            doc.AppendChild(doc.CreateXmlDeclaration("1.0", "UTF-8", "no"));
            doc.XmlResolver = null;
            doc.AppendChild(doc.CreateDocumentType("svg", "-//W3C//DTD SVG 1.1//EN", "http://www.w3.org/Graphics/SVG/1.1/DTD/svg11.dtd", null));
            var svgroot = doc.CreateElement("svg");

            var bbox = circle1.BoundingBox;
            bbox.Union(circle2.BoundingBox);
            var length = (bbox.Max - bbox.Min).Length;
            bbox.Inflate(length * 0.05);

            AppendAttribute(doc, svgroot, "viewBox", $"{bbox.Min.X} {bbox.Min.Y} {bbox.Max.X - bbox.Min.X} {bbox.Max.Y - bbox.Min.Y}");
            AppendAttribute(doc, svgroot, "version", "1.1");
            AppendAttribute(doc, svgroot, "xmlns", "http://www.w3.org/2000/svg");
            doc.AppendChild(svgroot);

            if (intersectionMeshes != null)
            {
                foreach (var mesh in intersectionMeshes)
                {
                    foreach (var face in mesh.Faces)
                    {
                        var elem = doc.CreateElement("polygon");
                        var attrib = doc.CreateAttribute("fill");
                        attrib.Value = "#008000"; // green
                        elem.Attributes.Append(attrib);
                        attrib = doc.CreateAttribute("stroke");
                        attrib.Value = "#008000"; // green
                        elem.Attributes.Append(attrib);
                        attrib = doc.CreateAttribute("points");
                        StringBuilder sb = new StringBuilder();
                        var points = new List<Rhino.Geometry.Point3d>();
                        points.Add(mesh.Vertices[face.A]);
                        points.Add(mesh.Vertices[face.B]);
                        points.Add(mesh.Vertices[face.C]);
                        if (face.IsQuad)
                            points.Add(mesh.Vertices[face.D]);
                        for (int i = 0; i < points.Count; i++)
                        {
                            if (i > 0)
                                sb.Append(", ");
                            sb.Append($"{points[i].X}, {points[i].Y}");
                        }
                        attrib.Value = sb.ToString().Trim();
                        elem.Attributes.Append(attrib);
                        svgroot.AppendChild(elem);
                    }
                }
            }

            svgroot.AppendChild(SvgCircle(circle1, doc));
            svgroot.AppendChild(SvgCircle(circle2, doc));

            doc.Save(path);
        }

        static void AppendAttribute(System.Xml.XmlDocument doc, System.Xml.XmlElement element, string name, string value)
        {
            var attr = doc.CreateAttribute(name);
            attr.Value = value;
            element.Attributes.Append(attr);
        }

        static System.Xml.XmlElement SvgCircle(Rhino.Geometry.Circle c, System.Xml.XmlDocument doc)
        {
            var elem = doc.CreateElement("circle");
            var attrib = doc.CreateAttribute("cx");
            attrib.Value = $"{c.Center.X}";
            elem.Attributes.Append(attrib);
            attrib = doc.CreateAttribute("cy");
            attrib.Value = $"{c.Center.Y}";
            elem.Attributes.Append(attrib);
            attrib = doc.CreateAttribute("r");
            attrib.Value = $"{c.Radius}";
            elem.Attributes.Append(attrib);
            attrib = doc.CreateAttribute("fill-opacity");
            attrib.Value = "0";
            elem.Attributes.Append(attrib);
            attrib = doc.CreateAttribute("stroke");
            attrib.Value = "#000000";
            elem.Attributes.Append(attrib);
            return elem;
        }
    }
}
Next Steps
Congratulations! You have the tools to use the Rhino.Compute server. Now what?
- Download the Compute Samples repo from GitHub.
- The libraries are still very new and changing rapidly. Give them a try or get involved. Ask any questions or share what you are working on the Compute Discussion Forum
