
Overview
This guide will walk you through how to setup an instance of Rhino.Compute on a virtual machine running Internet Information Services (IIS). IIS, is a flexible, general-purpose web server developed by Microsoft which can be configured to serve requested HTML pages or files. We can setup IIS to process incoming requests (either from Hops or some other client) and forward that request to the Rhino.Compute instance.
You may be asking yourself, “Why do I need IIS at all? Why can’t I simply launch the Rhino.Compute server and send API requests directly to that instance?”. Technically speaking, you don’t need IIS. However, you would need to figure out how to relaunch the compute server should it crash or malfunction. You would also need to configure Rhino.Compute to launch whenever the virtual machine is launched.
One of the main benefits of using IIS as a middleware is that it can automatically spin up an instance of the Rhino.Compute server whenever a request is recieved. With this configuration, you do not have to have compute running continuously. Instead, IIS can launch an instance of compute when it is needed which in turn will launch one or more child processes. These child processes are what perform the actual computation and also what require your license authorization.
When Rhino.Compute.exe does not receive requests to solve over a period of seconds (this is called idlespans and the default is set to 1 hour), child compute.geometry.exe processes will shut down and stop incurring core hour billing. At some date in the future when a new request is received, IIS will make sure that Rhino.Compute.exe is running which will then relaunch the child processes. Note, there may be some small delay in the response while the child processes are launching.

Prerequisites
Before running the bootstrap script on your server or virtual machine, you will need the following pieces of information.
EmailAddress- The script will use this email to download a copy of Rhino to install. This is similar to the Rhino download page behavior.ApiKey- The API key is a string of text that is secret to your compute server and your applications that are using the compute API e.g.b8f91f04-3782-4f1c-87ac-8682f865bf1b. It is basically how the compute server ensures that the API calls are coming from your apps only. You can enter any string that is unique and secret to you and your compute apps. Make sure to keep this in a safe place.RhinoToken– This is a long token that identifies your instance of Rhino Compute to the core-hour billing system. Go to the Licenses Portal to generate this unique id based on your license. See the “Core-Hour Billing” guide for more information.
Running rhino compute locally uses your existing Rhino license and does not cost any additional money (other than your initial rhino license investment). Running compute locally is the best option for development and testing and to find out more, read Running and Debugging Compute Locally.
However, when setting up a production environment you will need a server or virtual machine pre-installed with Windows Server 2019 or higher. Licensing works differently when running Rhino (ie. via Compute) in a production environment (ie. server-setting) and you will be charged at a rate of $0.10 per core per hour.
Follow the “Core-Hour Billing” guide to get set up. This is important so do not skip.
Create the VM
The first step in the process of deploying Rhino.Compute for production is to either setup a physical machine to act as a server or create a virtual machine (VM). For this guide, we will be using a virtual machine. There are several popular services which can be configured to setup a wide array of virtual machines depending on your resource needs. Two of the most prominent providers include Azure and AWS.
Depending on your preferences, we recommend starting with an Azure or AWS VM. Use the following guides to walk through that process.
Connect via RDP
Now that we’ve configured the virtual machine, we need to be able to log onto it so that we can setup IIS and the Rhino.Compute instance. We’ll do this by using a remote desktop protocol (RDP) which connects two computers over a network.
To start, let’s download the RDP file. We’ll use the Azure VM Portal but a similar process is used for AWS.
-
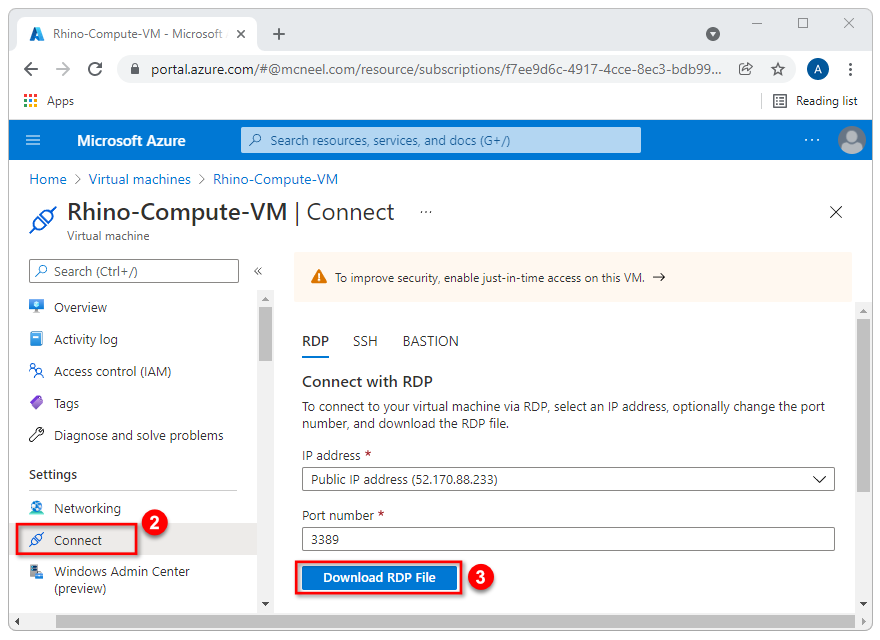
First, make sure the virtual machine is running. Click on the Overview tab in the left-hand menu. If the Status says Stopped (Deallocated), click on the Start button at the top to start the remote machine. After a few seconds, the status should say Running.
-
Click on the Connect menu item in the left-hand menu to pull out the connection settings blade.
-
Click on the Download RDP File button and save the file somewhere on your computer.
-
Click on the Windows Start menu and start typing remote desktop connection in the search bar. Click on the link to launch app.
-
Click on the button at the bottom of the app to Show Options
-
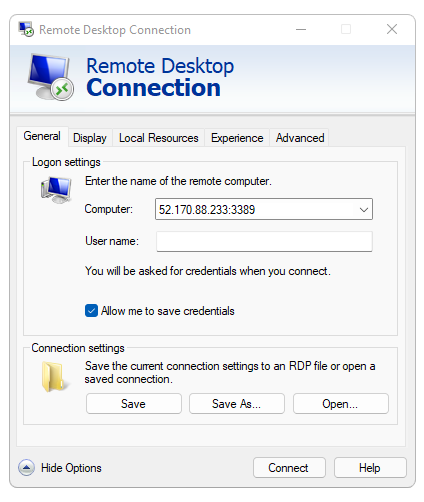
Under the Connection Settings area, select Open and navigate to the directory where you saved your RDP file. Choose that file and hit Open.
-
Select the checkbox to Allow me to save credentials
-
Click Connect.
-
A security pop-up will be opened. Click the checkbox for Don’t ask me again for connections to this computer and then click Connect.
-
Enter the administrator credentials that you entered in step 7 of Creating a Virtual Machine.
-
You may see another security pop-up. Again, select Don’t ask me again for connections to this computer and click Yes.
Congratulations. You should now have access to the desktop of the remote machine running Windows Server 2019 or higher.
Running the Bootstrap script
Assuming that you are now logged into the virtual machine (using RDP), follow the following steps to install Rhino.Compute behind IIS. Note: The following steps assume that this is an installation on a new virtual machine or server (meaning Rhino.Compute has not been previously installed on this machine). If you have already setup Rhino.Compute and IIS on this machine and simply need to update Rhino and/or Rhino.Compute on this VM, please proceed to the section on Updating Rhino Compute.
Step 1
-
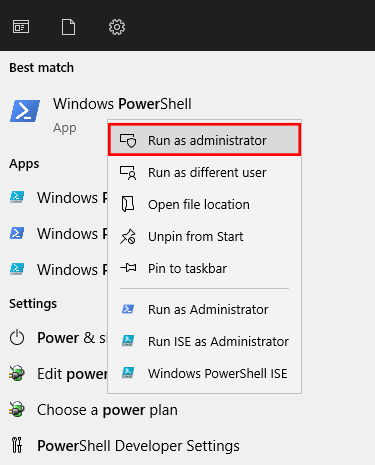
Click on the Windows Start menu and type in “Powershell”. In the menu that appears, right-click on the Windows Powershell app and choose Run As Administrator.
-
Copy and paste the command below into the Powershell prompt and hit Enter. This command will download the latest step 1 bootstrap script and install Rhino and IIS onto your VM. Note: you will be prompted to enter your Email Address, API Key, and Rhino Token, so please have that information handy.
$F="/bootstrap_step-1.zip";$T="$($Env:temp)\tmp$([convert]::tostring((get-random 65535),16).padleft(4,'0')).tmp"; New-Item -ItemType Directory -Path $T; iwr -useb https://raw.githubusercontent.com/mcneel/compute.rhino3d/7.x/script/production/bootstrap_step-1.zip -outfile $T$F; Expand-Archive $T$F -DestinationPath $T; Remove-Item $T$F;& "$T\bootstrap_step-1\boostrap_step-1.ps1"$F="/bootstrap_step-1.zip";$T="$($Env:temp)\tmp$([convert]::tostring((get-random 65535),16).padleft(4,'0')).tmp"; New-Item -ItemType Directory -Path $T; iwr -useb https://raw.githubusercontent.com/mcneel/compute.rhino3d/8.x/script/production/bootstrap_step-1.zip -outfile $T$F; Expand-Archive $T$F -DestinationPath $T; Remove-Item $T$F;& "$T\bootstrap_step-1\boostrap_step-1.ps1" -
At the end of step 1, your VM will automatically be restarted (You will be logged out of Remote Desktop).
Step 2
-
Log back into your VM using Remote Desktop.
-
Open a new instance of Windows Powershell. Make sure to right-click on the application and select Run As Administrator.
-
Copy and paste the command below into the Powershell prompt and hit Enter. This command will download the latest step 2 bootstrap script and will configure IIS to work with Rhino.Compute.
$F="/bootstrap_step-2.zip";$T="$($Env:temp)\tmp$([convert]::tostring((get-random 65535),16).padleft(4,'0')).tmp"; New-Item -ItemType Directory -Path $T; iwr -useb https://raw.githubusercontent.com/mcneel/compute.rhino3d/7.x/script/production/bootstrap_step-2.zip -outfile $T$F; Expand-Archive $T$F -DestinationPath $T; Remove-Item $T$F;& "$T\bootstrap_step-2\boostrap_step-2.ps1"$F="/bootstrap_step-2.zip";$T="$($Env:temp)\tmp$([convert]::tostring((get-random 65535),16).padleft(4,'0')).tmp"; New-Item -ItemType Directory -Path $T; iwr -useb https://raw.githubusercontent.com/mcneel/compute.rhino3d/8.x/script/production/bootstrap_step-2.zip -outfile $T$F; Expand-Archive $T$F -DestinationPath $T; Remove-Item $T$F;& "$T\bootstrap_step-2\boostrap_step-2.ps1" -
At the end of the step 2 installation script, you should see the message Congratulations! All components have now been installed. This will be followed by some instructions about how to install 3rd party plugins so that they will work properly with Rhino.Compute. Please take note of the new Username and Password which will be required when logging back in to install any additional plugin.
Testing the app
At this point, IIS should be configured to launch the Rhino.Compute instance when an API request is made. Let’s try getting Hops to send a definition to our virtual machine’s URL.
-
Launch Rhino on your local machine.
-
If you have not already installed hops on this machine, please do so by searching for it in the Rhino Package Manager.
-
Start Grasshopper by typing the word Grasshopper into the command prompt and hitting enter.
-
Go to File and then Preferences to open the preferences dialog.
-
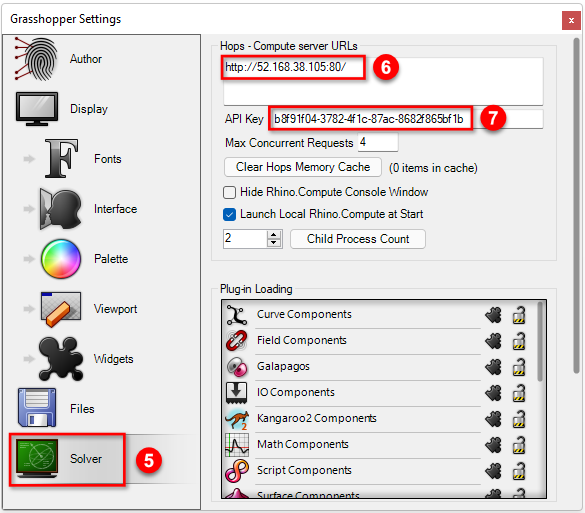
Click on the Solver tab in the left-hand menu.
-
In the Hops - Compute server URLs section, type in the web address of your virtual machine. Start by typing in
http://followed by the IP address of the virtual machine followed by a:and the port number80. So, the full address would look something like this:http://52.168.38.105:80/ -
In the API Key section, enter the API Key that you saved in the Prerequisites section.
-
Add a Hops component to the Grasshopper canvas (Params/Util)
-
Right-click on the Hops component and set the Path to a valid Hops/Grasshopper definition. To learn more about setting up a Grasshopper definition that will work properly with Hops, follow this guide.
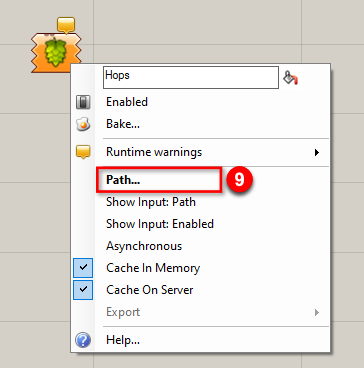
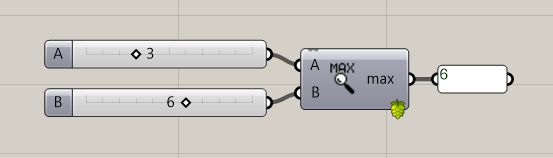
Once the path is set, the Hops component will create the appropriate API request and sends it to the URL that we specified in step 6 (the Rhino.Compute server running on IIS). The compute server processes the request and sends a response back to Hops, which returns the result.
Congratulations! You have successfully setup an instance of Rhino.Compute running behind IIS on a virtual machine.
Modifying Compute Parameters After Deployment
There are a number of command line arguments that can be used to modify how Rhino.Compute behaves. This section covers how to change those parameters after Rhino.Compute has been deployed.
-
Log into your VM (via RDP). See the section Connect via RDP for more details.
-
On the Start menu, click in the search area and type Internet Information Services (IIS) Manager. Click to launch the app.
-
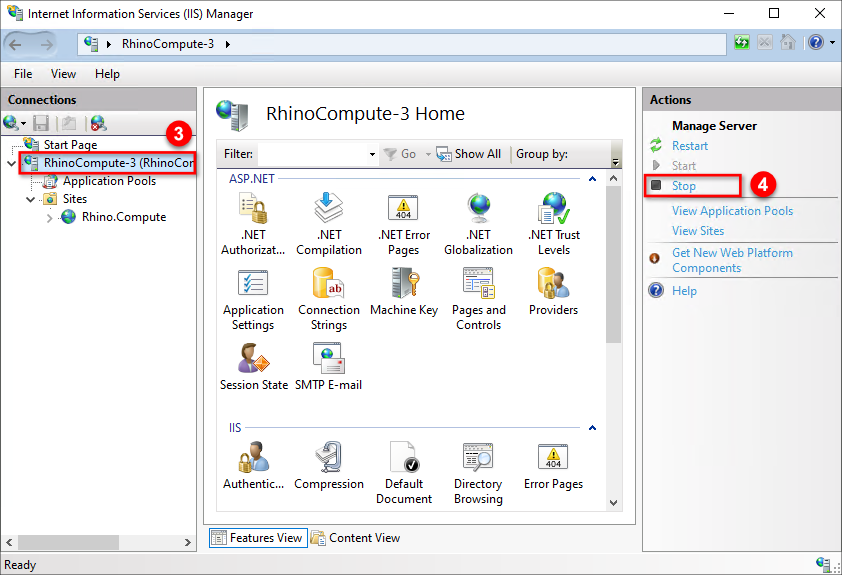
In the IIS Manager, click on the web server node in the Connections panel on the left. Note, this web server name should be the same name you used when setting up the name of your virtual machine.
-
In the Actions pane on the right, click Stop to stop the web server.
Now that the IIS web server has been stopped, we need to go and modify the *web.config file for Rhino.Compute. The web.config file is a file that is read by IIS and the ASP.NET Core module to configure an which is hosted by IIS.
- Open a File Explorer window and navigate to C:\inetpub\wwwroot\aspnet_client\system_web\4_0_30319\rhino.compute. At the end of this directory, you should see a file labled web.config. Note, you may need to click on the View tab and click the checkbox to turn on file name extensions. Open the web.config file with Notepad or any other text editor you prefer.
The full web.config file should look like this:
<?xml version="1.0" encoding="utf-8"?>
<configuration>
  <system.webServer>
    <handlers>
      <add name="aspNetCore" path="*" verb="*" modules="AspNetCoreModuleV2" resourceType="Unspecified"/>
    </handlers>
    <aspNetCore processPath=".\rhino.compute.exe" arguments="--port 80" stdoutLogEnabled="true" stdoutLogFile="..\..\..\..\..\logs\LogFiles\W3SVC1\" forwardWindowsAuthToken="true" hostingModel="InProcess"/>
  </system.webServer>
</configuration>
The line we are most interested in modifying is the one which starts with the <aspNetCore> tag. You can see the second parameter on this line is called arguments. This is the section that you would edit to add other command line arguments to modify Rhino.Compute.
Below is a description of each command line argument which can be modified.
-
port - This is the port number to run Rhino.Compute on. Port number 80 is typically reserved for HTTP communication, while port number 443 is used for the HTTPS protocol. We have setup Rhino.Compute to be bound to port 80 in the bootstrap script, so do not modify this value unless you know what you are doing. Example usage:
--port 80. -
childcount - This parameter controls the number of child compute.geometry processes to manage. The default value is 4 which means that Rhino.Compute will spawn four child processes each of which can handle incoming requests. Example usage:
--childcount 8would tell Rhino.Compute to launch eight child processes. -
childof - This is the process handle of parent process. Compute watches for the existence of this handle and will shut down when this process has exited. Since we are relying on IIS starting and stopping Rhino.Compute, you do not need this parameter when running in a production environment.
-
spawn-on-startup - This flag determines whether to launch a child compute.geometry process when Rhino.Compute gets started. The default value is false. This parameter is a flag which means that if it is not included in the argument list, the value will be false. If you include this parameter, then its value will be true. For production environments, this value should remain false.
-
idlespan - This is the number of seconds that a child compute.geometry processes should remain open between requests. The default value is 1 hour. When Rhino.Compute.exe does not receive requests to solve over a period of
idlespanseconds, child compute.geometry.exe processes will shut down and stop incurring core hour billing. At some date in the future when a new request is received, the child processes will be relaunched which will cause a small delay on requests while the child processes are launching. Example usage:--idlespan 1800would tell Rhino.Compute to shutdown the child processes after 30 minutes (30 mins x 60 secs = 1800).If you change the
idelspanvalue in the command line arguments for Rhino.Compute, you will also need to make a modification to the IIS configuration. This is because IIS also contains a setting to shut down Rhino.Compute if no new requests are received after a period of time. When Rhino.Compute gets shutdown, it will in turn shutdown any child processes.For example, lets say you change the
idlespanvalue to 7,200 (2 hours). The bootstrap script sets the IISIdleTimeoutvalue to 65 minutes (slightly longer than the defaultidlespanvalue). After 65 minutes, IIS would shutdown Rhino.Compute, which would then shutdown all of its child processes much earlier than the expected 2 hour time limit. So, if you change theidlespanvalue, it is recommended that you also change theIdleTimeoutvalue in the IIS settings.-
To do this, go back to the IIS Manager and click on the Application Pools item in the Connections pane on the left.
-
In the center window click on the RhinoComputeAppPool.
-
In the Actions pane on the right, click Advanced Settings.
-
Find the Idle Time-out row under the Process Model section and change the time out value to be slightly longer than the
idlespanvalue you set in the command line arguments. Note: theidlespanvalue is in seconds while theIdle Timeoutvalue is in minutes.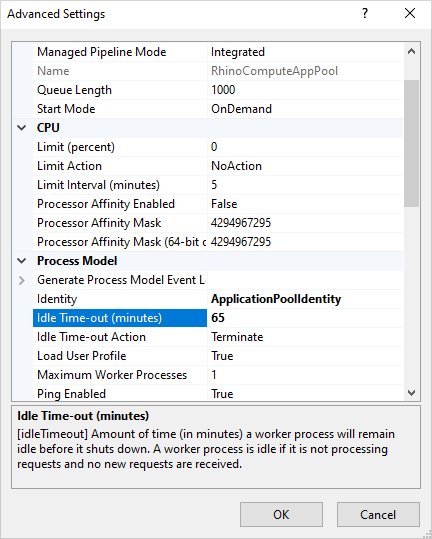
-
Once you have modified web.config file, save it and close the file. You can then go back to the IIS Manager and Start the web server by clicking on the web server node in the Connections panel on the left and clicking Start in the Actions pane on the right.
Updating The Deployment
If you have already setup Rhino.Compute and/or IIS on this machine, you may need to periodically update Rhino and/or the Rhino.Compute build files to the latest version. Follow the steps below to update these applications.
Update Rhino
-
Click on the Windows Start menu and type in “Powershell”. In the menu that appears, right-click on the Windows Powershell app and choose Run As Administrator.
-
Copy and paste the command below into the Powershell prompt and hit Enter. This command will download the latest version of Rhino for Windows. Note: you will be prompted to enter your Email Address so please have that information available.
iwr -useb https://raw.githubusercontent.com/mcneel/compute.rhino3d/7.x/script/production/module_update_rhino.ps1 -outfile update_rhino.ps1; .\update_rhino.ps1iwr -useb https://raw.githubusercontent.com/mcneel/compute.rhino3d/8.x/script/production/module_update_rhino.ps1 -outfile update_rhino.ps1; .\update_rhino.ps1
Update Compute
-
Click on the Windows Start menu and type in “Powershell”. In the menu that appears, right-click on the Windows Powershell app and choose Run As Administrator.
-
Copy and paste the command below into the Powershell prompt and hit Enter. This command will download the latest version of Rhino.Compute.
iwr -useb https://raw.githubusercontent.com/mcneel/compute.rhino3d/7.x/script/production/module_update_compute.ps1 -outfile update_compute.ps1; .\update_compute.ps1iwr -useb https://raw.githubusercontent.com/mcneel/compute.rhino3d/8.x/script/production/module_update_compute.ps1 -outfile update_compute.ps1; .\update_compute.ps1
