
Why NuGet?
In previous guides you’ve seen how to set up a project to develop a RhinoCommon Plugin or Grasshopper component. These guides relied on the Visual Studio Project Wizards that we publish to quickly get you going on plugin development. The wizards automatically reference the necessary assemblies to make RhinoCommon and Grasshopper SDKs available in your Visual Studio project. While this project setup should be fine for a number of cases, there might be some reasons to switch the RhinoCommon and Grasshopper assembly references to those which are published by McNeel on NuGet…
Advantages
There are several potential advantages to using NuGet packages for RhinoCommon SDKs:
- It’s great for projects with multiple developers (or developers with multiple computers). No more references to
Grasshopper.dllthat includeC:\Users\<username>\AppData\.... - NuGet runs on Windows and Mac and is baked into Visual Studio (for Windows).
- Are you using Continuous Integration (CI)? Your build servers can automatically download the correct version of the SDK before compiling and publishing your shiny new release.
- You’re probably already using it to install packages like Json.NET.
- You can target a lower version of RhinoCommon than you have installed to ensure full compatibility across all Rhino versions
Potential Pitfalls
NuGet makes it easy to compile plug-ins against versions of Rhino other than those installed on your computer. This is handy for backwards-compatible and/or cross-platform development. However, the fact that your Rhino installation and your RhinoCommon/Grasshopper references are “out of sync” can cause problems.
- NuGet packages will need to be updated separately to Rhino
- You may have trouble debugging your plug-in if it was built against a version of RhinoCommon that is newer than the one included with Rhino1
Getting Started
Note: You may wish to read Microsoft’s guide to installing NuGet packages in Visual Studio in addition to this one. And how to install a Nuget Package in Visual Studio Code.
We have a few NuGet packages available and you can install them like you would any other.
The RhinoCommon package includes
- RhinoCommon.dll
- Eto.dll
- Rhino.UI.dll
The Grasshopper package depends2 on the RhinoCommon package with the same version and includes
- Grasshopper.dll
- GH_IO.dll
We also have a RhinoWindows package.
We’re currently publishing new package versions for every public release of Rhino for Windows, including preleases (WIP, release candidate and beta). If you’re developing for Rhino WIP for Mac, choose the latest 6.* package – RhinoCommon and Grasshopper are cross-platform!
If you’re searching for a version of one of our packages that corresponds to a prerelease version of Rhino then make sure you check “include prerelease”. These packages are marked with a prerelease suffix in the version number, such as -wip or -rc.
Step-by-Step (Windows)
To switch to NuGet packages, follow these steps:
-
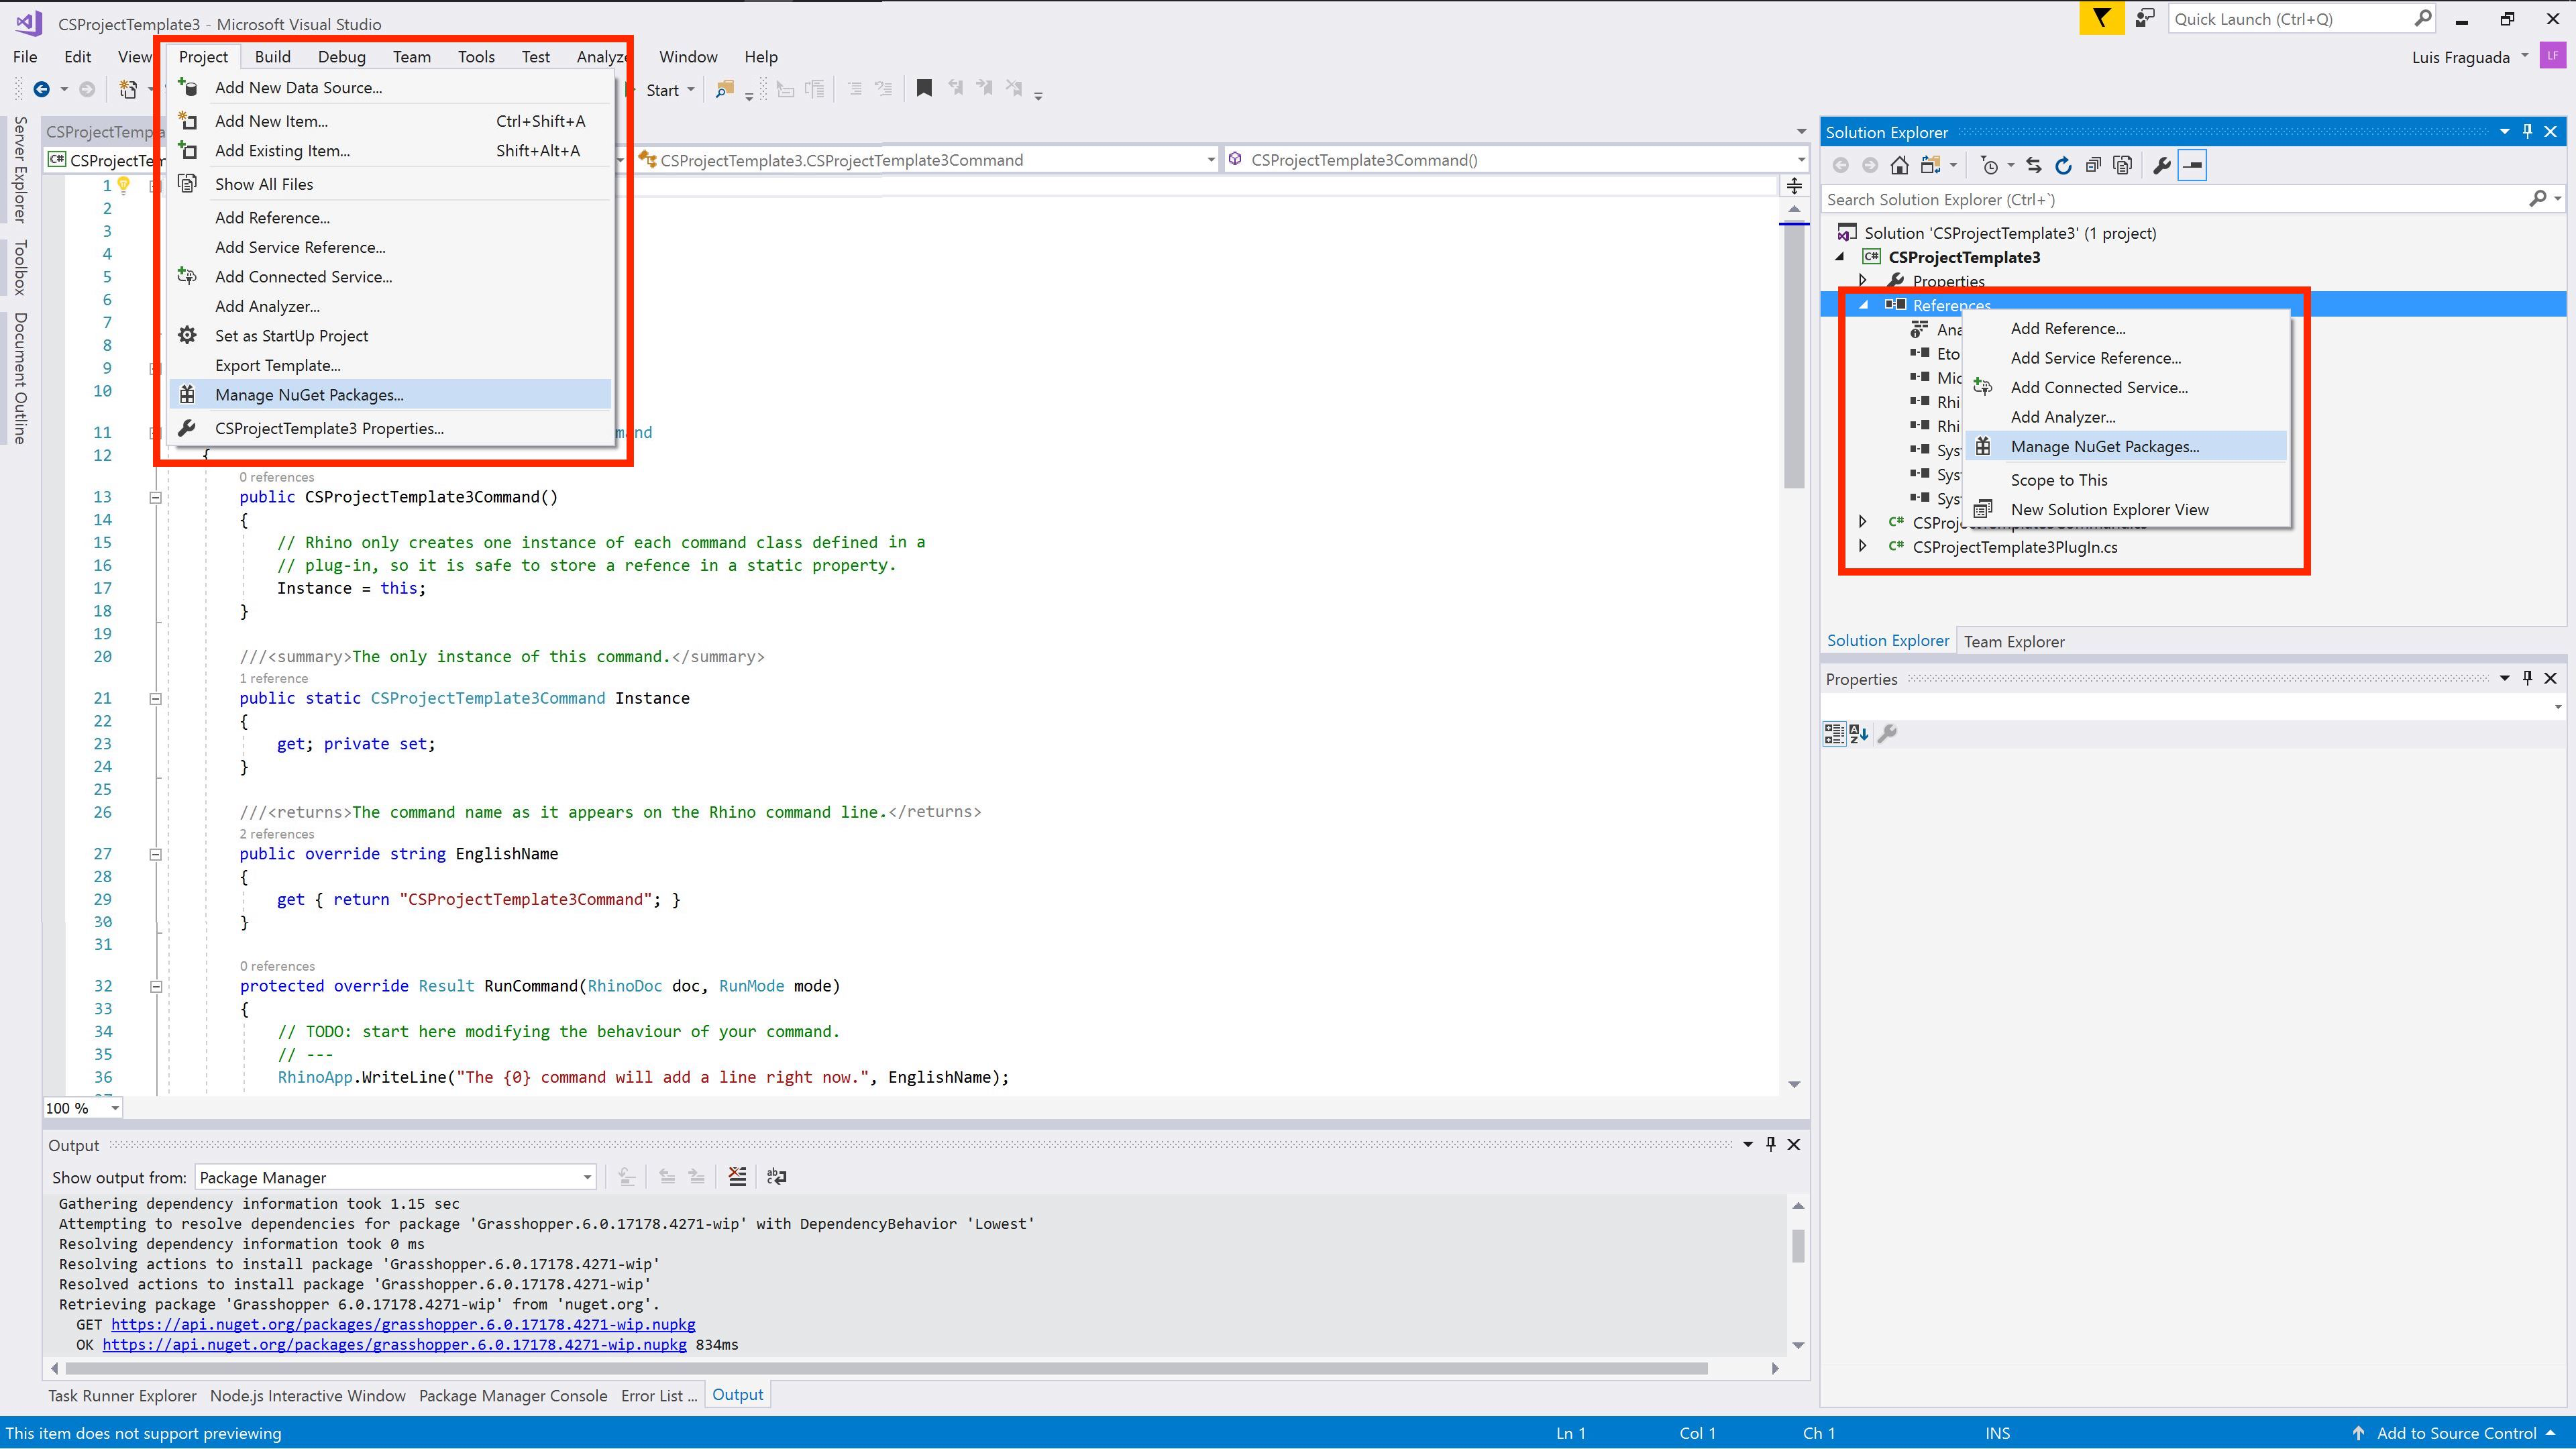
In Visual Studio, find the Solution Explorer and right-click on the References section of your project. Select Manage NuGet Packages… Alternatively, the same can be done through the Visual Studio Project menu, and choosing Manage NuGet Packages…
-
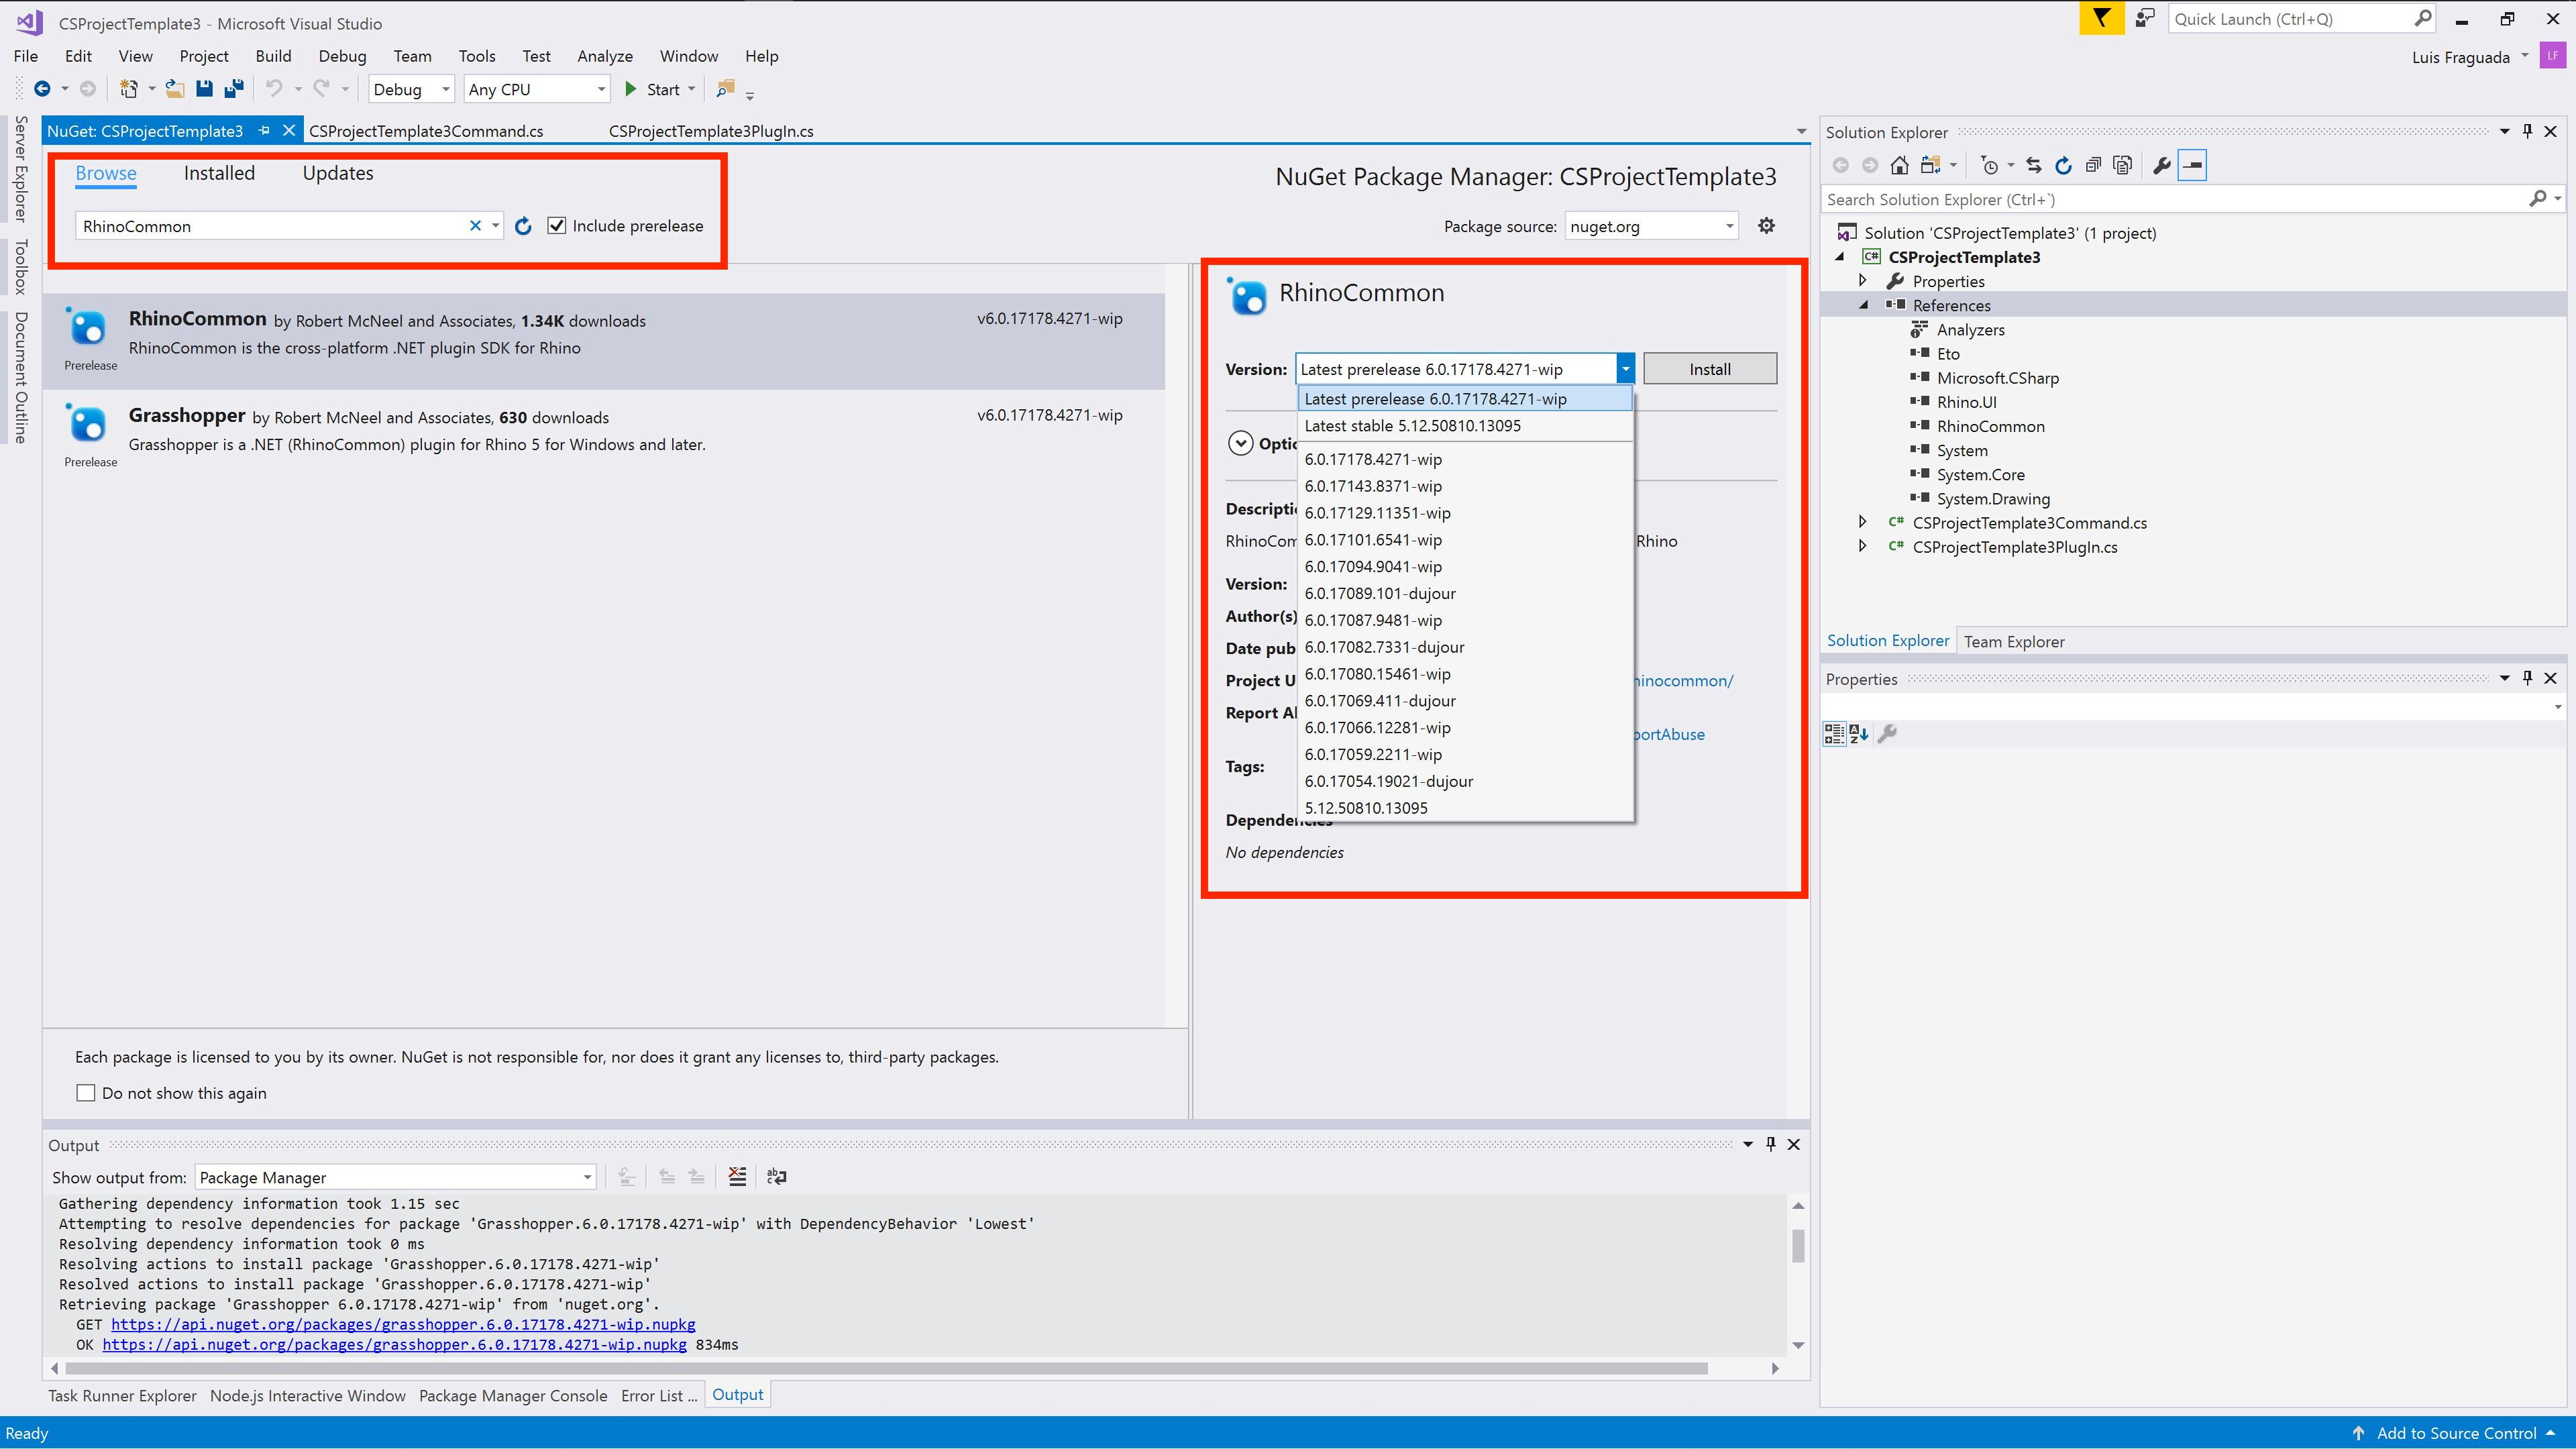
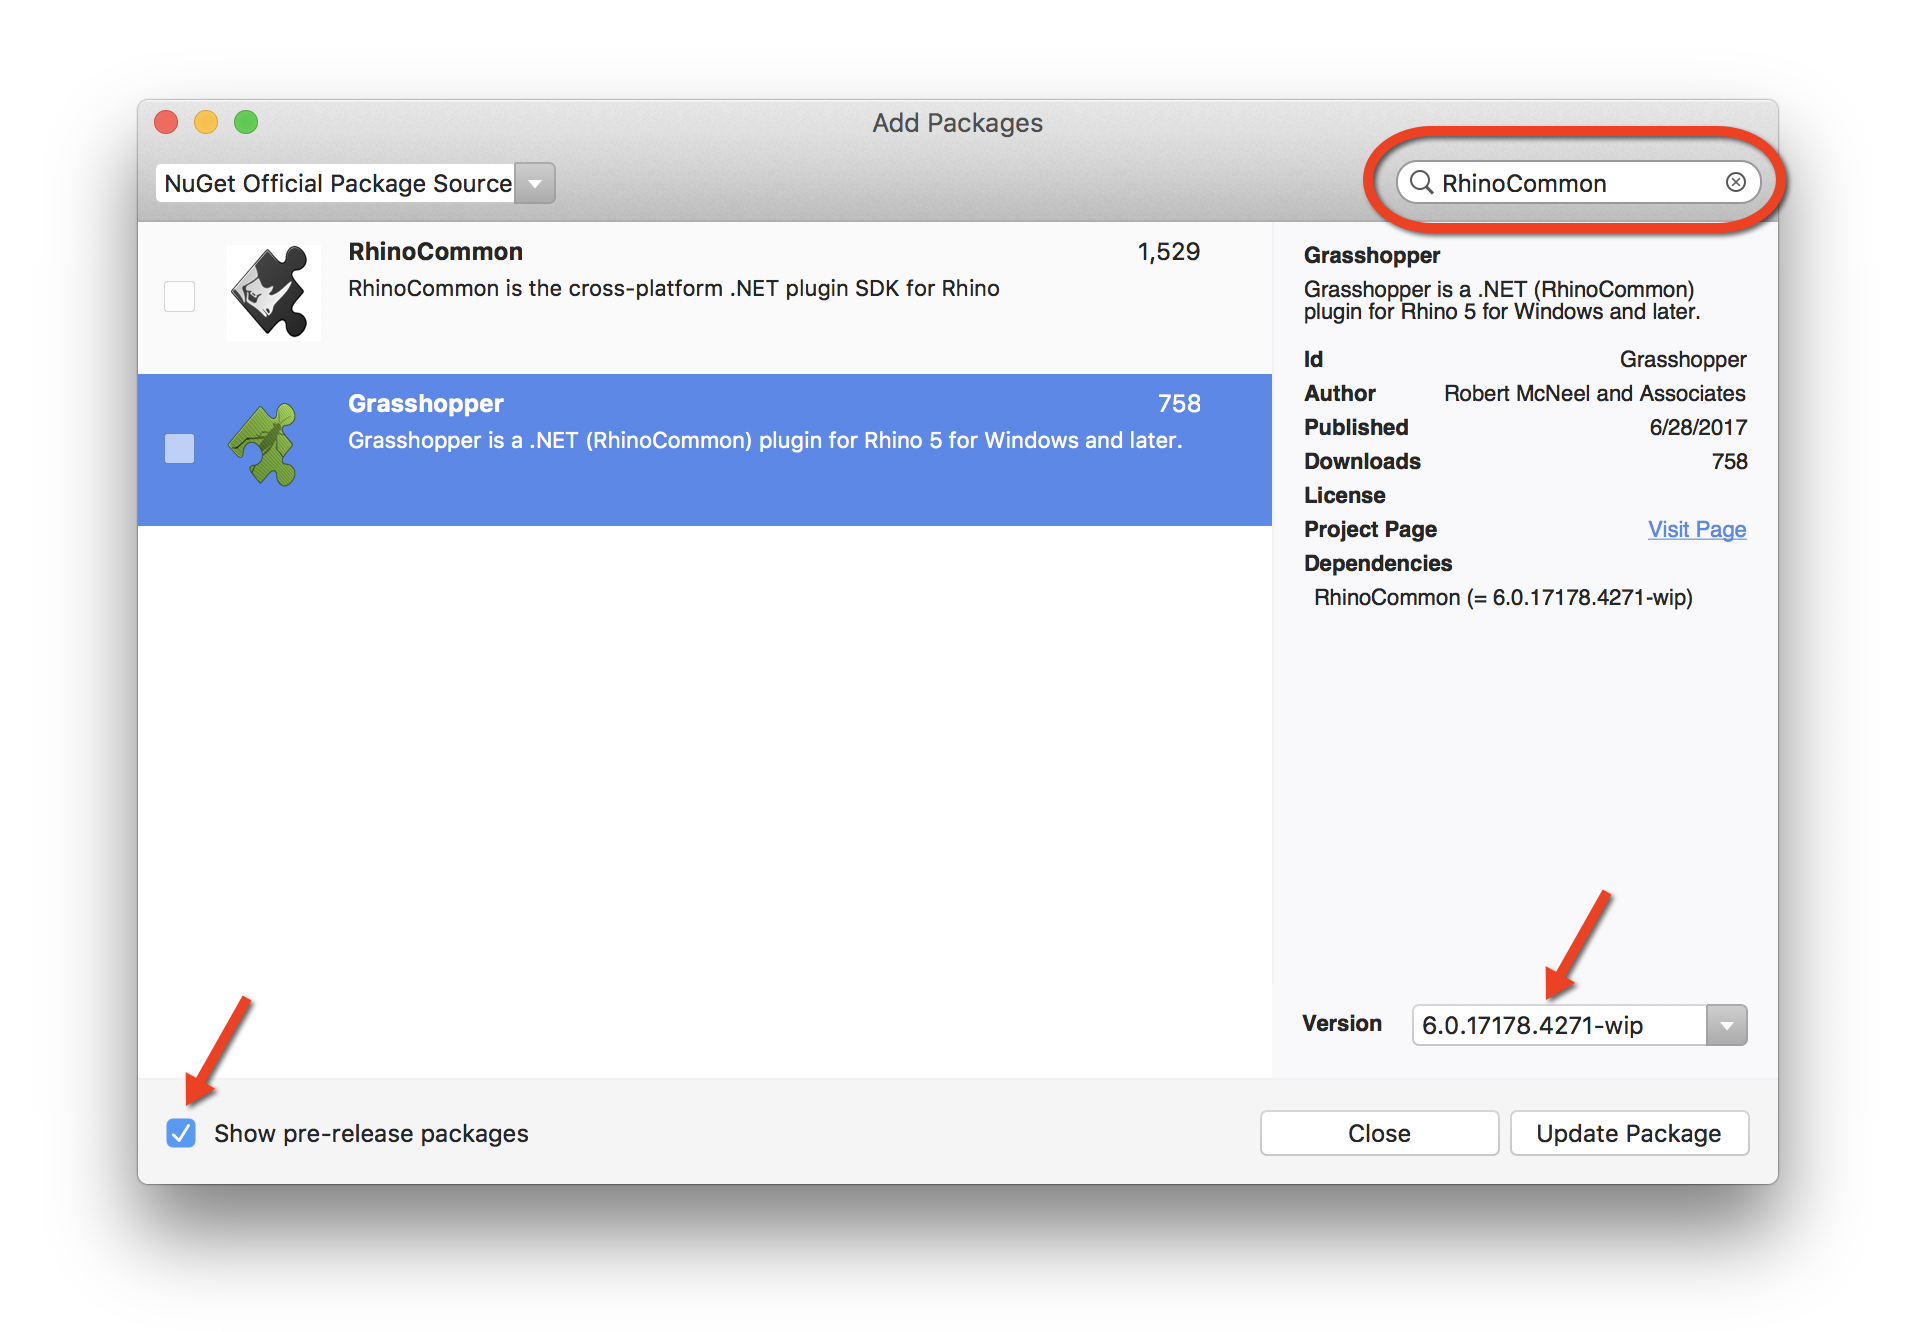
In the NuGet tab which appears, click on Browse. In the search box, type in RhinoCommon. You should see an entry for RhinoCommon and one for Grasshopper. If you are writing a Rhino Plugin or Grasshopper Add-on for Rhino WIP, ensure you check Include prerelease.
If your project is a RhinoCommon Plug-in, select the RhinoCommon package. For Rhino WIP choose the Latest prerelease and click Install. NuGet will install3 RhinoCommon.dll, Rhino.UI and Eto.dll.
If your project is a Grasshopper Add-on, select the Grasshopper package. For Grasshopper Add-ons in Rhino WIP choose the Latest prerelease and click Install. NuGet will install3 Grasshopper.dll and GH_IO.dll as well as the corresponding version of the RhinoCommon assemblies.
-
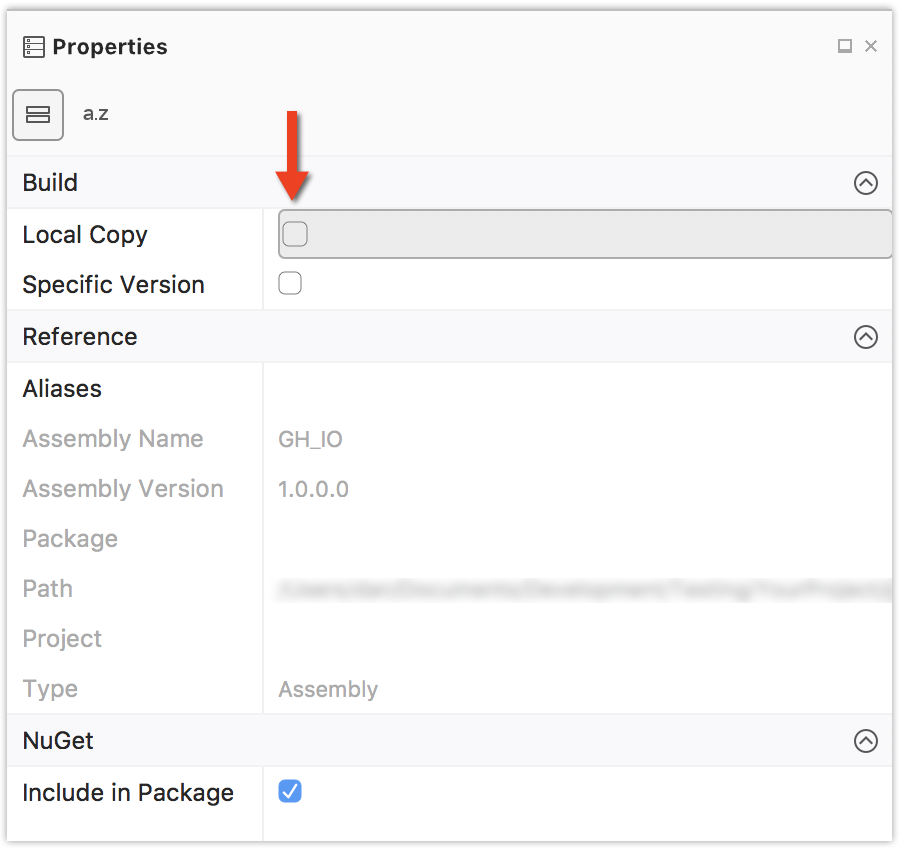
(Optional) The references created by these packages have
CopyLocalset totrue. Normally, it is a best practice to make sure that the references are not copied to the output directory, since they are included with Rhino. You can do this by selecting any of the following references if they exist in your project - RhinoCommon, Eto, Rhino.UI, Grasshopper, GH_IO - and, in the Properties window, setCopyLocaltofalse. The reason this step is optional is that we’ve included some MSBuild witchcraft that will ensure thatCopyLocalis set tofalsewhen compiling your project, regardless of what it says in the Properties window.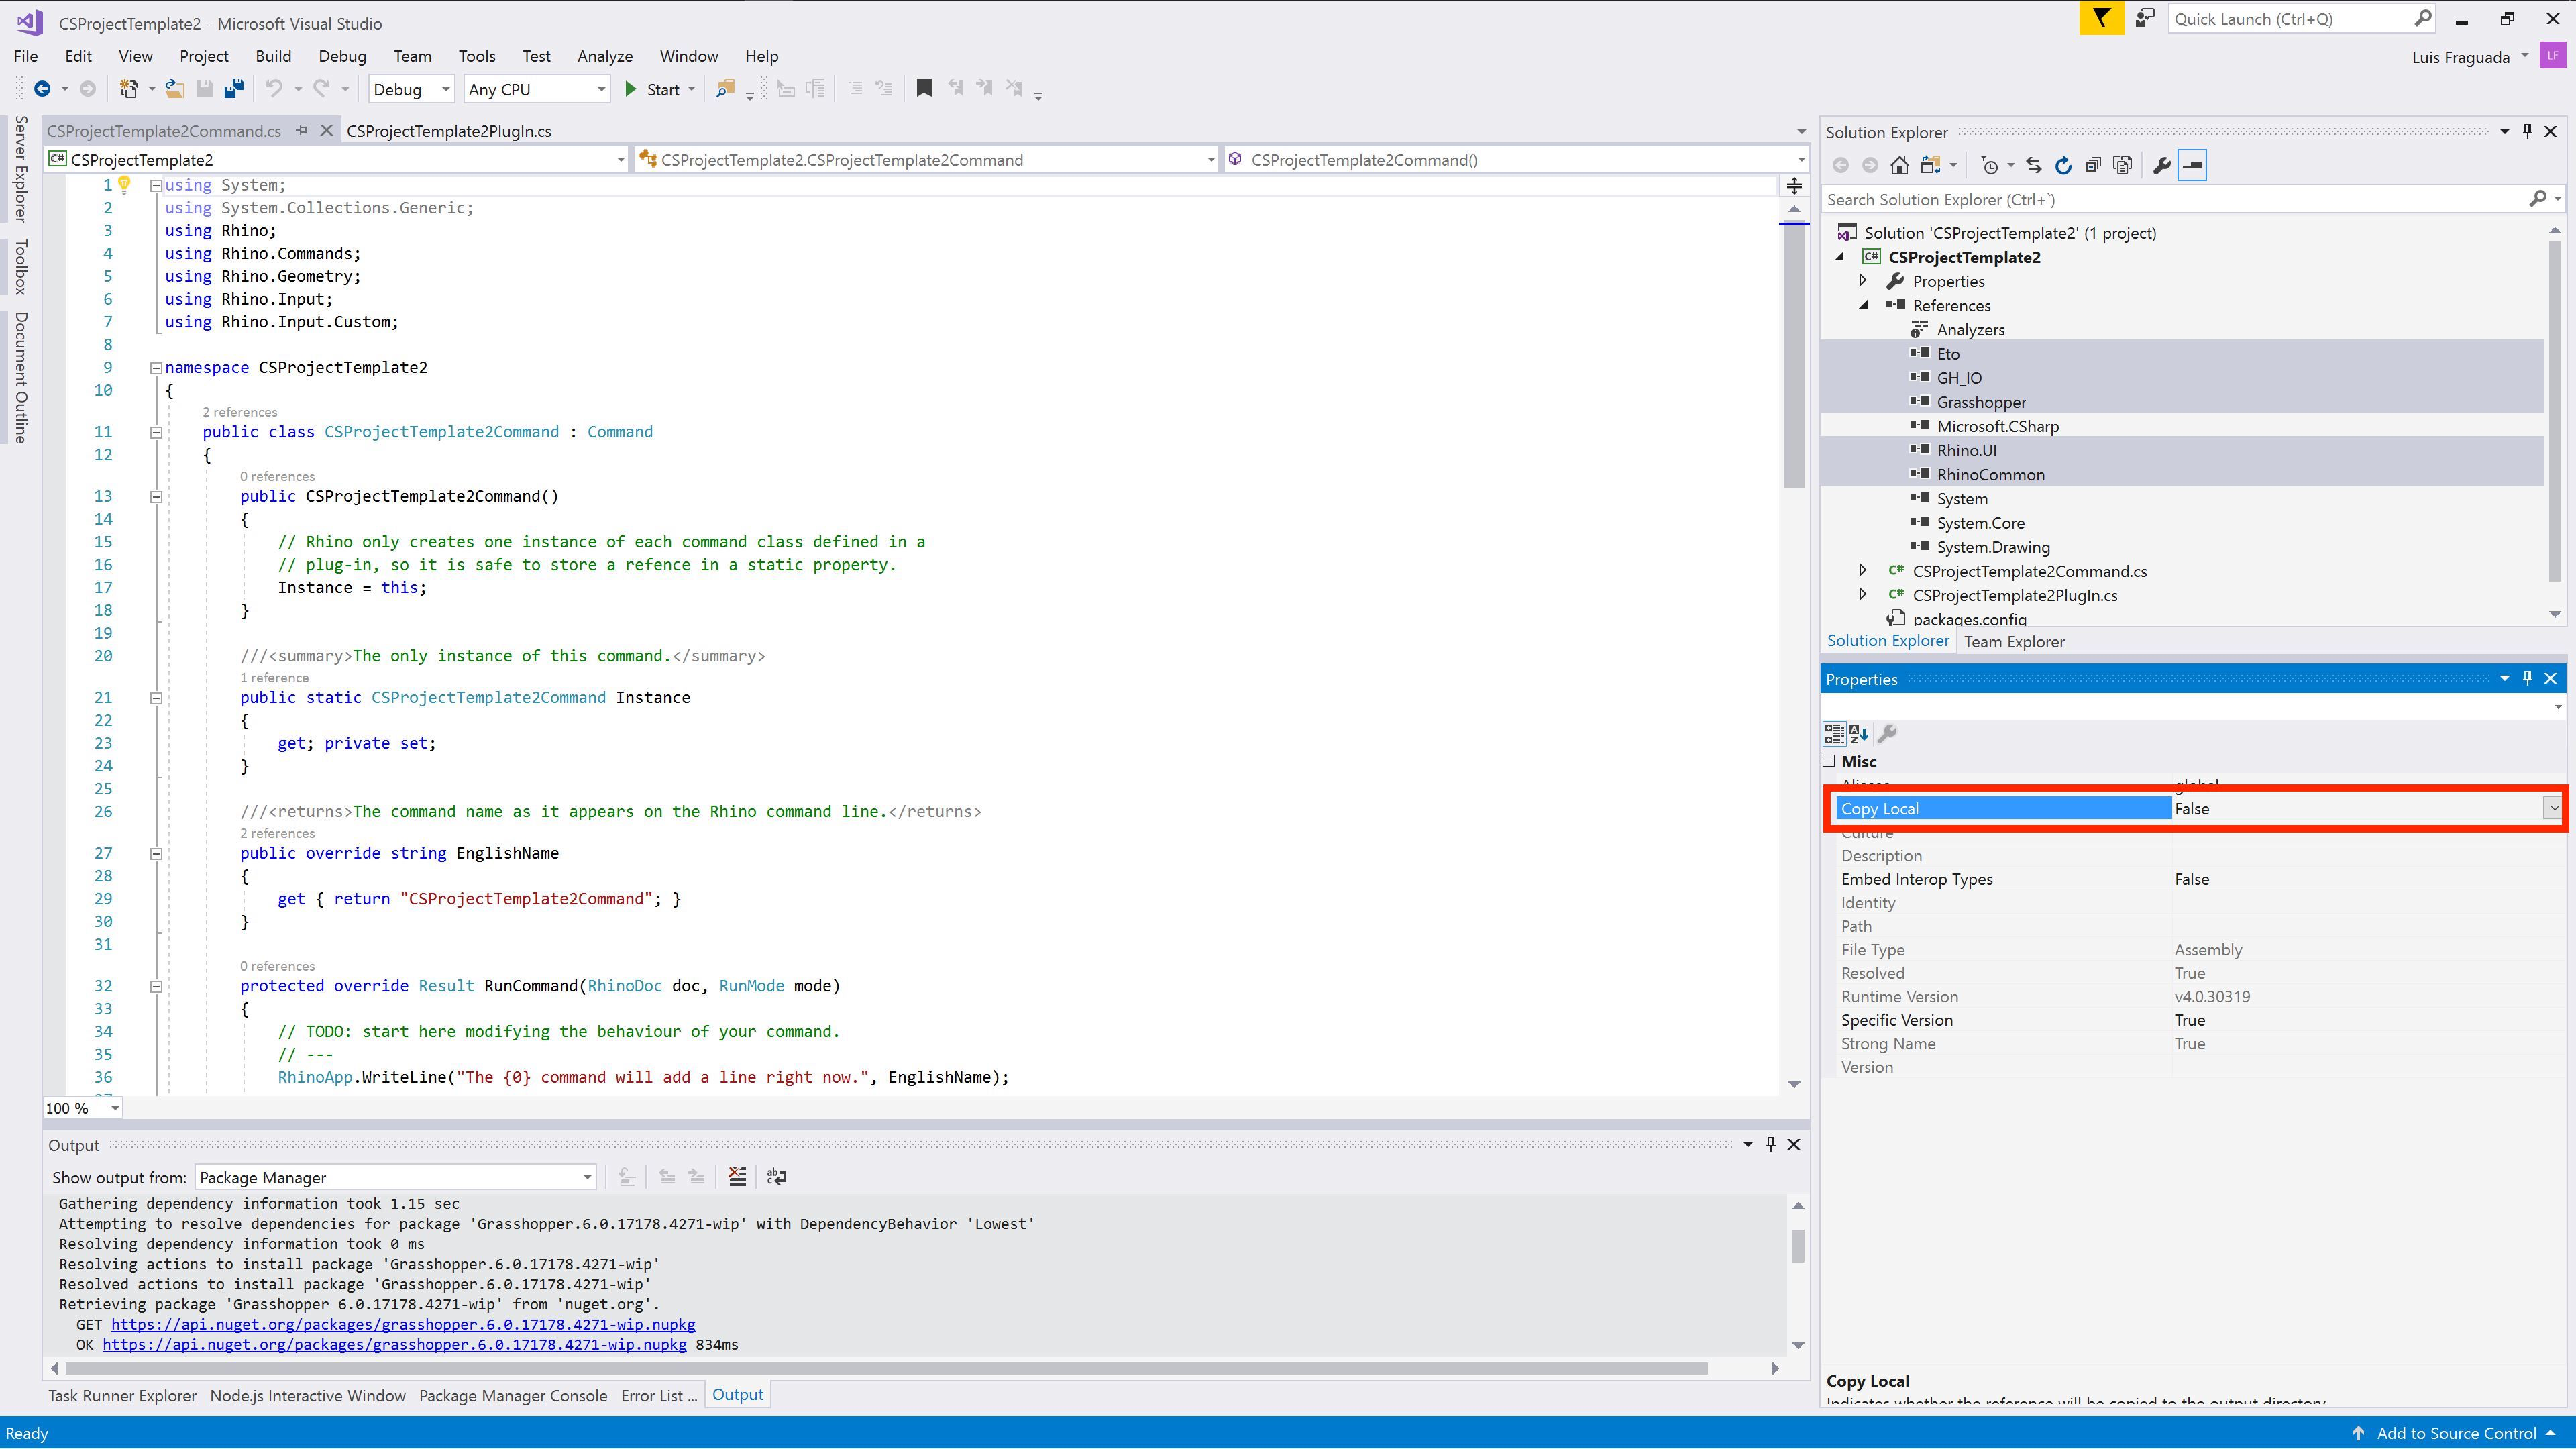
Step-by-Step (Mac)
Further Reading NuGet in Visual Studio Code
-
In Visual Studio Code, open the Command Palette (⌘ ⇧ P) and search nuget, choose Add NuGet Package. Alternatively, the same can be done through the Solution Explorer by right clicking the Project you wish to add the package to, and choosing Add NuGet Package…
Required Plugin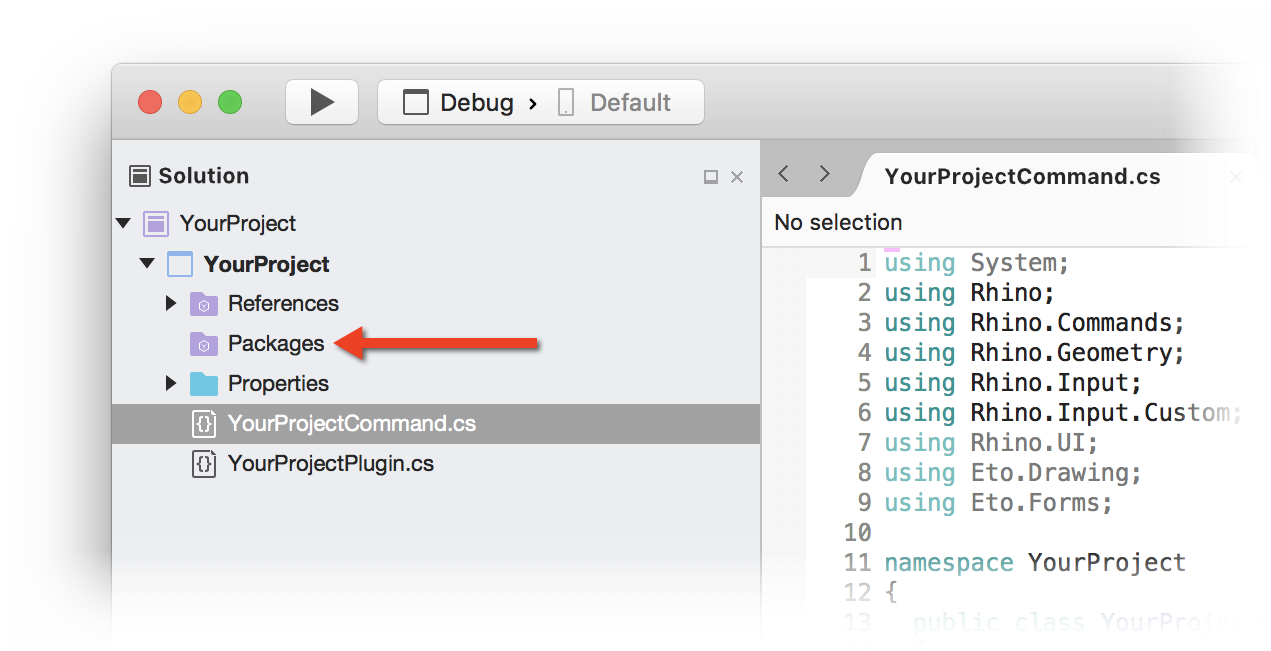
-
The command palette will appear at the top of Visual Studio Code. In the search box, type in RhinoCommon and press enter. You should see an entry for RhinoCommon and one for Grasshopper.
-
Now you can choose the version of the NuGet package you wish to target
If your project is a RhinoCommon Plug-in, select the RhinoCommon package. NuGet will install RhinoCommon.dll, Rhino.UI and Eto.dll once you have selected a version.
If your project is a Grasshopper Add-on, select the Grasshopper package. NuGet will install2 Grasshopper.dll and GH_IO.dll as well as the corresponding version of the RhinoCommon assemblies once you have selected a version.
-
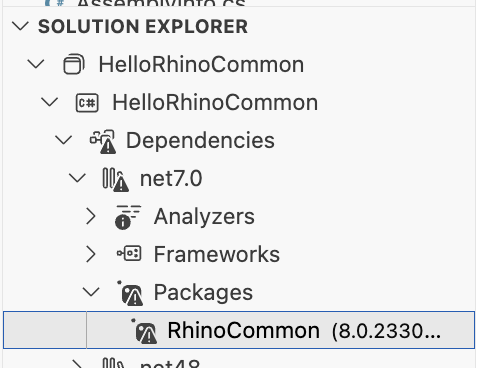
Confirm your NuGet Packages installed correctly Check your Project in the Solution Explorer, you should see a new entry under dependencies > Packages
Related topics
Footnotes
-
Your plug-in will not load if it uses parts of the API which don’t exist in the running version of Rhino. ↩︎
-
This means that if you install the Grasshopper NuGet package, the matching RhinoCommon package will be installed automatically. ↩︎ ↩︎
-
If your project already references one of the above assemblies, don’t worry! NuGet will handle it. ↩︎ ↩︎
