
Overview
Eto is an open source cross-platform user-interface framework available in Rhino 6. Eto can be used in Rhino plug-ins, Grasshopper components, and Python scripts to create dialog boxes and other user-interface features.
Rhino.Python comes with a series of pre-defined user interface dialogs which can be used for the times a simple dialog box is needed. But, if the pre-defined dialogs above do not provide enough functionality, then creating a custom dialog box using Eto may be the right solution.
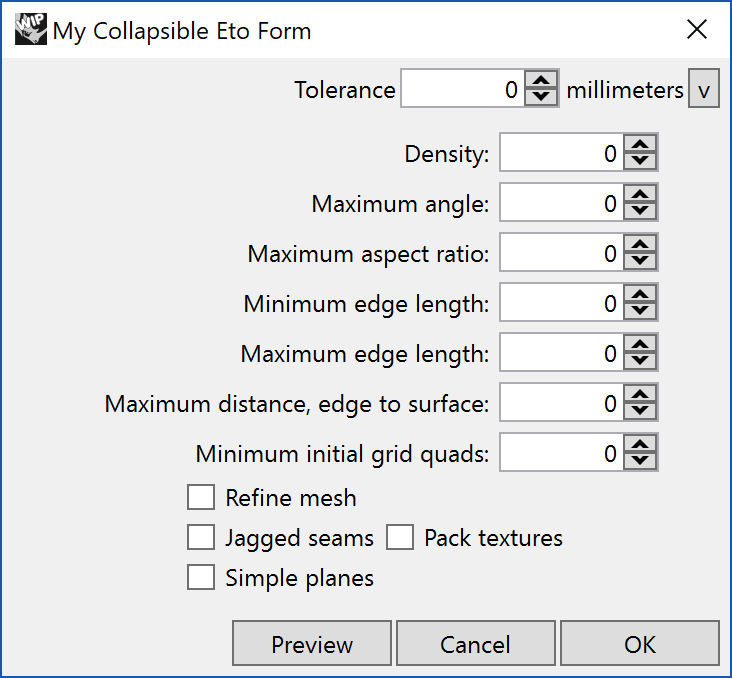
For example, here is a custom, collapsing dialog that uses many controls:
The Eto framework allows creation of the dialog box, the controls, and the actions and events required to make the form functional.
Eto is powerful, full-features user-interface toolkit. Understanding how best to write, organize and use Eto dialogs will take some work.
This guide will cover the basics and best practices of creating Eto dialogs in Rhino.Python. Some of the syntax may seem a little onerous, but in practice the following methods allow Eto code to efficiently be managed in Rhino.Python scripts.
The Eto framework
Conceptually, an Eto dialog can be thought of as a set of layers:

Learning how each code each of these layers is key to learning Eto:
- Custom Dialog Class - Extending the Eto Dialog/Form class is the best way to create a dialog.
- The Dialog Form - The Dialog/Form is the base container.
- The Controls - Controls, such as labels, buttons and edit boxes, can be created and then placed in a layout.
- The Layout - Within each form, a layout is used to position the controls.
- Control delegates - Delegate actions are the methods that are executed when a control is click, edited or changed. Any delegate actions must be bound to specific controls to specify what methods are run at the time of control events.
Thinking about theses dialog parts as layers can help keep the code is organized. As an example of the layered approach of a dialog, here is a simple Eto dialog with few controls.
The rest of this guide will cover the sections of the code in much more detail:
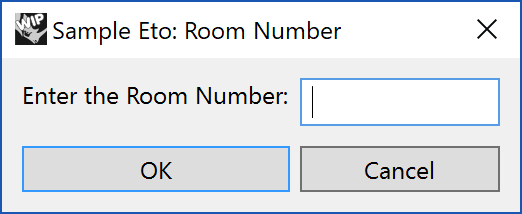
#! python3

# Imports
import Rhino
import scriptcontext
import System
import Rhino.UI
import Eto.Drawing as drawing
import Eto.Forms as forms

# SampleEtoRoomNumber dialog class
class SampleEtoRoomNumberDialog(forms.Dialog[bool]):

    # Dialog box Class initializer
    def __init__(self):
        super().__init__()
        # Initialize dialog box
        self.Title = 'Sample Eto: Room Number'
        self.Padding = drawing.Padding(10)
        self.Resizable = False

        # Create controls for the dialog
        self.m_label = forms.Label()
        self.m_label.Text = 'Enter the Room Number:'
        self.m_textbox = forms.TextBox()
        self.m_textbox.Text = ""

        # Create the default button
        self.DefaultButton = forms.Button()
        self.DefaultButton.Text ='OK'
        self.DefaultButton.Click += self.OnOKButtonClick

        # Create the abort button
        self.AbortButton = forms.Button()
        self.AbortButton.Text ='Cancel'
        self.AbortButton.Click += self.OnCloseButtonClick

        # Create a table layout and add all the controls
        layout = forms.DynamicLayout()
        layout.Spacing = drawing.Size(5, 5)
        layout.AddRow(self.m_label, self.m_textbox)
        layout.AddRow(None) # spacer
        layout.AddRow(self.DefaultButton, self.AbortButton)

        # Set the dialog content
        self.Content = layout

    # Start of the class functions

    # Get the value of the textbox
    def GetText(self):
        return self.m_textbox.Text

    # Close button click handler
    def OnCloseButtonClick(self, sender, e):
        self.m_textbox.Text = ""
        self.Close(False)

    # OK button click handler
    def OnOKButtonClick(self, sender, e):
        if self.m_textbox.Text == "":
            self.Close(False)
        else:
            self.Close(True)

    ## End of Dialog Class ##

# The script that will be using the dialog.
def RequestRoomNumber():
    dialog = SampleEtoRoomNumberDialog();
    rc = dialog.ShowModal(Rhino.UI.RhinoEtoApp.MainWindow)
    if (rc):
        print(dialog.GetText()) #Print the Room Number from the dialog control

##########################################################################
# Check to see if this file is being executed as the "main" python
# script instead of being used as a module by some other python script
# This allows us to use the module which ever way we want.
if __name__ == "__main__":
    RequestRoomNumber()
This script is split into 3 main sections.
- The
importsection to include all the assemblies needed for the script. - The dialog class definition
SampleRoomNumberDialog() - The script itself
RequestRoomNumber()
Imports for Eto
Eto is a large assembly. For readabilities sake, you need only import the most important portions:
import Rhino.UI
import Eto.Drawing as drawing
import Eto.Forms as forms
The Rhino.UI assembly is used to interface between Rhino and Eto. When using dialog.ShowModal method, using a Rhino.UI.RhinoEtoApp.MainWindow class allows the dialog to show as a child of the Rhino application.
Eto is a large namespace. The next two import lines access the most referenced portions of Eto, the Eto.Drawing namespace and Eto.Forms. The Eto.Drawing namespace contains specific classes that help with the graphic properties of objects. The Eto.Forms namespace contains the dialogs, layouts, and controls for a dialog. Using Python’s renaming feature, the namespaces are shortened to drawing and forms.
Along the left column of the Python editor, the methods within this Eto Assembly are listed. For a detailed view of all the methods the Eto can be found in the Eto.Forms API Documentation
Custom Dialog Class
The next section of the code creates a new class definition that extends the Dialog(T) class. Creating classes in Python requires some very specific syntax. While it may seems little more complicated to create a class, the ability to reuse, import and interact with class based dialog in Python scripts is well worth the practice. A class will contain the default information about the default layouts and actions of the class controls. The class will also be used to store all the values of the controls for the while the script is running. contain the values of
A dialog class is started with these lines:
class SampleEtoViewRoomNumber(forms.Dialog[bool]):
In this case the new class will be named SampleEtoRoomNumberDialog and inherits the Eto class Eto.Froms.Dialog[bool]. The bool argument shows that a Boolean value is expected back from the dialog. This Boolean value can be used to tell if the OK or Cancel button was hit when the dialog was exited. If more return values then True/False are need back from a dialog then a Dialog[int] or Dialog[string] might be needed.
Note, this guide will only cover the creation of model dialogs, which require the user to respond before continuing the program. The other dialog types, semi-modal and modeless, are beyond the scope of this guide, but may be useful in future projects.
The Dialog Form
Once the new class is declared, then the init instantiation operation to assign the defaults to the new dialog object when created. Python uses the self variable in class declarations to reference the class members in the init. This of self as a placeholder for the class name once the class is actually created in the script.
class SampleEtoViewRoomNumber(forms.Dialog[bool]):

    def __init__(self):
        super().__init__()
        # Initialize dialog box
        self.Title = 'Sample Eto: Room Number'
        self.Padding = drawing.Padding(10)
        self.Resizable = False
The first section of the init is a few common properties that all dialogs have:
super().__init__()- Intialize the base class.self.Title- Sets the title of the dialog. This is a standard string.self.Padding- Set a blank border area within which any child content will be placed. This requires the creation of a Eto.Drawing.Padding structure.self.Resizable- Whether the dialog box is resizable by dragging with the mouse. This is a True/False Boolean.

There are a few Padding formats that are accepted by Eto.Drawing.Padding. These match the margin and padding formats of standard CSS styling:
Eto.Drawing.Padding(10)- 10 pixel padding around all 4 sides.Eto.Drawing.Padding(10, 20)- A padding of 10 to the left and right and a padding of 20 on top and bottom.Eto.Drawing.Padding(10, 20, 30, 40)- A padding of 10 to the left, 20 to the top, 30 to the right and 40 to the bottom.
By default the dialog will automatically adjust its size to the contents it contains. But an addition line can be added to set an initial size to the dialog using self.ClientSize:
self.ClientSize = drawing.Size(300, 400) #sets the (Width, Height)
The ClientSize property takes a Eto.Drawing.Size structure.
After we create the controls and a layout the contents can be placed within the dialog using the self.Content class, as is done on line 39:
self.Content = layout
A dialog class is will show up on the screen as modal. To close the dialog a button will be pressed. To close a dialog, use the self.Close method. It is common to do little data checking before closing the dialog:
    # Close button click handler
    def OnCloseButtonClick(self, sender, e):
        self.m_textbox.Text = ""
        self.Close(False)
The self.Close method is also returning a False because the Cancel button was pressed to cause this event. The script will continue on based on the return value of the dialog.
Also, because we are using a new class object to create the dialog, even after the dialog is closed the dialog will still be in memory. This means the methods and values within the dialog will continue to be available within the scope of the script as the script may need to reference those values.
After creating the dialog framework, we will start to create some controls for the dialog.
The Controls
The business end of a dialog is the user-interface controls it displays. Controls may include Labels, Buttons, Edit boxes and Sliders. In Eto, there are more then 35 different controls that can be created. For details information on these controls, go to the Eto Controls in Python guide.
Controls normally need to be setup properly in a layout before they are added to a dialog.
Label Control
The simplest control is the Label control. It is simply a piece of text that normally is used to create a prompt, or label for another control.

    self.m_label = forms.Label()
    self.m_label.Text = 'Enter the Room Number:'
As with many controls, the line above create a name for the control m_label. Then the main property of a Label is the text it shows by setting the Text Property of the label.
Normally this is as complex as a label needs to be, but a label also has many more properties in addition to Text. Additonal properties include VerticalAlignment, Horizontal Alignment, TextAlignment, Wrap, TextColor, and Font. Properties can be added to the Text Property by using a comma(,):
    self.m_label = forms.Label()
    self.m_label.Text = 'Enter the Room Number:'
    self.m_label.VerticalAlignment = `VerticalAlignment.Center`
For a complete list of properties and events of the Label class, see the Eto Label Class documentation.
TextBox Control
A TextBox is used to enter a string into the dialog.

To check the contents of the textbox in the script, the textbox control must have a name to reference it.
self.m_textbox = forms.TextBox()
In this case the name m_textbox can be used to reference the control later in the class method starting on line 44:
    # Get the value of the textbox
    def GetText(self):
        return self.m_textbox.Text
Just creating a new Eto.Forms.TextBox() is common. There are a number of additional properties of a TextBox which can be used to control the input. These properties include MaxLength, PlaceholderText, InsertMode and many more that can be seen in the Eto TextBox Class.
Button Controls
Buttons are placed on almost every dialog. Buttons are created, then bound through their .Click event to run a method when the button is clicked.

Buttons can be assigned to any name. Along with the name, the Text property can be set to display on the button:
        # Create the default button
        self.DefaultButton = forms.Button()
        self.DefaultButton.Text ='OK'
        self.DefaultButton.Click += self.OnOKButtonClick
Once created, the button then can be bound to an event method (OnOKButtonClick) through .Click class using the += syntax as follows:
        # Create the default button
        self.DefaultButton = forms.Button()
        self.DefaultButton.Text ='OK'
        self.DefaultButton.Click += self.OnOKButtonClick
The bound method is run if the button is clicked on. The bound method is declared in the methods section later in the class:
    # Close button click handler
    def OnOKButtonClick(self, sender, e):
        if self.m_textbox.Text == "":
            self.Close(False)
        else:
            self.Close(True)
In this case the button is clicked and the bound method OnOKButtonClick checks the Text of the m_textbox to to determine if anything has been entered. Then the method closes the dialog, returning either True or False.
The Eto.Dialog class has two special reserved names, the DefaultButton and the AbortButton. The DefaultButton name will create a button that is a standard button and also will receive a click event if the Enter Key is used. The AbortButton is a button that recieves a .Click event if the ESC key is used. These buttons are simple assigned through the name of the control, using self syntax.
This guide review the most basic controls. To understand how to create and control more controls with Python see the Eto Controls in Python guide (TODO).
Once all the controls for the dialog are created then they can be placed in a layout to be positioned on a dialog.
The Layout
Layouts are used to size and place controls in a logical way in a dialog. They can generally be thought of as grid controls that adjusts based on their contents. The sample code a new Layout is created on line 30 in this section of the code:
        # Create a table layout and add all the controls
        layout = forms.DynamicLayout()
        layout.Spacing = drawing.Size(5, 5)
        layout.AddRow(self.m_label, self.m_textbox)
        layout.AddRow(None) # spacer
        layout.AddRow(self.DefaultButton, self.AbortButton)


        # Set the dialog content
        self.Content = layout
The code for the layout comes further down in the class definition, because it seems to make sense to create the controls first before placing them in a layout.
In this a case a new dynamic layout object is created at:
layout = forms.DynamicLayout()
The DynamicLayout is one of 5 layout types supported by Eto. The Dynamic layout is a virtual grid that can organized controls both vertically and horizontally. For a detailed look at layouts, go to the Eto Layouts in Python guide.
The spacing between controls in the layout is set by layout.Spacing on the line:
layout.Spacing = drawing.Size(5, 5)
The Eto.Drawing.Size(5, 5) sets the horizontal spacing and vertical spacing of the controls to 5 pixels between the controls.
Placing Rows in Layouts
Once the layout type has been setup then controls can be placed. Control are placed into Rows in the layout.

        layout.AddRow(self.m_label, self.m_textbox)
        layout.AddRow(self.DefaultButton, self.AbortButton)
Each row can be added to the newly created Eto.Forms.Layout object using the .AddRow method. Each control that is added in each row is given a cell on the row added. So if two controls are added, the row will contain two cells that control the placement of the control. The controls will stretch to fill up the cells.
The Eto.Forms.DynamicLayout can positioned controls vertically and horizontally. Each vertical set of controls can be aligned with controls in previous horizontal sections, giving a very easy way to build forms. For more information see the Eto DynamicLayout documenation
Using None in a Layout
Sometimes blank spacers are needed within a layout to help controls align properly or help to align the number of cells from above. Or a blank form may be needed to allow the height of the layout to fill up the vertical space of the dialog. In Eto, using the None value will allow for spacers in dialogs.
In the sample above a blank row is added between the controls:
layout.AddRow(None) # spacer
If the dialog box gets vertically taller, then the None row will expand to fill up the needed space.
None can also be used in a Row as a horizontal spacer. For instance the buttons could be dynamically justified to the right of the row by adding a None spacer at the start of the row:
layout.AddRow(None, self.DefaultButton, self.AbortButton)
The None cell will expand and contract to justify the buttons to the right.
There are many options when using Layout, Rows and Cells with Eto to place controls. For more information on the details of using Layouts see the Eto Layout advanced Options with Python (TODO)
Control Delegates and Events
The last section of the Dialog class, in the example, is a series of class methods:
- Methods used to access the class members
- Method actions for binding to control events.
A common practice is to create a function that returns the value of a control you might want to get or set:
    # Get the value of the textbox
    def GetText(self):
        return self.m_textbox.Text
There is an unusual syntax here in the method declaration with the inclusion of (self) as an argument of the function. This is done in functions that are a member of a class. As we learned before the self variable is like a placeholder for the class name that this method is a member.
To use this method in a script the following syntax is used:
    dialog = SampleEtoRoomNumberDialog();
    rc = dialog.ShowModal(RhinoEtoApp.MainWindow)
    if (rc):
        print dialog.GetText() #Print the Room Number from the dialog control
In this case, a new dialog is created with the name dialog. The dialog is shown and the return value is assigned to the rc variable. Then, based on the result of rc the GetText method is used to get the value of the Textbox in the dialog using the dialog.GetText() method, even though the dialog has already been closed.
Class methods also need to be created to handle events that may happen with controls in the dialog. Here is a function that will be used for the OK button:
   # OK button click handler
   def OnOKButtonClick(self, sender, e):
       if self.m_textbox.Text == "":
           self.Close(False)
       else:
           self.Close(True)
Again here is an unusual syntax for the method declaration: (self, sender, e). This is the standard argument declaration for any function that will be bound to a control action. This OnOKButtonClick() method will be bound to the OK button click with this code:
self.DefaultButton.Click += self.OnOKButtonClick
So now on every click the method will be called.
There are many more events that methods may be bound to on controls such as TextChanged, CheckedChanged, AddValue, etc.. Review the Eto APi documentation for specific events supported by each control.
Using Eto Dialogs in Scripts
Once the class definition is set, the dialog is ready to be used in a script:
# The script that will be using the dialog.
def RequestRoomNumber():
    dialog = SampleEtoRoomNumberDialog();
    rc = dialog.ShowModal(Rhino.UI.RhinoEtoApp.MainWindow)
    if (rc):
        print dialog.GetText() #Print the Room Number from the dialog control
First a new class instance of the dialog is created:
dialog = SampleEtoRoomNumberDialog();
Once create then the dialog needs to shown as a child of the Rhino application:
rc = dialog.ShowModal(Rhino.UI.RhinoEtoApp.MainWindow)
Because the dialog is modal, the script will continue to the next lines only after the dialog is closed. When dialog.Close is called the dialog will also return a value that is assigned to rc .
The script continues along, checking the return rc value and also referencing the dialog.GetText() value. Remember, if if the dialog is closed the values of the dialog controls are still available.
Sample Dialogs
Now with some understanding of Eto Dialogs in Python, take a look at some of the Sample dialogs in the Python Developer Samples Repo:
